
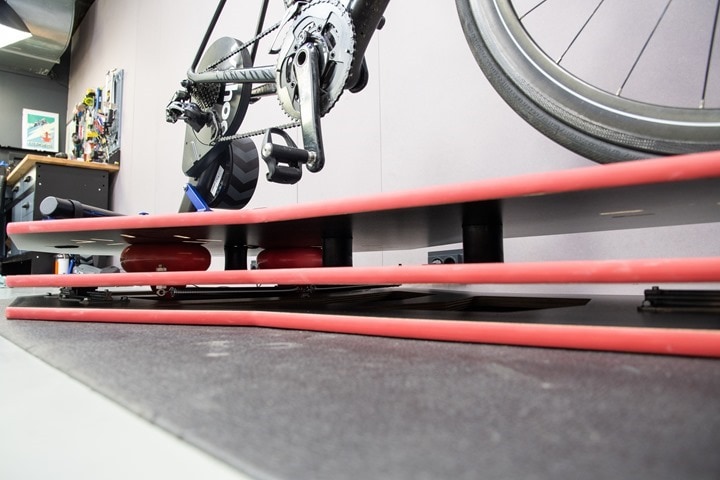
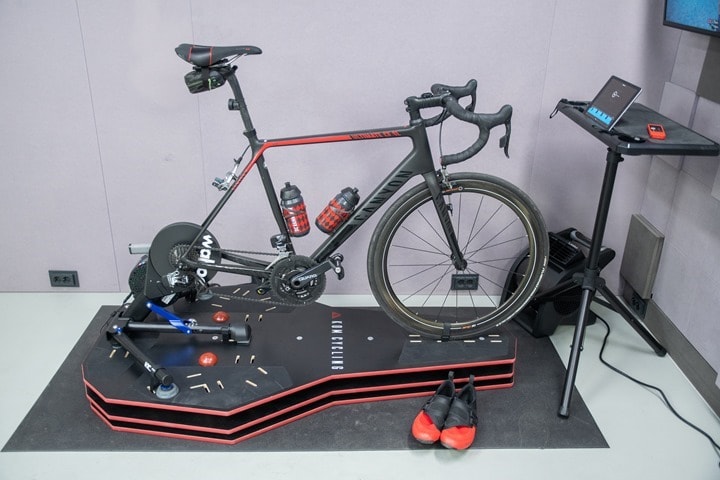
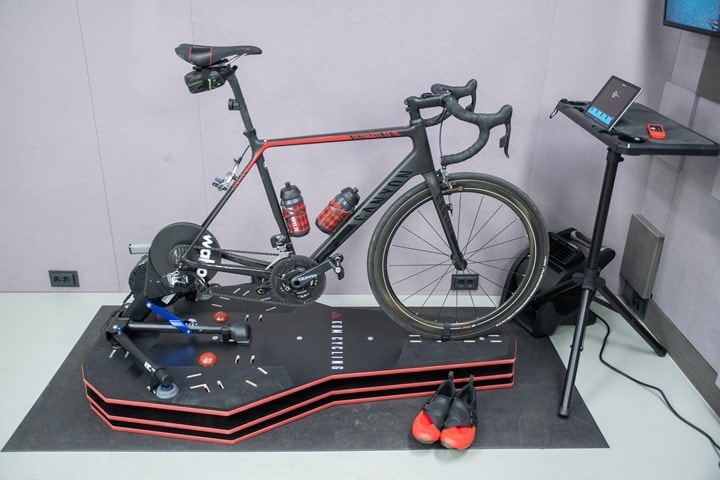
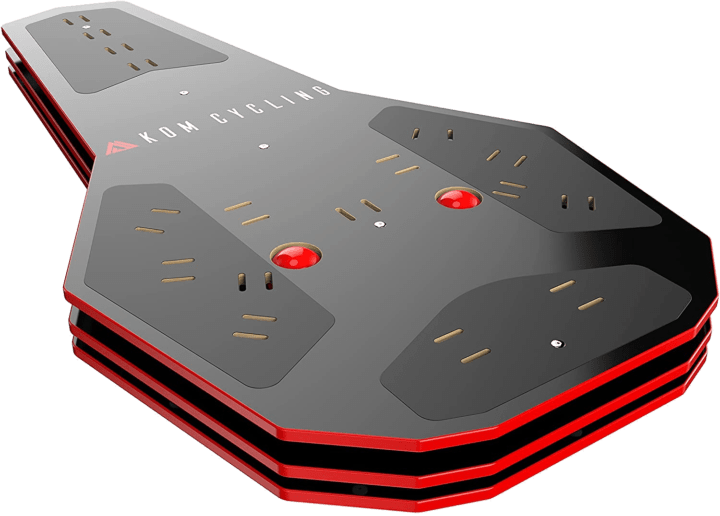
Double-cheeseburger. That’s what the new KOM Cycling RPV2 rocker plate is, or at least, looks like. This double-decker rocker plate essentially takes their existing popular RPV1 rocker plate (which tilts side to side), and adds a new forward/back sliding sensation – in the same vein that Saris’s MP1 plate does.
The concept behind rocker plates is to give you indoor training sessions more movement, which in turn roughly translates to more comfort. Out on the road you’re constantly shifting slightly on the saddle as the bike moves – but indoors you’re riding a brick that rarely moves meaningfully. Thus, you’ll mostly notice the difference on longer rides. But still, on shorter rides you’ll simply notice that you’re not a brick. However, an astute cycling tail watcher will also notice that you ‘invert’ the way you sprint indoors on a rocker plate. And yup, I’ll cover that too.
The transition from single to double-cheeseburger has doubled the price though, from $449 for the RPV1 to $799. So, not exactly double, but getting there. Still, that’s some $400 less than the equally woody Saris MP1. So…how do they compare? Let’s dig in.
Note that KOM Cycling sent me a media loaner of the RPV2 to test out. After this review they’ll have to figure out how to get it back to them. That’s just the way I roll. If you found this review useful, consider becoming a DCR Supporter, which helps the site here and basically just makes you awesome.
Unboxing & Setup:
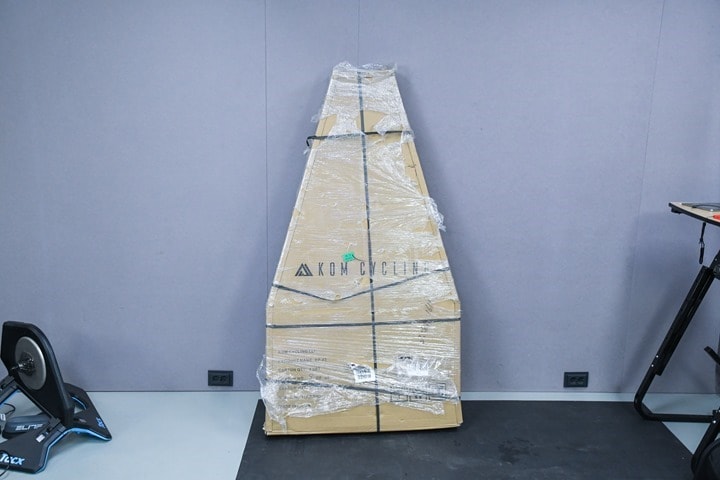
The KOM Cycling Double-Cheeseburger arrives in one large piece, looking like the top of a paper airplane. Albeit, a heavy one at 66 pounds/30kg.
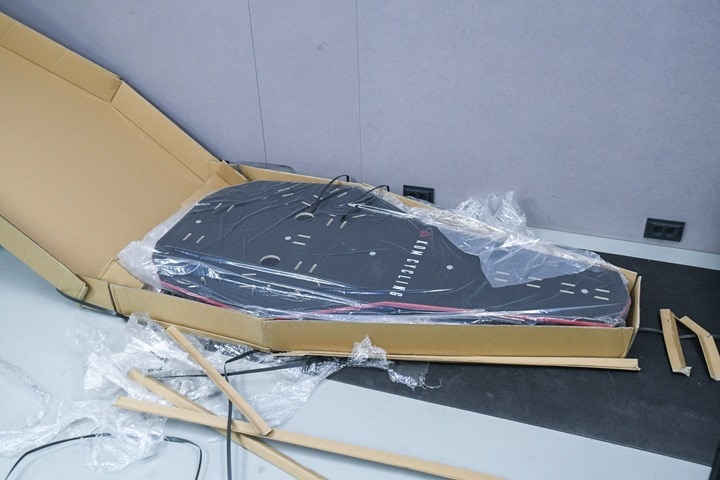
To make your life easier later, position the box label-side up, and then remove the top of the box. Assuming everyone did their jobs correctly, you’ll have the top plate of the rocker plate looking back at you.
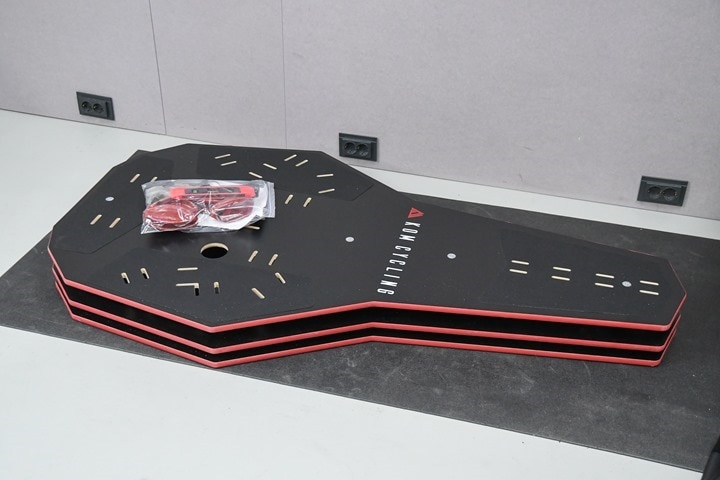
You can now pretty easily slide (or rip) the plastic bag off, and then slide the cardboard out from under it. When all is said and done, you should find yourself one rocker plate double-stack, and one oversized Ziploc bag with balls inside.
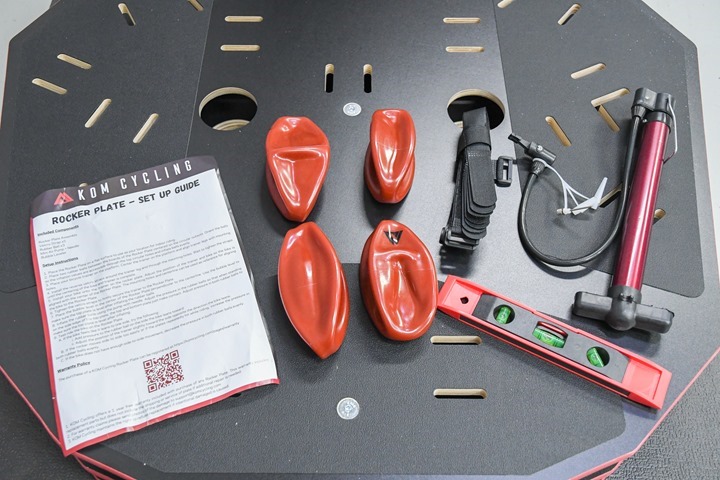
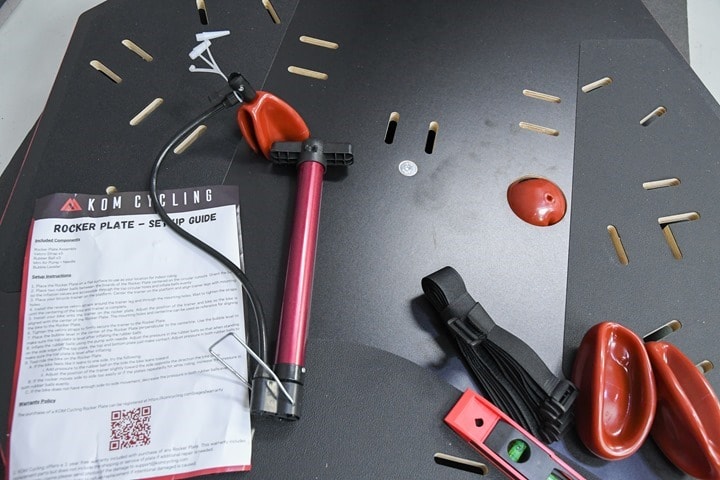
Inside that bag we have four deflated balls. We’ll only use two of them, the other two are in case…well…I guess in case you screw up somehow and blow up your balls. You’ll also find a pile of 7 straps, a level, and a cheap inflation pump. Frankly, the red level might be the best party freebie of this entire kit.
Setup is silly easy. If you can pump up a soccer ball (or, football), then you can set up RPV2. I mean, at least assuming you don’t go all Tom Brady on it.
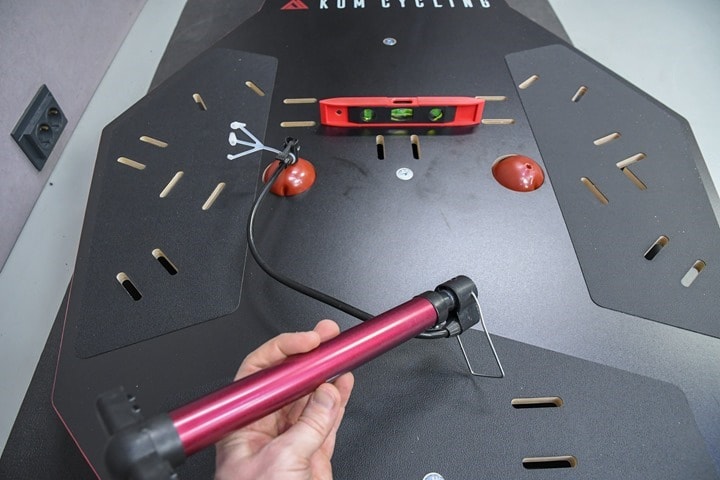
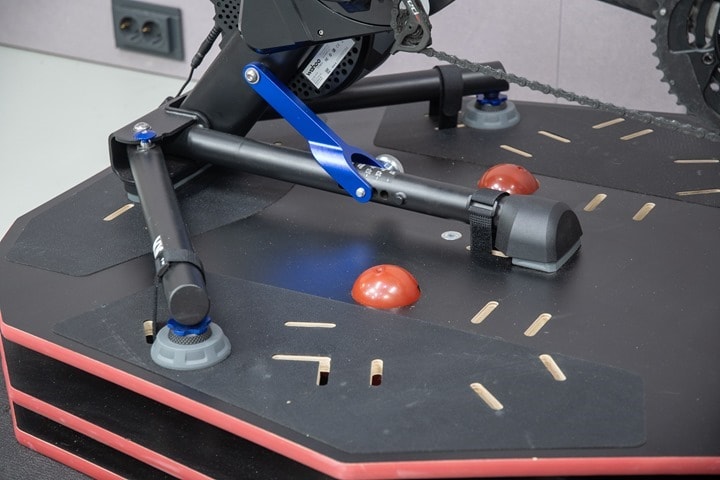
Essentially, you’re gonna use the pump to inflate two balls, inserting them into the two round ball-shaped holes. These will act as the resistance for left/right tilt. You’ll be astounded just how big these balls will get, despite being made of super-thick rubber (or silicone or something). You can see below I’ve inserted one ball into the left and right sides, and have put a bit of air in the right side. I’m just starting to pump up the left side.
When you do this, it’ll behoove you to ensure the inflation holes of the ball are centered. First, it’ll look pretty later, but second, it’ll mean that as they inflate, the ball hole won’t go somewhere harder to reach later for inflation or deflation.
You’ll want to also ensure that your balls stay centered below deck as you blow them up. Thus, you’ll reach around and adjust your balls to provide for consistency between them, ultimately ensuring the situation is level.
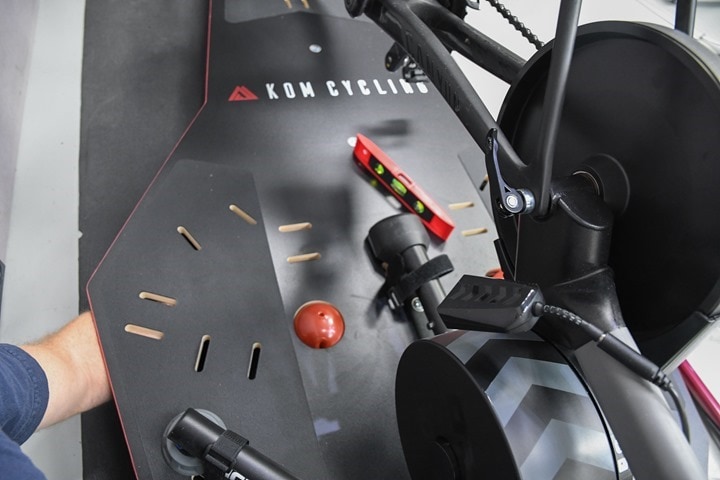
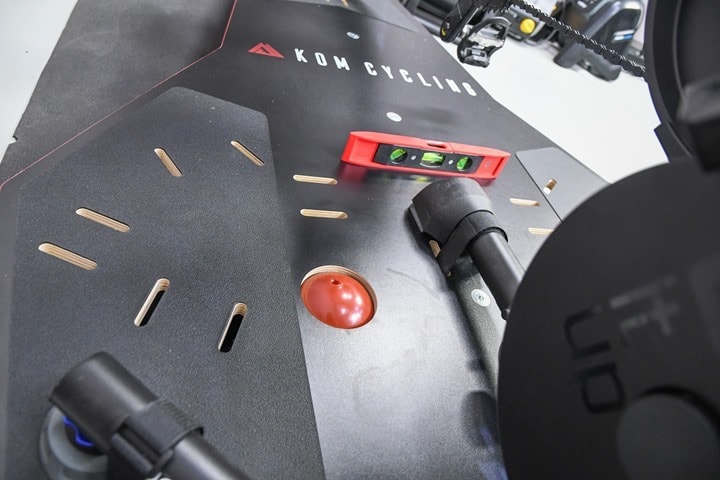
In my case I used the level most of the time throughout this process, and eventually you’ll add the trainer too. The goal here is that when you stand on either edge of the platform, you’ve got enough air that the two platforms ‘just touch’. If you have too little air, then you could hit the boards together when you tilt. That wouldn’t likely damage anything, it just wouldn’t feel terribly awesome. Inversely, if you have too much air, then it’ll feel too stiff.
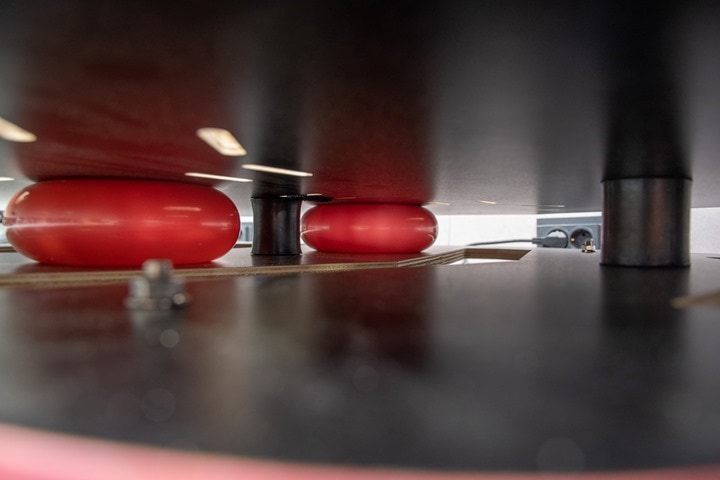
What’s arguably the most impressive part here is just how darn big these balls get below deck. Check this out:
They’re massively larger than the above-deck ball size.
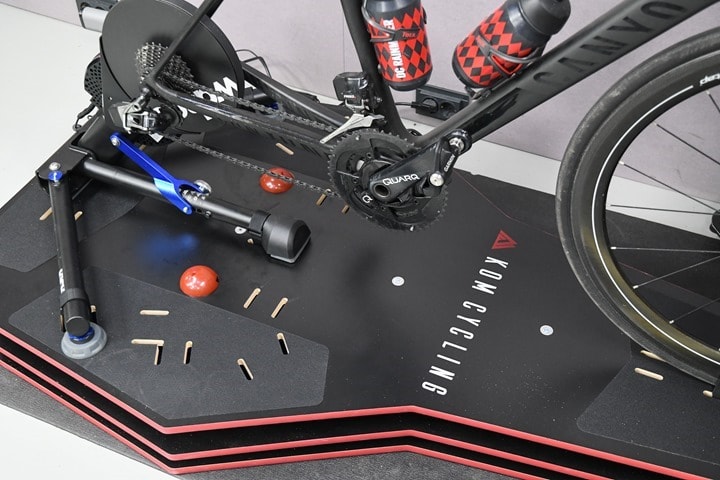
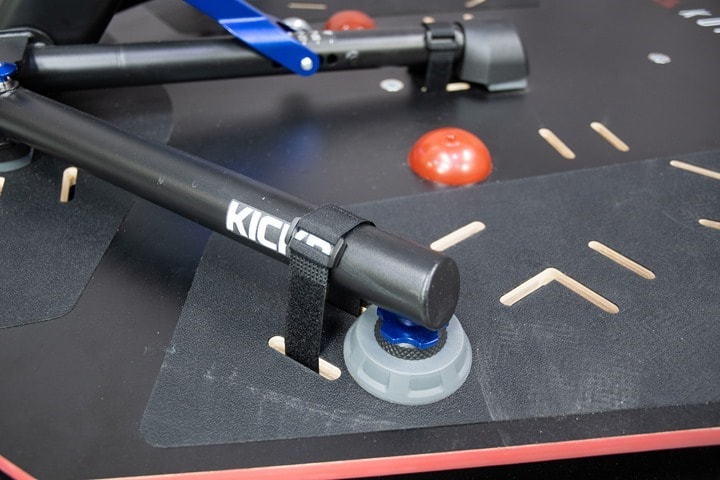
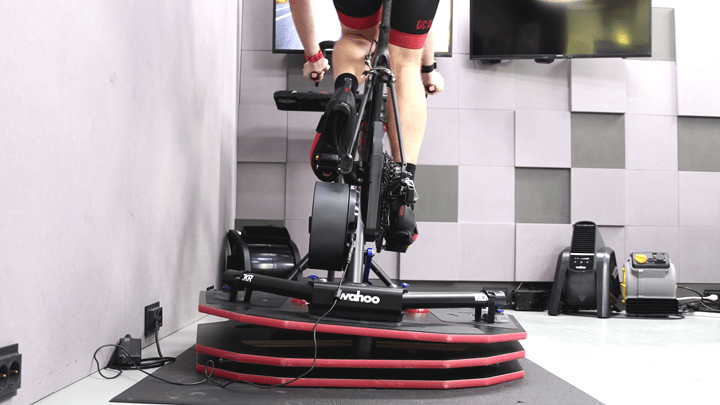
And with that, it’s time to throw your trainer on there. Doing so is quick and easy. You can use the straps to get your trainer nice and centered. There’s seven straps, and I used three on my KICKR. And then one more for my front wheel. You’ll see grooves throughout the platform, allowing you to connect up just about any trainer or smart bike you can think of.
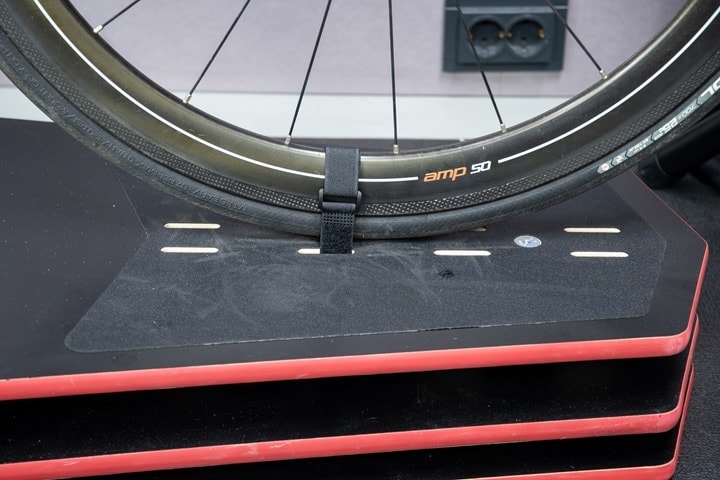
And then up front you’ll use a strap for your wheel. Pro Tip: Don’t put the buckle on the center point of the wheel, instead situate it off to one side. First, it’s not good for the carbon/material, but second, it’ll create scratches or noises if it moves across the edge.
In my case, I used the platform almost entirely with a Wahoo KICKR. But it’s compatible with basically everything out there. They officially claim compatibility with the entire Wahoo KICKR lineup (including CORE & SNAP), the Tacx NEO/Flux/Flow series, the Saris M2 series, and “most other trainers”.
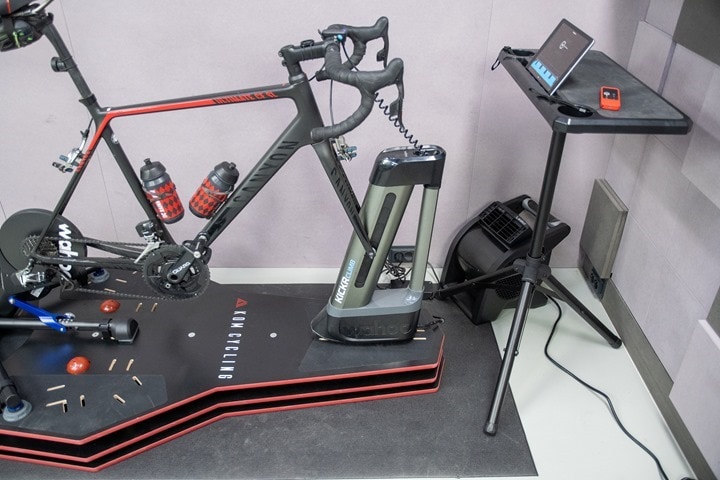
Realistically speaking, basically everything is compatible with it. People have tossed on KICKR bikes too. Though, that’s a bit iffy, but hey, it works. It also works with the KICKR CLIMB, I did that too for one ride. In that case you can either free-style it on the front without a strap (your weight is more than enough), or, you can use two straps together. The only downside to straps (I didn’t use straps) is that it can slightly restrict the tilting base of the KICKR CLIMB, so don’t pull it too tight.
Finally, two random spec things. First is that the bottom of the plate actually has small rubber feet on it, to keep it from scratching your floor. In my case, I placed it on a trainer mat anyway. And lastly, the max allowable on-deck weight is 425lbs/193kg. So that’s even enough to accommodate a KICKR Bike + most riders.
How it Works and Usage:
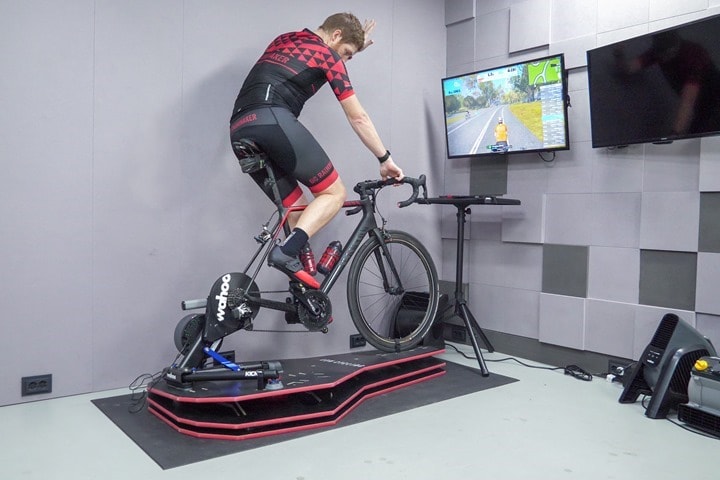
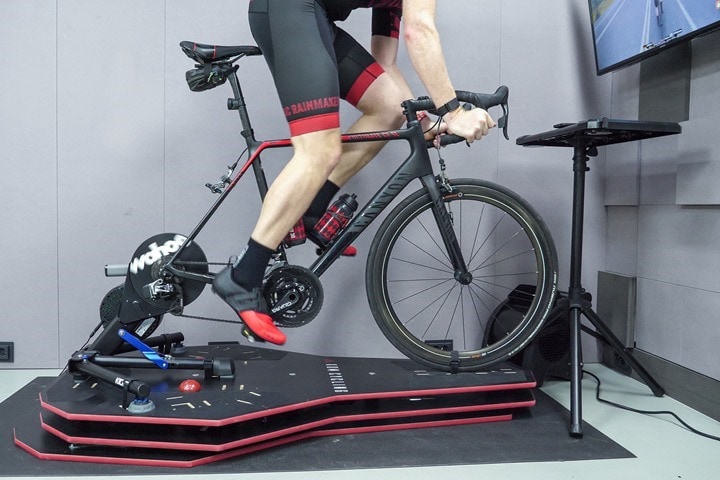
With everything all set it’s time to get atop the platform and your bike. The first time you do this you’ll probably assume you’ll tip over and die. And while that’s always a possibility, it’s mostly an unlikely one. To demonstrate this, here’s me on the platform, leaning quite far to the wall side (without touching the wall, you see my hands being held up).
Now mind you, if I were to lunge harder, I could probably take the whole thing airborne, but that’d be stupid. And I only do stupid things on Friday. Today is a Tuesday, thus, free of stupidity. But before we get to all the tilts and slides, lets step back and briefly talk about the non-slip surface on the edges. You’ll see this in all the places that both the trainer/wheel is likely to sit, as well as where you’re likely to step. Though, some smaller riders might find the gap nearer the crankset (where it says “CYCLING”) lacking in grippy stuff. In my case, it wasn’t where my feet tended to land though.
Somewhat surprisingly, while the Saris MP1 anti-slip grippy stuff is more grippy, I actually like the KOM cycling material better for cleaning purposes. The Saris stuff is hell to clean if you actually get something on it (like gel or squished Haribo). Whereas the KOM material is easier to clean while still being grippy enough.
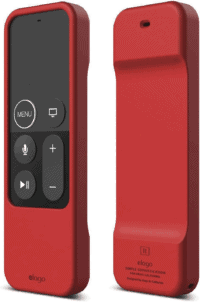
Now aesthetically speaking, I love the KOM Cycling red/black look – because it matches my bike…and my shoes…and my kit….and my water bottles. Also, my Apple TV remote case. But looks are individual, and some people may prefer the more woody look of the Saris MP1. To each their own.
However, I haven’t seen any issues with the wood surface and sweat, despite letting sweat just pool up there post-ride and leaving it there. Perhaps long term, but I also haven’t heard of issues there on other plates that have a protective coating applied as this does. So, boring stuff done, let’s talk movement.
The RPV2 moves in two main directions: Side to side tilting, and front/back sliding. It’s the front/back sliding that’s unique on the RPV2 compared to the RPV1 (which only does tilting).
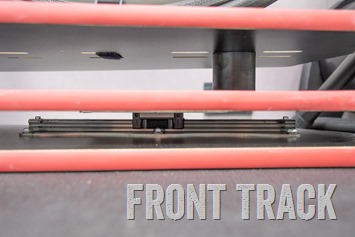
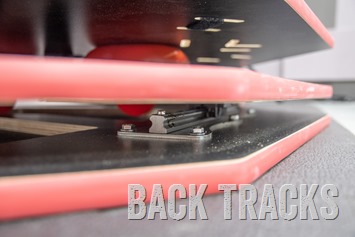
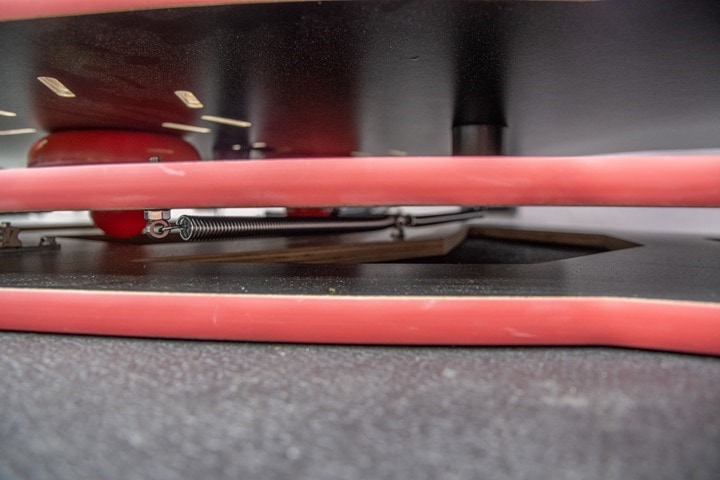
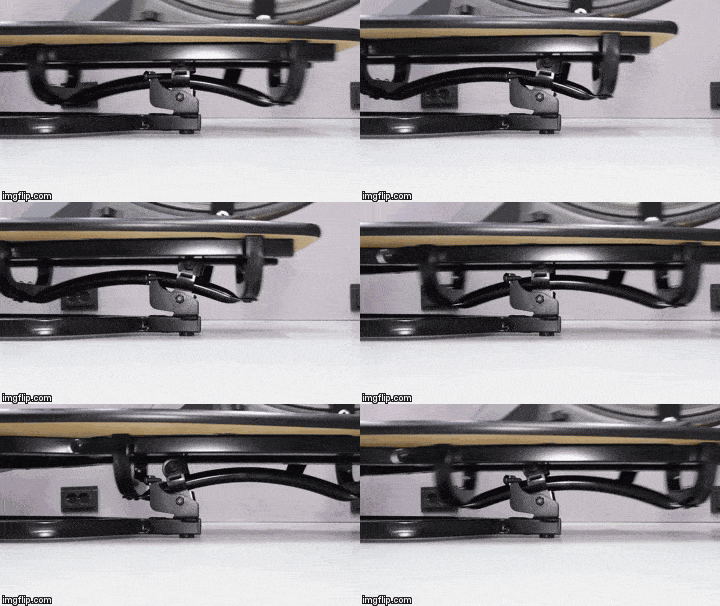
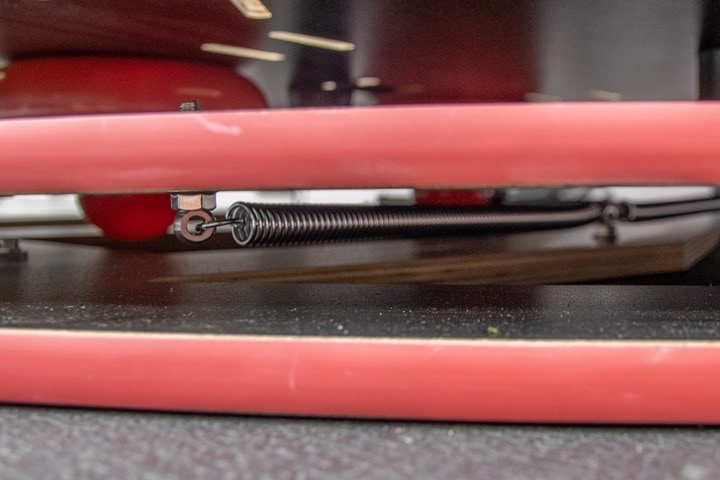
In the case of front/back movement, the platform is essentially rolling on flat metal tracks, one at the front and two at the rear sides (like airplane wheel bays). This interaction occurs between the base and the middle platform. There’s then two sets of springs that extend outwards from roughly below your crotch towards the sides. These apply a force that bounces the plate back in place when moved forward/back. Here’s the tracks:
Also, about now you’re noticing it’s a bit of a dust magnet underneath. On top it’s not too bad if you remember to wipe it down.
And here you can see the springs.
Here’s roughly where the two springs are:
Now these rails and springs are notably different from a front/back standpoint than the Saris MP1. In that case, it uses a curved track (seen below), to basically provide that resistance using your body weight instead of springs. And in fact you’re really talking the total weight of your body + trainer + platform to drive the rollers back to the center point. As a result, the MP1 has a slightly more natural feel.
The other difference is that you’re more likely to hit the edges (front/back) on the RPV2 than the MP1, during a sprint. That’s because while the track lengths aren’t that different, it takes far more effort to move it the full extent on the MP1 than the RPV2. Now, is that worth the price difference? Meh, probably not for most, but, it’s probably the single biggest difference.
Still, if we set aside the sprint edges, for normal riding, you’ll get very gradual front/back movement as you apply slight bits of acceleration or deceleration. This is the main difference between this (or the MP1) and any other platform on the market that’s just side to side. Effectively it means that every pedal stroke generates a very slight bit of 3D movement – front to back as well as side to side. Just as you’d generate 3D movement outside on a bike (even if that movement is slightly different here).
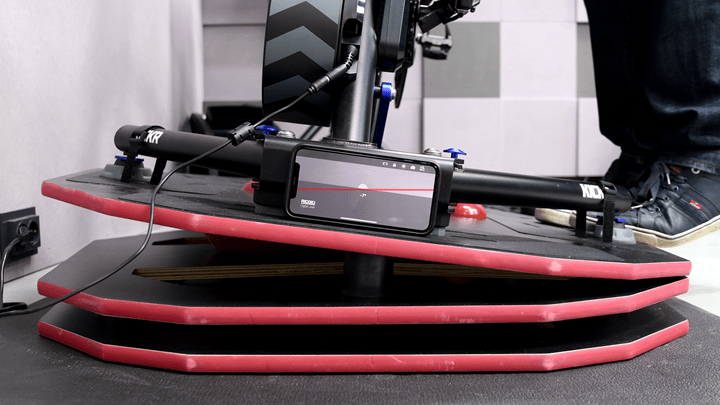
Next, we’ve got the side to side tilting motion. In this case the platform is leveraging the resistance provided by the air-filled balls for that movement. The tilting occurs between the top platform and the middle platform. Thus, the middle platform acts as the base and doesn’t tilt itself, only the top platform tilts, as seen below:
You can effectively control the amount of tilt by the amount of air you put in the balls. Unfortunately, without a pressure gauge on the provided pump you’re entirely freewheeling it. But, if you’ve got a needle for your bike pump, then you can get more precise about it. The top two panels are connected using five rubber isolation mounts that give it its flex. You can see these down the center of the platform in black:
Following their instructions, this gives me a total max platform tilt of 7° at the base of the platform, which is most easily found by simply standing on the edge. Realistically speaking, you won’t tilt this much sitting on the bike unless you’re about to try and tip it over.
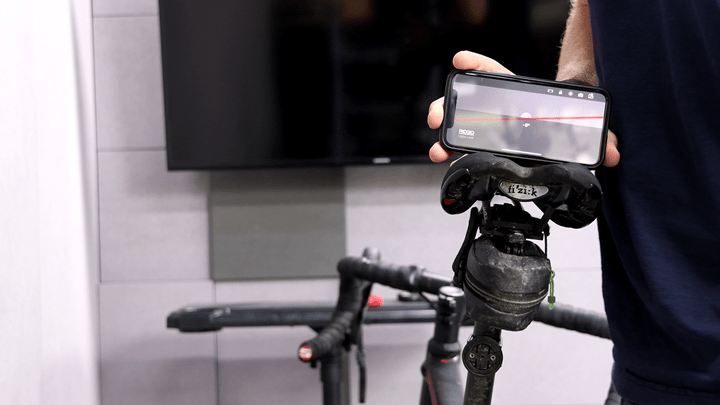
I then placed the level up higher – on my saddle. Would that result in any greater tilt angle (given the higher altitude)? Yes, a bit, it recorded 9° up there:
Why is it more though, shouldn’t it be the same? This is something I saw with the Saris MP1 as well. And in thinking about it now, it’s likely because the trainer itself provides a very slight amount of tilt, that when weighted to the side will add that extra 1° or so.
Still, this is short of the official 13° of official movement per their current spec sheet. However, that’s because the official 13° of tilt is actually the total left/right range (at 6.5° each), which frankly seems a pretty wonky way of measuring that.
As noted earlier, the platform is pretty darn stable – even for me, a tall dude on a tall bicycle. I leaned as far as I could towards the wall on the bike, and it wouldn’t tip there. Which isn’t to say you couldn’t get it to tip ever. I’m sure someone with more balls than I would do some jiggling and such while leaning obtusely towards the wall to get it to flip. But again, I reserve my stupidity for Friday, and today is not Friday.
Ok, so with all that explainer and stuff covered, how does it actually feel? Pretty darn good. At least, as usual with these sorts of plates – if we’re not sprinting. As I mentioned earlier, the main appeal with rocker plates in my opinion is really just long rides and lots of saddle time, specifically introducing that slight bit of movement that makes it not only feel more realistic but also gives your ass some relief due to those micromovements.
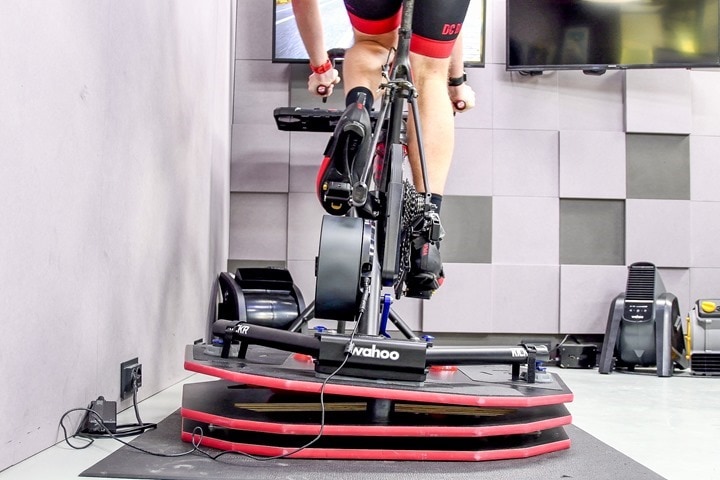
Now, one issue, just like with the MP1 (and every other rocker plate) is sprints. In this scenario, the movements indoors on the rocker plates are opposite what happens outdoors. Like opposite day. See, outdoors when your right foot/leg goes down, your bike/body will naturally lean to the left. But on a rocker plate by default, the opposite happens, the bike leans right – it’s hard to see it in a still shot like below, but super easy to see in the video at the start of the post.
As anyone in the rocker plate community or industry will quickly remind you, you can fix this by ‘learning’ how to sprint indoors on a rocker plate, which roughly involves using your arms to counterbalance. And that’s OK– to an extent. But I’m going to repeat exactly what I said in my original Saris MP1 review:
I think it’s completely fine that the experience of sprinting indoors is different on a rocker plate than the real world. Just like racing a crit in Zwift is different in various ways than racing a crit outside. There are things you must account for inside in Zwift that you don’t account for outside. And vice versa. So, if one wants to learn how to sprint properly indoors – that’s totally cool.
However, where I have an issue is when a company/individual represents a rocker plate product as being “just like outdoors”. Which, it isn’t. That newly learned skill to sprint/climb indoors won’t translate outdoors – because your body already knows how to ride a bike outdoors (hopefully). Thankfully most companies these days don’t actually make any claims like that here. Most reputable companies are open that there’s differences between the two.
And again – don’t misunderstand me: Go forth (if you want) and learn how to sprint on a rocker plate. I have zero issues with that. Just don’t tell other people that they “need” to learn how to do that. Got it? Good.
Finally, in the miscellaneous category, a few random things. First off, the RPV2 does make a bit of noise when it’s rocking around. Like doing the horizontal shuffle on an older bed, you’ll hear the springs below the platform more loudly in certain more aggressive movements. But you’ll also hear them slightly with just gentle movements. This is because they’re constantly expanding and compressing, and for whatever reason, they aren’t absolutely silent. It’s less noise than your bike drivetrain likely is, but it’s not as virtually silent as the MP1. Additionally, the bearings that are within the rails aren’t silent either. Again, very minor amounts of noise, but worth pointing out.
Still, despite these minor quirks – overall it’s a really good option. The overall feel is is good, especially for more steady-state riding. If you’re like me, who doesn’t hard explosive sprint a ton (except of course in the last 5 seconds of a group ride to move from 98th place to 97th place), it’s a great option. Whereas if you’re someone who is constantly sprinting pretty aggressively and is a heavier rider (like me), you might find the springs reach the end too often and too abruptly.
But for everyone else, especially triathletes who are more steady-state in training, it’s a great compromise to save $400 compared to the Saris MP1.
Product Comparison Thoughts:
There are roughly three types of people in this world:
A) Those that want to build their own rocker plates
B) Those that just want to buy a pre-made rocker plate
C) Those that want nothing to do with a rocker plate
For the first category – more power to ya. KOM’s initial rocker plate, the RPV1, was essentially a rebranded RideNow plate – offered under many other brands/names too. Arguably, KOM Cycling’s paint job and marketing was what sold it more broadly in the US. However, the RPV2 is fully new to them at this point, though also from RideNow based on some of their social media posts. It appears to be sold directly from them in some Asian markets, but t’s a bit fuzzy exactly.
Either way, when it comes to the home-built crowd, for the most part it’s heavily in the tilting side to side realm. Some have done more complicated designs, but very few. It’s one thing to add some tennis or inflatable objects to a few pieces of wood, but it’s an entirely different ball of wax to also have fore/aft movement. Again, some impressive peeps have accomplished this, but that list is very small.
So that then gets you to ready-made options. In the side-to-side tilting market, there’s tons of options by tons of companies. However, once you add forward/back movement, that gets slim quick. In my case, I’ve only tested two units that fall under that category: The Saris MP1 & the KOM RPV2. Thus, I’m not going to make comments about other designs, because I simply haven’t ridden those other designs.
In terms of comparing the Saris and KOM offerings though, they’re similar – yet clearly different. The build quality of the KOM RPV2 is perfectly fine, quite good in fact. But it’s also clear that the build quality of the Saris MP1 is definitely higher. There’s no slight squeaking of springs below-deck, nor any balls to inflate. And they include a front wheel block to ensure perfect alignment.
Would most people notice however? Probably not – except for the harder stop on the ends of the sprints, as I noted.
But inversely, I actually preferred the grip material on the KOM Cycling unit, as well as the strap design. And while the Saris MP1 strap design is clearly a better engineered solution, for someone like myself changing around trainers somewhat frequently, the KOM unit is actually easier in that regard. But if you’re leaving your trainer on there all the time, then the Saris design is great. Neither ever moved on me though.
Like I said, the differences are minor – so ultimately you’ve just gotta decide what features you prefer the most and what you want to pay.
Wrap-Up:
Overall, I’m pretty happy with the RPV2 in terms of overall ride feel and the full motion aspects. As I keep harping on, the value here is really more of the flowy movement as you work your way through a ride, rather than ultra-realistic outdoor sprint replication. But with that flowing movement with small accelerations and shifts in the saddle comes a feeling of realism, because it’s a feeling of movement. Even if in some cases it’s not as realistic as it technically should be.
In some ways it’s the same thing with overall indoor trainer road-feel realism. Sure, companies can replicate the inertia as best as possible, but even in the best of bikes and trainers I’ve tried, that doesn’t mean it entirely tricks your brain into thinking you’re outdoors. After all, you’re still not dodging cars and having to fix flats. But each layer you add in does contribute to either increased enjoyment of riding indoors (especially long rides), or in some cases, increased ability to ride longer indoors if required (due to those micro-movements on the saddle).
In the case of KOM Cycling, they’ve found a strong middle-ground between the slightly higher-end Saris MP1 motion platform of similar overall feeling, while finding places to reduce the cost without sacrificing huge elements for most people. You can then take that $400 and spend it on other indoor cycling gear, or just a lot of Ben & Jerry’s. Or a Trainer and Chill mug or t-shirt. Your call.
With that, thanks for reading!
Found This Post Useful? Support The Site!
Hopefully you found this review/post useful. At the end of the day, I’m an athlete just like you looking for the most detail possible on a new purchase – so my review is written from the standpoint of how I used the device. The reviews generally take a lot of hours to put together, so it’s a fair bit of work (and labor of love). As you probably noticed by looking below, I also take time to answer all the questions posted in the comments – and there’s quite a bit of detail in there as well.
If you're shopping for the KOM Cycling RPV2 Full Motion Rocker Plate or any other accessory items, please consider using the affiliate links below! As an Amazon Associate I earn from qualifying purchases. It doesn’t cost you anything extra, but your purchases help support this website a lot.
Here's a few other variants or sibling products that are worth considering:
And of course – you can always sign-up to be a DCR Supporter! That gets you an ad-free DCR, access to the DCR Quarantine Corner video series packed with behind the scenes tidbits...and it also makes you awesome. And being awesome is what it’s all about!
Thanks for reading! And as always, feel free to post comments or questions in the comments section below, I’ll be happy to try and answer them as quickly as possible. And lastly, if you felt this review was useful – I always appreciate feedback in the comments below. Thanks!





Curious how these things work with something like the Sterzo. Does the experience feel at all coherent (as in, when you steer one way, the rocker plate goes with it like you might get on the road)?
I didn’t try the Sterzo Smart in this case, though I think Tariq from SmartBikeTrainers did try it and said it was fine.
You can mount a Sterzo or DIY steering plate to rockers just fine. I suggest a firm connection with hook-and-loop fastening at the least, and more advanced clamps are best.
The addition of steering freedom gets you one step closer to the feel we get outside. Including spring centering in the steering table (like the Sterzo), helps mimic the feel we get outside with the centering action of rolling forward.
The added freedom of the steering in this case does not really help with lean control, but that extra motion feels better to me when compared to locked front wheel. We wiggle the front wheel a lot more than people realize when riding outside, and that is more evident when standing. So adding that motion inside makes sense to me.
Not specifically related to rocker plates, but speaking of road feeling indoors I have my own experience.
I’ve using Elite Nero rollers for more than a year. On them, I can sprint like outdoors, I can move my bike from left to right, it moves slightly backward and frontward…
It has a lot of drawbacks in front of standard trainers, but for me, it’s the most realistic and fun way to train indoors.
Maybe one day you may do a review of them.
Yup, I’ve used about every rocker design made, fixed trainers and my own DIY motion rollers. The motion rollers are the best feel that I have found with regards to feeling most like outside. They are great fun and can really keep you engaged.
The drawbacks are the same as most rollers have usually had. More attention and skill needed in general, and especially so when doing really hard efforts (not to mention the recover afterwards). Those recoveries about sent me off the rollers more than once, and are part of what lead me down the road of making a rocker plate over 5 years ago.
Additionally, most rollers lack enough flywheel to really keep a more fluid stroke when compared to most modern trainers. That free spin is touted for working on spin, and has merit. But I also feel that some use suffers from to little inertia in the system and is very different when compared to the feel outside. The TruTrainer in particular sounds like it has a better inertia solution along with InsideRide and SportCrafter too. But many rollers lack real inertia and feel a bit more dead around the pedal circle.
I wanted the ability to have a smart trainer and it’s advantages, along with more freedom than just that. I wanted something close to the motion rollers, without the same risk of falling or need to pay as much attention to balance.
My goal with rocker plates was to find that happy medium of controlled freedom to allow some motion without as much risk or attention. The beauty of many rockers is the ability to adjust leveling force (via the inflatable springs/balls) to get more or less support to suit your preference. I run it really loose for easier rides where I want to get max comfort. I stiffen it up for harder workouts where I want to have more support.
I used to have the Elite Neros and now have the SmartLoad rollers from TruTrainer. For me, if you want things to feel like you’re riding outside, these really tick the box!
Hey Chad, since you “used about every rocker design made” and know a thing or two about TrainerRoad: any suggestions what to look for to make longer endurance workouts like Warren and Koip a little more comfortable?
Do I want the forward-backward motion? Or is the tilting enough? What about (cheaper) plates that only hold the trainer (Tacx Neo) with a separate block to level the front wheel?
I don’t care about Swift or road feeling; it’s just that 5 hours on the road is fine whereas after 90 minutes on the Tacx my behind is screaming to me :-/ I don’t train for sprinting (audax is my thing, steady as it goes), but do like the “muscle activation” and high cadence sprints in workouts like Bay and Andrews +1.
Top of my list is link to bikeacces.com as they are in my country (Netherlands), significantly reducing shipping cost and no hassles with taxes; link to turborocks.co from the UK would be an alternative with forward/backward motion.
In reading the review, my first thought was: “That’s a lot of work to have come up with something that InsideRide e-motion rollers have been doing for quite a while…”
Like rocker plates, people either love or hate rollers. And statistically speaking, the vast majority of riders don’t want rollers. Like, 95% don’t. Yet the 5% that do..really…really…really…really love them.
I reviewed the InsideRide e-motion rollers in the past, here: link to dcrainmaker.com
Should have googled first, Chad already did a massive write up: link to docs.google.com and there’s a 700+ posts TR forum topic on rocker boards: link to trainerroad.com
PeteF, I’ve done those long 3+ hour Endurance workouts on rigid setups, motion rollers, pure lean rockers, and rockers with fore-aft. Adding even modest motion with enough squishy mat can sure help. But getting onto something with extra motion is what I recommend if you are into the longer rides.
I benefited for years with pure lean action rocker. It is a world better than rigid in every way. That said, I am liking the extra fore-aft motion on the newer rocker plates. Makes since, because my favorite experience ever was using motion rollers which gave real life to those long rides.
But as Ray covers and I agree, rollers are not for everyone. They are still tricky to ride for many and not something that is really appropriate for the masses, no matter how much the mega-fans think they should be.
As mentioned, I used a rear-only rocker under my trainer for several years. That and a fixed front riser did great for me and made those inside rides so much better. Adding fore-aft motion is more of an icing on the cake thing, maybe 10% improvement, but I welcome it. Many other people actually feel the fore-aft is the greater benefit, and I understand why, even though that is not my preference. Likely has to do with me riding lean only for so long, but I get their point.
So, for someone wanting to maximize comfort in the long stuff, I think adding the fore-aft is worthwhile.
As to your listed options, I haven’t used those (across the big water from me), but I have read great reviews on both, so I think you with with either one. Let me know if you have any more questions. :D
Yeah, I have tried to cover a lot of the bases in my doc, the TR forum thread and the rest in the FB group. Kinda spread out, but the doc is like the best starting point in many cases. The TR forum is where I spend most of my time, so questions there will be seen and addressed quickly.
Thanks for finding and sharing those resources :D
I’ve got the SportCrafter Rollers with the big inertia drum and the progressive resistance drum. I built my own platform for them to get the fore/aft motion (basically a dolly that the rollers sit on and a flat base with tracks so it can move forwards and back with exercise bands to provide the tension to keep it centered – probably should go with something stronger like a really solid spring, but I didn’t have those handy). The problem is, I never learned to ride without the forkstand, then I had major knee surgery and got scared of falling and re-injuring it, so I never learned. In the end, I ended up with a dumb trainer that has a really good motion front to back (and the rear wheel can move a bit on the roller side to side).
One thing I wonder about the fore/aft motion is, if your pedaling causes your bike to move, is that taking away Watts that would otherwise be pushing the pedals? I’ve tried it with the fore/aft wheels locked or rolling and I seem to have higher average W when it rolls (probably due to less fatigue), but I always wonder if I am robbing myself of an extra couple W that could make a difference in a sprint to a line.
Power on a rocker is a tough subject. No testing or data exists. All we have is anecdotes and some wild guessing, mine included.
But I have a start of the complexity that hides within this topic:
link to docs.google.com
Two questions:
(a) This KOM Rocker looks to sit the Wahoo Kickr much “higher” than the Saris: a triple stacked burger versus a NY thin crust pizza! Perched on Kickr atop a KOM Rocker seems to be like peering over the Grand Canyon! Is this correct?
(b) Kickr flywheel is Left mounted. Positioning the Kickr centered on rocker plate will therefore tilt rocker left. Does this affect the MP1 in this manner too as its tilt mechanism is different to KOM’s rubber balls? Do I need to use counter weights on right side of rocker plate, to counter the Kick Left side weight bias? On both models? Only on KOM?
These two units are not available in the Australian market, so the freight cost would be exorbitant.
Heath
a) I don’t have hard numbers on the deck height, but the KOM RPV2 as a 2-layer design is probably a 2-3″ [25-50mm] taller at a guess. The MP1 may be a 1-layer design, but it is taller than some other designs like the linear bearing rockers seen in many DIY designs as well as ones like the TurboRocks models. Not great for low headroom applications, but the taller designs are fine once you get used to them.
b) Yes, most trainers have an off-center weight bias. The MP1 is notable since it does not offer any leveling spring adjustment. Some riders report a lean bias in use, but many don’t. The fact that the MP1 uses a rather stiff leveling spring setting is how they try to avoid dealing with the weight bias.
It “works” since some people never notice it, but it can be seen and corrected for those that want to do it. The best way to setup a rocker plate is to apply a counterweight to the opposite side of the plate vs the flywheel. We find that a 10lb [5kg] weight placed towards the right edge of the rear section works well for most applications. I know some MP1 users that did this and prefer it even with the stiff spring settings.
On other rockers with adjustable springs, you don’t “have” to use a counterweight to level the deck. But without a counterweight, the actual lean force between left-right directions differs enough that it can be measured. Again, some people won’t notice it, but a counterweight gives even lean forces and the best feel.
At this time, the JetBlack rocker should be available for you. And if they are still around, Sydney Bespoke Rocker Plates is another option in Aus.
How is this from a sound perspective? No mention of sound in the review – does this dampen the sound coming from the trainer on sprints for example? I live in an apartment and want to avoid excess noise to the lower floor neighbor.
DC, there are a couple XX placeholders in the copy…
Yikes, the dangerous xx but not xxx (my usual placeholder I look for). Thanks!
Interesting. I retro fitted my MP1 to hold my Neo bike and loving it. Have a 2T before.
Can you send me the details, to make it myself .. thanks
If the springs are twanging/ringing, a piece of rope strung loosely through them will damp the sound.
I recently purchased the Paragon Matrix BT52 4-Way Rocker Plate and I’m quite happy with it. It looks similar to this one, if less complicated in its build and set up (it arrived fully assembled – no inflation or ball manipulation required ;P).
While I’m still getting used to the feel when out of the saddle or sprinting, it feels good when just riding in the saddle for extended periods. Also, I’m using it with a KICKR CLIMB with no issues.
The only mods I made to it were:
1. I had to buy a longer retention strap for the middle leg of the KICKR as the included one was too short to get around the fore-aft mechanism below the plate
2. Added a 5Kg counter weight to the right side to balance the flywheel on the KICKR
3. Added an adhesive rubber mat to the front so that the CLIMB feels more planted on the front
So now I just wait for a Sterzo smart steering device that works with the CLIMB and I’m set :)
Oops. That was supposed to be my profile pic :(
From the photos it looks like you didn’t use a counterweight to allow for the fact that the Kickr has an offset flywheel (i.e., its flywheel is not on the centerline of the rocker plate).
Consequently, if you pumped up the balls to different pressures to keep the rocker plate horizontal when the trainer was mounted, you should have noticed that the rocking resistance would be different when rocking one way versus the other (harder one way due to the higher pressure in the ball you are rocking against)
It’s true that using a counterweight allows equal ball pressure and a more even feel for rocking, especially at the wider lean angles. But the difference compared to using unequal pressure and no counterweight is marginal in the grand scheme of things.
I went so far as to quantify it in terms of moment (torque) values between lean direction and amount with unequal pressure. It’s measurable differences, but small enough as to go unnoticed by most riders. I used unequal pressures without a weight for years and it’s perfectly fine.
I do prefer the feel of a counterweighted setup with equal pressure, but it’s a luxury and not a requirement.
I have one of these paired with a Tacx Neo and overall it is great. With this trainer the unit is perfectly centered, in balance, without the rubber balls. So the issue of the uneven pressure, even if mild is not present with this trainer pairing. I did have to fine-tune (meaning lightly mod) the set up as described below. But this may be user preference as I likely am in the upper side of side to side resistance for my preferred movement. And this may not be an issue for users whose preferred side to side is on the low-resistance or mid-resistance settings.
One thing that I did encounter was that at the ball pressure I like for the side-to-side movement, (about 11-12 pumps with the provided pump) the balls would significantly expand and deform downwards and touch the bottom surface. This would not only provide fiction, noise and ultimately will lead to unbalance plate movement. This due to the fact that degree of ball deformation is not even on each ball, thus the contact with the lower surface was not even and same translated to the plate movement while riding. Also this would reduce the degrees of freedom for the movement, so overall, this was a problem in my set up.
So to solve this I found an alternative, a very simple solution, which is to block the expansion of the rubber ball downwards using basically a physical barrier on the middle plate hole. I am using a drain strainer with a concave cone filter. This fits perfectly in the middle plate hole, allows sufficient ball expansion downwards to anchor the ball, but prevents further expansion that would otherwise interfere with the operation. So after some brainstorming, this was a very easy and inexpensive fix!
Overall, I agree with DC Rainmaker’s review, this is a solid option, significantly cheaper than the Saris.
Room for improvement: Better packing. My unit also arrived damaged on one corner. This should not be hard to fix though, perhaps better rubber isolation around the plate edges or light foam isolation for shipping should do the trick.
It would also help to provide isolation on the underside of the top plate to buffer the “touch” to the middle plate and provide extended protection for wear and tear.
Cheers!
Thanks for the great write-up. How does the feel of this compare to the InsideRide e-flex?
That’s a good question, though unfortunately, it’s nearing two years since I last tried the e-flex. So my comparative memory isn’t as sharp there between the two.
I think it’d probably lean slightly more towards the platform due to longer term compatibility aspects. Meaning, the e-Flex only works with the Wahoo KICKR, and only current generations. We’d have to hope future generations matched exactly in frame design.
That said, I liked the handlebar twist aspects of the e-flex, which largely don’t exist here unless you put on a front twisting plate too.
Great write up Ray. Thanks. Quick add. EFlex now supports KICKR Core as well. I’ve had one (on a KICKR) for about 4 months now and just love it. Also agree with Ray that the biggest benefit is not sprinting but just riding. My saddle got more confortable instantly!
I use the Inside Ride e-flex. And I love it for the same reason, the more realistic motion front-to-back and side-to-side. The compatibility issue is a major consideration, for sure. But at ~$450, it’s a good deal if you have the current KICKR and will be keeping it for a few years. Plus it has a smaller overall footprint. I’m not sure this rocker plate would fit on my current pain cave.
Yup, the relatively low price, small overall footprint size and extra low height (effectively same as regular bike height) are some great features of the E-flex.
I like full rockers too, but they are BIG and heavy to have around. The stack height, especially with a triple deck design like this is also notable. Not great for anyone with low ceilings.
Our product does all this and more, with less weight and for less money. And made in the USA. https:://velocityrockers.com
Looks very interesting! What are the pros and cons of yours vs Saris and KOM?
Agree, I’m all for companies in the sports tech realm interacting here, I think it’s great. But leaving a substantive comment, as Bruce alluded to, is more useful.
“I reserve my stupidity for Friday, and today is not Friday.”
Gold.
That’s some weird physics/geometry where two parallel surfaces (the base plate & the saddle) have different tilts, just because one is higher up… sounds more like a measurement error honestly!
Hope you get your hands on a Rockr Axis when they start shipping. They do look interesting.
Great review as always, thanks!
I don’t understand the part about the tilt angles though. You wrote “this gives me a total max platform tilt of 7° at the base of the platform” and “I then placed the level up higher – on my saddle. Would that result in any greater tilt angle (given the higher altitude)? Yes, a bit, it recorded 9° up there”.
The ‘higher altitude’ explanation does not make sense to me. Geometrically, I don’t see how the higher altitude should affect the tilt angle (see link to bbc.co.uk, “F angles”). Instead, my guess is that the observed difference of 2 degrees (which is not a lot) may be explained by a combination of:
(1) slightly different angles of the platform for the two pictures;
(2) angle estimate / reporting inaccuracies / rounding effects of the angle measurement phone app;
(3) not holding the phone completely level relative to the top part of the saddle;
(4) not mounting the bike frame perfectly orthogonal to the platform.
Cheers!
Yeah, I don’t disagree that it could be user measurement error there. However, this is something that I saw as well on the Saris MP1 – just slightly more.
One thought thinking about it now is that it could be the trainer/frame of the bike that is actually bending slightly more, rather than the items in your list. As in this case I did the two measurements back to back, on video, and until the side of the platform compressed till the two boars hit each other.
I’ll update above, but it’s actually an interesting point because in reality, that bit of extra movement (probably from trainer/frame flex) would vary by trainer, but gives slightly more tilt than just the platform itself.
Assuming no flex or additional deflection in any parts of the system, the 7* angle of the rocker deck will lead to a 7* angle on any surface that is parallel to it when flat. That is pure geometry in action. Parallel lines (deck and saddle) will remain parallel through any and all lean angles, assuming no “flex” in any parts between those measurement points.
Any deviation more or less than the angle of the deck is a result of deflection (flex) in one or more components in the system that sit on that deck. So, a deflection of 9* or so at the saddle means the trainer and or bike are resulting in that additional lean angle when compared to the deck angle.
I think one way to think about the way it should be phrased by companies with theses type of products is “degrees of freedom” for the plate. I.e. what is the total travel angle to the horizontal plane in a complete rocking cycle.
Yes, I have penned some info on Degree’s of Freedom in my Rocker Plate document.
link to docs.google.com
The half vs full angle rotation for lean, as well as half vs full linear shift are fine as long as the related info specifies if it is full or half. For instance, Saris clearly states the following:
Max Fore-Aft Travel: 9.5”
Max Side-to-Side Angle: 6°
Oddly enough, they are listing the full distance for the fore-aft motion, but only the half angle for the lean. Max Side-to-Side would actually be 12°, as far a I am concerned. So even that is confusing to people trying to compare these units.
Some level of consistency in ratings sure would be nice. When in doubt, makers would be best to list it with both data points (full & half).
“You’ll want to also ensure that your balls stay centered below deck as you blow them up. Thus, you’ll reach around and adjust your balls to provide for consistency between them, ultimately ensuring the situation is level.”
Isn’t that a fine piece of irony in a trainer platform review? Enjoyable reading!
“You’ll want to also ensure that your balls stay centered below deck as you blow them up. Thus, you’ll reach around and adjust your balls to provide for consistency between them, ultimately ensuring the situation is level.”
heh
Great review. Will you be reviewing the RPV1 on its own merits? At its price point, it’s basically the cheapest rocker you can buy (often cheaper than you have listed), so it’s definitely what I’m considering. Fwiw, my main concern is comfort and ability to ride longer (I can ride about an hour on the trainer before everything starts bothering me).
I’m wondering what’s the difference between 1 plane of movement and 2 planes of movement, in terms of user experience.
It is a range where some love the fore-aft motion, while others hate it and consider it “wasteful” from a power perspective. If I had to guess, I would say that 60-80% of people in our FB group like the additional fore-aft motion once they try it.
I like it because most of the time when seated, it gives just a minor amount of motion that goes with the rocking action to make the ride more comfortable overall. I know some people who would actually choose fore-aft motion if they had to pick a single motion option. So it can make a big difference for some riders.
I rode for years with just rocking motion. But I personally like the dual motion setups and will likely stick with them in the future.
My counterpoint to the “opposite motion when sprinting” issue is this: I think many riders who have spent a lot of time on a static trainer setup have learned, unconsciously, to sprint with a technique that does NOT match outdoors. They’ve learned to ride with that “opposite technique” but on a static setup (so it doesn’t feel super weird like it does on a rocker plate.)
Ray, I’ll use a video of you sprinting on the Direto to prove my point: link to youtube.com – look closely and you’ll see the bike is leaning in the direction of your down leg as you sprint – the dreaded “opposite form”.
So what happens when these “static riders” hop onto a rocker plate setup? They use the same technique they’ve always used indoors… but now things lean a LOT, so the opposite-ness of it all is very noticeable.
(It’s also worth noting that having a plate too “tight” (the balls too inflated, or the springs too tight in the case of the MP1) can re-inforce opposite form. I’ve talked about this here link to zwiftinsider.com. Based on the pics in the post, your balls (I’ll never feel comfortable writing that) are inflated higher than mine in my KOM plate demo video: link to youtube.com)
For me, I hopped onto my first rocker plate after just a few months of indoor riding – and it felt totally natural to me. I didn’t have opposite technique in sprinting – I just used similar form as I do outside when out of the saddle.
Ray, you say you don’t want to learn how to sprint on a rocker plate – and I get it. It seems like a silly ask. But I would submit to you that it’s not so much learning how to sprint on a rocker plate – it’s unlearning the bad form you’ve developed from years of sprinting on a static setup. And that seems like something worth doing.
Indeed, I don’t doubt we’ve slowly adapted our indoor training body responses over time, based on the hardware we have and how it responds to us, no doubt.
My comments there are mostly towards those that like to nit-pick and get really upset at someone every time someone isn’t ‘sprinting right’ on a rocker plate. If someone wants to learn that behaviour (or unlearn one, and learn the other) – I’m all good with that, totally fine.
But I also wonder if a few years from now we’ll get ‘new’ rocker plate technology that removes the inversion and then this won’t be an issue. I know there’s that video floating around of whichever brand I can’t remember at the moment, claiming that, but we’ll have to see if that comes to fruition.
Thanks for the comment though!
Rather see you review a Lezyne GPS than a kicker plate. Or review a power unit that you have not previously covered.
I’m always aiming to vary things. Lezyne hasn’t released a new GPS in…2 years? 3 years? They have done some good updates along the way, which I’ve outlined as they’ve done them.
I’ve done a few power meters in the last month actually, and have two more I’m working on as well (MTB-focused). I’m hesitant on the super-budget mostly China-based ones. These just seem like a fairly substantial hassle when almost every time the answer is “no, they still have issues”. And, perhaps more notably, my experience with budget power meters is that everytime I test these and find issues before publishing, I go back to the company and they make changes, and then the cycle repeats…over and over again endlessly.
I’m not really sure how to deal with that, if it were simply testing budget powermeters and spitting out the results, it’d be easy. But like every review I try and talk with companies to understand why the issues are what they are, and if it’s a me-issue or a them-issue. And I find that super-budget power meters companies tend to consume an enourmous amount of my time with this back and forth because every time their units don’t work well in some way. :-/ And I know I’m not the only reviewer that’s frustrated with this time suck.
Which isn’t to say I’m not going to test them as a blanket thing, but to point out that I could review 3-5 budget but not super-budget power meters in the same time as one budget power meter from an unknown brand.
Hey Ray, unrelated topic here I noticed you’re wearing a whoop strap, have you change your mind about it or are you reviewing a new upcoming one? I did give whoop a shot, platform wise amazing, but for my personal use case not worth 31€/month. But watching this video I couldn’t stop noticing it and made me curious.
Nah, it’s still horrendously inaccurate.
For the last…umm…11 months, I wake up each week with a plan to shoot a video on it. But, never quite get there. Eventually, I will, hopefully, sooner rather than later, so I can take this thing off and stop paying for it.
Thanks DC for the great review as always. Could you or someone confirm if this would be compatible with Elite Direto Trainer? Thank you!
Should be no problem at all there, the legs make it easy given the way they go outwards sideways and forwards. Cheers!
Has anybody used a pressure guage with the balls? I’m curious if there is a max PSI I should watch out for andI don’t want to find out the hard way. :/
In my experience, if you pump the balls beyond 12 or so pumps, you are going to start to see that they will expande through the middle plate hole and start to make contact with the bottom. If that happens the movement is going to be affected by this and it is a no-go. I found a simple solution by blocking the expansion. I don’t think you’ll need to pump these balls beyond -11-13 pumps and they seem quite fine
I haven’t unpacked my RP2 yet, but from my other rockers with balls around 4-6″ [100-150mm], I use 3-5psi in each ball. Some might like more pressure, since I like a very loose and active rocker.
If you find that you are inflating the balls notably more than that, especially if they are sticking out of the installation hole very much, I see that as a problem. You are better off to deflate and move the balls more to the outside of the plate, between the two decks, with the inflation hole set sideways for access. Then inflate from that side location.
You will get more support at lower pressures with wider placement of the balls, vs trying to use excessive pressure in the inner location. We’ve seen several other KOM and LifeLine rocker plate users take this approach with good success.
The solution that worked for me was to place a drain cover, with a concave end, in the middle plate hole. This limits any expansion issues downwards. The concave end still allows the ball to expand a bit and anchor itself, without any further issues
Something wrong with your phone gyroscope, it’s impossible you have different misures at different altitudes (math basic)
Nope, as discussed in the post, it’s because the trainer also bends/tilts slightly, adding a tiny bit more. :)
“Why is it more though, shouldn’t it be the same? This is something I saw with the Saris MP1 as well. And in thinking about it now, it’s likely because the trainer itself provides a very slight amount of tilt, that when weighted to the side will add that extra 1° or so.”
In your review you say “In the side-to-side tilting market, there’s tons of options by tons of companies. However, once you add forward/back movement, that gets slim quick. In my case, I’ve only tested two units that fall under that category: The Saris MP1 & the KOM RPV2”
I think you’ve reviewed at least three of them – link to dcrainmaker.com
How does the E-Flex compare to these two? Thanks.
Is it the best one money can buy? Or you think saris or else?!
Looks like it is no longer available – do you know if it is temporarily out of stock or discontinued?
Don’t know much about current production but for a short while they had them at a serious discount on Amazon, like $300 off. Maybe they wanted to clear out the inventory. This is a large and bulky product, not sure any manufacturer may want to be sitting on inventory.
They have stopped making these:
Thank you for your patience in our response to your message. We are saddened to inform you that our RPV2 Rocker Plate is now discontinued due to unforeseen legal threats and will not be available this winter season or in the future.
Please note we do still offer a range of other indoor products that include the following.
RPV1 Rocker Plate
Rocker Plate Fore/Aft Starter Kit
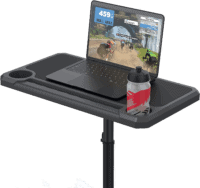
Media Display Desk
Trainer Block
Trainer Tire
We appreciate your interest in our products and hope to continue to provide high-quality and innovative solutions for all your cycling needs.
Thank you!
KOM Cycling | Customer Support Team
I have a Tacx Neo Smart. What are your thoughts about adding the RPV2? it appears that it can handle the weight.
The Neo models will work just fine on all versions of the KOM Cycling (and other RideNow clones) rocker plates. Plenty of people are using them with great success.
That is my setup, Neo2T, and works fine. However they do not sell the RPV2 as described above
Is the KOM Cycling RPV2 Rocker Plate still available? I can’t find anything but the RPV1.
No, it sounds like Saris went after them for patent stuff and they had to pull it. :(
They don’t offer the full motion V2 directly, but they do sell a “ROCKER PLATE FORE/AFT DIY STARTER KIT” that is essentially the 2nd half of the V2.
So its possible to make the V2 again, for those that want it. $500 + $400 = $900 for the complete, and some manual labor.
link to komcycling.com
Buy the new Wahoo Kickr MOVE that you reviewed with wifey. Sounds good but the side-to-side movement is “too little” (which is basically the Wahoo KICKR AXIS Action Feet that I already have). It doesn’t rock enough!!!!
Wahoo should have implemented a totally new fore and aft-side to side, not piggy back the existing inadequate Axis Action feet to a new fore and aft accesory!
There are THREE settings of lateral movement on this Axis Action feet. I had it set to MED, which doesn’t seem to ((((ROCK))) enough!
For those using the totally revamped Wahoo App, it is a NIGHTMARE on elm street. I have already notified Wahoo. It is geared towards Biking, understandably biking accesories is its cash cow. But it sucks big time for running. Its GPS must be designed for MARS gravity. Always at least 2 km short (had to be GPS corrected on Strava). I know I am slow (and steady :) ) but man, my running pace cannot be slower than my pedestrian walk pace!!! It records the correct time but shortchanges on the distance by min 2km. Resut, the PACE sinks like a lead balloon!
I think the best BT for lateral motion is the Kinetic Rock And Roll Control Turbo Trainer. I still have it but unused because I got it before buying the Kickr 1st ed. That Kinetic BT really “rocks”. Drawback is it ain’t “SMART” and the wheel to roller contact wears out tires fast! The ed I have is 1st gen and POWER capture requires additional accesories – way too complicated!
I haven’t subscribed to newsletter since I am already subscribed. :)