This product has been discontinued by the manufacturer. It's been replaced by the Garmin Forerunner 645/645 Music, you may want to check out that review instead.
The Garmin FR620 is Garmin’s newest and most advanced running GPS watch. The unit packs in everything from WiFi to ANT+ to Bluetooth Smart, and adds a slew of new metrics and functionality. But are these new metrics a fair trade for some of the older functionality that’s been removed?
And quite simply, is it worth the cash over the FR220 which costs roughly half as much? Especially once you consider needing the new FR620’s HRM-Run strap to take advantage of all the new features.
Because I want to be transparent about my reviews – Garmin provided both beta and final production FR620’s, with this review being written on the basis of the final production hardware + software (some photos were taken during the software beta period of course). As always, in the next little bit I’ll be sending them back to Garmin and then going out and getting my own (to be able to support y’all in the comments section down the road). Simple as that. Sorta like hiking in wilderness trails – leave only footprints. If you find my review useful, you can use any of the Amazon or Clever Training links from this page to help support future reviews.
Lastly, at the end of the day keep in mind I’m just like any other regular athlete out there. I write these reviews because I’m inherently a curious person with a technology background, and thus I try and be as complete as I can. But, if I’ve missed something or if you spot something that doesn’t quite jive – just let me know and I’ll be happy to get it all sorted out. Also, because the technology world constantly changes, I try and go back and update these reviews as new features and functionality are added – or if bugs are fixed.
So – with that intro, let’s get into things.
Unboxing:
Before we can use the thing, we’ve got to get it all unboxed.
There’s an outer shell which protects the inner stuff. Below the watch are all the accessories.
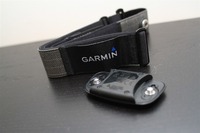
Here would be those accessories, or rather, the contents of the box. On the left we’ve got the power cable, in the middle we have the watch plus the HRM-Run pod, then the manual, and then finally the heart rate strap that connects to the HRM-Run transmitter pod.
With the plastic removed, you’ve got the below situation:
As you’ll see in later sections, the FR620 is much lighter than its predecessor – the FR610. It’s also just a touch bit slimmer than it as well, owing in part because the band goes completely flush with the unit when placed on a flat service – versus the FR610 having a portion of the GPS antenna in that area causing a bit more of a bump.
As you can see, the FR620’s charger is completely different than previous Garmin Forerunner chargers, and isn’t really compatible with any other devices in the lineup either. It’s a bit better than the FR610’s charger, but I find the FR220 charger much more secure in that it clips on and can be swung around without fear of the charger falling off.
Next we’ve got the new HRM-Run strap. This is perhaps one of the most important pieces to being able to take advantage of all the new FR620 functionality.
Inside the HRM-Run transmitter pod (which has the little running man icon) there’s an accelerometer which measures movement, enabling new Running Dynamics metrics which I cover in a later section. This is all in addition to traditional HR metrics such as beats per minute.
Also worth pointing out is that while the pod is new, Garmin has stated that they’ve continued to make minor tweaks to the strap itself – trying to further minimize HR spike/dropout issues. Additionally, more work has been done around that within the pod as well (above and beyond what the HRM3 offers).
Finally, the last item within the box is the Getting Started guide.
With that, let’s dive into some of the comparisons with other units on the market.
Size Comparisons & Weights:
Next up lets compare how the size of the Garmin FR620 is to that of other units in the same general price and functionality range.
First we’ve got the standard rolling pin side view. You’ll notice that for the most part the GPS units these days are all roughly in the same size arena. It’s only the ones to the far left that are a bit bigger – the Adidas Smart Run GPS and the Suunto Ambit 2s. And, at the far right side you’ve got the lightest and smallest of the bunch, the Magellan Echo. Except that doesn’t have GPS in it but rather depends on your phone’s GPS.
(From left to right: Adidas Smart Run GPS, Suunto Ambit 2s, Garmin FR610, Garmin FR620, Polar RC3, TomTom Runner/Multisport, Timex Run Trainer 2.0, Garmin FR220, Magellan Echo)
Next, we can turn them up a bit and see the height of each one. The pattern is pretty similar here. The TomTom is a bit of an optical illusion because while the height looks thin on the display side, the button wraps down around the front and pops up a bit. The thickest units overall are the Adidas, Suunto and then the Timex Run Trainer 2.0 (3rd from right).
If I look at the three other units the Garmin FR620 tends to be compared to the most, you can see this a bit more clearly.
The FR620 is of course the successor to the FR610. Below, we can see the two side by side. Display-size wise they’re virtually indistinguishable. The touch button placement has been swapped around a bit, and there’s now one additional button.
The most noticeable aspect (aside from weight) though is really thickness. In particular though towards the base of the unit. You can see how the first bit of the FR610 (silver) watch band as it leaves the display is still a portion of the unit and added bulk, whereas the FR620 doesn’t have any of that extra bulk.
Looking at wearing it, here’s what it looks like on my wrist, my wrist size is 17cm (or about 6.5 inches):
And, for all the smaller ladies in the house, here’s what it looks like on The Girl’s wrist, her wrist size is 14cm (or 5.5 inches) – and she’s tiny – 5’2” tall:
The Girl wishes to convey that she plans to steal my FR620 upon pressing publish on this review. Thus far, she’s been using it pretty much every time I’m not using it (she’s also been using the FR220 as well).
Last but not least, here’s the weight situation. The FR620 weighed in at 44g:
Whereas the older FR610 (metal backing) came in at 75g, and the updated plastic backing at 62g:
Running Functionality and Features:
After you’re ready to start running you’ll head outside and get GPS reception. Unlike past Garmin Fitness watches, the Garmin FR620 automatically caches the satellite locations for the next week, which means that it can find satellites much faster than before. This caching is updated via WiFi and Bluetooth Smart each time you connect the FR620.
To illustrate this in a short video, I’ve started with the FR620 turned off (entirely – which is sorta unusual) and then recorded the process to turn it on and until satellite reception. The red bar on the left side indicates the satellite reception, which turns green once nearing completion.
Typically the unit is already on, so it’s just a 2-second matter to switch into running mode and then enable GPS. So that first portion to turn on from being off took 18 seconds. Then, the satellite lock while sitting next to a tall stone wall/ground took 14 seconds. I’ve seen it even faster when not sitting next to a massive wall.
One pretty cool new feature on the FR620 (and the FR220) is the ability to change how long until the unit falls asleep. Previously it would fall asleep after 5 minutes if you weren’t actively recording an activity, or hadn’t touched the screen. This meant for folks waiting at the start line of a big race, the unit could fall asleep on you. Now though you can change to ‘Extended’ mode, which will in turn shut the unit off after 25 minutes.
So, with the unit on, we’re ready to start running. To do so you’ll press the upper right button, which starts the activity. You can press the same button again to resume it. The lower right button is the lap button. The upper left turns on the backlight. On the front bezel you’ll see a little ‘Back’ arrow and on the opposite side ‘Three lines’, which allow you to navigate through the menus.
Once we’ve started running the unit will display a multitude of metrics, based on what you’ve configured. By default this will be things like pace, distance, time and heart rate. Each page can have different metrics on them, and you can have different pages.
For example, below I’ve configured a four-metric lap page, which shows my current lap distance, lap time, lap pace, and heart rate.
In this case, below, I’ve setup a two-metric screen that just shows heart rate and the HR zone:
In total you can configure four data screens (+ a Virtual Partner and Running Dynamics screen). Each screen (page) can contain up to four pieces of data (or as little as one piece of data). You’ll change all of these within the Activity Settings area, and then Data Screens:
Here’s the full listing of data fields you can configure:
While running in order to change screens you simply tap the screen. The touchscreen can be navigated by swiping up and down, just like most phones. This is similar to the FR610 (but very different from the FR405/FR410 touch bezel). This touch screen has no problems with water droplets (rain), nor with gloves. For fun, here’s a quick little video I shot wandering through the menu with a few different gloves:
As you can see, even with the biggest mitten you can navigate it.
Many people ask about pace stability while using GPS. Below is a short video I took while running with the unit. I’m not wearing any footpod, this is pure GPS pace. I ran for a short distance and then abruptly stopped, so you could see the short delay until the unit shows zero (stopped). The pace number is shown in minutes/mile
The unit can be configured for both metric and statute displays (i.e. miles or kilometers), and in fact, there’s actually settings to change any of the different fields (such as elevation, pace, distance) individually and independently of each other. So you could have elevation in meters and distance in miles.
While running you can configure the unit to automatically create laps, called Auto Laps. These can be setup based on a preset time, such as 1 Mile. I tend to use this for longer runs, rather than shorter ones.
Additionally you can also configure Auto Pause, which will automatically pause the unit when you go slower than a certain threshold – such as stopping at a light for a crosswalk. You can customize the thresholds if they’re too high/low for you.
When it comes to alerting you’ve got a few options. You can create alerts on a number of metrics such as time, distance, calories, cadence, or pace. In the case of pace or cadence, these are typically defined as high/low alerts, where you set a high value and/or a low value (both or individual) and then the unit alerts based upon crossing that threshold:
You can also setup alerts such as the Run/Walk alert, which is common in a number of marathon training plans these days. In this case you setup a Run Time (i.e. 10 minutes), and then a walk time (i.e. 1 minute) and then the unit will simply repeat this duo forever until you tell it otherwise.
Lastly in alerting you have the Virtual Partner. Once enabled the Virtual Partner is set for a given pace (you can adjust it on the fly), such as 7:25/mile.
The unit will then tell you how far ahead or behind that virtual pacer you are, in both distance and time.
What’s unfortunate here is you can’t set a goal time for an event (i.e. 3:30 marathon), nor can you see the predicted finish time based on your current pace (for a given distance/event). I was really hoping to see this given some other units have implemented it lately (namely, the Magellan Switch/Switch Up).
Further, Garmin removed the ability to race against past results (at least temporarily), so you can’t race against yourself nor against any other runner.
Once your run is done you’ll go ahead and tap the pause button to pause it, which then brings you to this screen where you can save the run (or discard it I suppose):
After which it’ll list off any PR’s that you’ve hit for that run. PR’s (Personal Records) are listed for distances from 1KM upwards to Marathon, as well as for records such as longest run. Here’s a few of them:
The only problem is that while it’s supposed to pull your previous PR’s from Garmin Connect, it doesn’t appear to be doing so. So in reality my PR’s are kinda skewed.
All of this information then ends up in the history section if you’d like to review it later from the watch itself.
And of course it’ll get uploaded as I’ll cover in a bit.
Looking at GPS accuracy, I’ve seen good stuff with the FR620. It’s in line with a bunch of other GPS units I’ve paired it up against, always relatively close to each other. Given the accuracy of GPS technology in the consumer space, you’ll almost never get the same measurement from two units (even two like units), but in these cases you see very similar numbers across the board:
Sorry this last one’s a bit fuzzy, it was at night. 26.87km = 16.69 miles. So in this case we had a bit more variance (from 16.19mi to 16.69 miles with the Echo hanging out in the middle at 16.4 miles. Of course, it’s impossible to know which one is right.
I’ll likely be doing accuracy tests again with the large batch of new running watches on the block, since it now makes sense to do so.
New FR620 Running Dynamics Metrics:
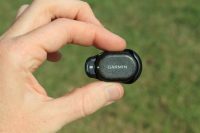
The FR620 has introduced the ability to get new “Running Dynamics” metrics, which focus primarily on running efficiency areas. These metrics are only available if you have the (also new) HRM-Run heart rate strap. This is the strap that has the little runner symbol on the front of it, and contains an accelerometer in it (it otherwise looks like any previous Garmin HR strap).
There are two and a half new metrics that come from the HRM-Run. I say ‘and a half’, because one of them – cadence – was previously available via the footpod (and also available in the FR620 internally).
The other two metrics are Vertical Oscillation and Ground Contact Time. First let’s cover what these are:
Vertical Oscillation: This is simply how much you (specifically, your chest) goes up and down during each footstep. Basically defining how much vertical movement you generate, measured in centimeters. The less vertical oscillation the better, as it means you’re in theory spending less energy pushing your body up and down vertically (energy which could be used to move your body forward).
Ground Contact Time: This metric covers how long each footstep spends on the ground, measured in milliseconds. Remember that 1,000ms = 1 second. Typically speaking the less time you spend on the ground the faster your cadence. And most elite runners tend to have a fairly fast cadence. You’ll likely see this number fluctuate directly with that of cadence, which in many people’s situations tends to also correlate with speed.
Cadence: This is not a new metric. It’s just that Garmin has decided it was time to make you aware of it. This measures how many steps per minute you take, or, how many times per minute your feet touch the ground. Traditionally this has always been measured in Garmin products for just a single foot (i.e. 90SPM). However with the switch to the FR620 and FR220, all of these metrics across Garmin sites are now shown as both feet (i.e. 180SPM). You’ll note that any previous runs you did now show double what they did before (the change occurred last week updating all old runs).
As a side note, Garmin produced two YouTube videos which were actually surprisingly good. In fact, I don’t think I’ve ever linked to a Garmin video in a review before – but this one on Running Dynamics explains it very well with cute graphics and animations.. And the same on VO2Max & Recovery Adviser (which I’ll cover in my next section).
Garmin includes this handy little chart in the manual to help you figure out whether or not your results are good. Of course, they don’t say good, rather, they just label them with non-descript colors so that everyone feels good about themselves.
So how is this information displayed for you? Well, let’s first start off with running. While running you can choose to enable a new display screen called, obviously, Running Dynamics. This screen looks like a small car dashboard:
The data is updated in real-time just like any other metric on your watch.
You can switch around any of these three metrics in the configuration of your data fields. Further, you can add these metrics to any of your other data pages/screens.
Next, post-run you’ll see a few new (and updated, in the case of cadence) display fields within Garmin Connect:
Looking more closely at the fields you can start to see clear trends between pace, cadence, vertical oscillation and ground contact time. Though, I think it’ll be some months until coaches and others can really start to make sense of what this data looks like en mass (sorta like left/right power data).
I say that because if you look at the charts above (from one run), and then compare it to the charts below (from a different run), you see different trends. For example, below you see an increase in vertical oscillation (more bounce) while there’s actually a decrease (faster) in ground contact time. Which is a bit of a strange correlation to have occur. Again, more over time here.
Here’s a close look at each of the graphs from a recent run.
Ground Contact Time:
Vertical Oscillation:
Cadence:
You’ll notice a few little blips here and there. For example that random spike about 80-90% of the way through my run is when a very old man partially fell off his bike a bit ahead of me. I stopped for a second to make sure he was OK, resulting in that short spike. Beyond that I’ve seen the data be incredibly clean while running on trails/routes uninterrupted. However, with city running and jumping on/off sidewalks and around people I see a fair bit more variance. So be sure you keep your running environment in context when looking at the data.
It should be noted that the HRM-Run continues to also grab standard heart rate data as well – so no changes there:
Note that only the Garmin FR620 today can take advantage of the new Running Dynamics metrics from the HRM-Run. The other units can still connect to the heart rate portion just fine, but not anything beyond that. Garmin does not have plans to add this to the now ‘older’ FR910XT, but I suspect you’ll see it in future higher-end fitness units from Garmin.
It’s probably worthwhile noting that the HRM-Run strap produces without question the ‘cleanest’ HR data I’ve seen to date on any strap, Garmin or otherwise. In fact, nearly all of my runs have been very good. This is notable especially because it’s the fall, which tends to be the worst time of year for HR spikes and dropouts due to the cool weather where people are still wearing t-shirts/shorts and thus you tend to produce less sweat than in either summer (hot), or winter (bundled up).
I’ve only seen a tiny bit of initial latency in the first 1-3 minutes, and only if the strap becomes more dry due to excessive waiting pre-run (you’re to wet the strap in three spots before running).
If you’re struggling with past HR straps, this may be the golden ticket from what I’ve seen. I’ve never seen any issues (spikes/dropouts/whatever) past the first couple of minutes with the HRM-Run and running with it the past 30-40 days.
Lastly, it should be noted that at this time Garmin has selected to make the transmission of the Running Dynamics data ‘private’, rather than open ANT+. This means that other companies can’t leverage this data real-time from the HRM-Run to the FR620. However, they can still read the data once the .FIT file is downloaded after the activity (that portion is open).
It should thus be pointed out that it’s a bit hypocritical for Garmin to keep this private-ANT rather than ANT+, especially since they own ANT+ (Dynastream technically), and the sheer success of ANT+ (and to a large extent, Garmin fitness devices – especially cycling) can be owed to the openness of ANT+ amongst member organizations and the willingness of those organizations to produce devices that are compliant with Garmin units (i.e. power meters).
Ironically, if Garmin were to open this up, it’d actually compliment other metrics that other companies are working on – potentially allowing for even greater metrics across the board. For example, the Scribe running kinematics pod I talked about last week.
The Garmin FR620 introduced four new features: VO2Max (to predict/determine your VO2Max), Recovery Check (to tell you the current state of recovery), and Race Predictor (to tell you how fast you can run your next race).
First we’ll start with VO2Max. Your VO2Max is a number that defines your body’s maximum ability to transport and utilize oxygen during exercise. Many consider it a way to identify elite athletes, though there’s certainly cases where elite marathoners may not have the highest VO2Max numbers and can still do well focusing on other areas (i.e. running efficiency).
Still, this number is nonetheless ‘interesting’. Though unfortunately, there’s very little you can do to change it beyond initial fitness. It’s more genetic than trained, and beyond a standard baseline level of fitness you won’t see dramatic (or even major) shifts in your individual VO2Max number. Most people get this number by performing a standard VO2Max test that lasts about 10-15 minutes on a treadmill. You can read about one of my past tests here.
The FR620 attempts to predict this number when using a heart rate strap by leveraging algorithms from FirstBeat Technologies. These algorithms can get you in the ballpark of your VO2Max, and do so in a way that’s much less painful than a VO2Max test (which hurts a lot).
After 10 minutes of running, the unit will calculate a VO2Max value, however, the entire run is considered for the final VO2Max number presented at the end of the run. Upon completion of the run the watch will display it to you:
You can go back and check your current value on the watch at any time from the menu:
This data is then tracked on a chart within Garmin Connect:
You’ll likely see slight variations in this day to day because of a lot of factors that the FR620 doesn’t know about (such as fatigue or sleep). Further, the type of workout you do may impact this number. For example, I have a rather difficult workout coming up on Tuesday and I’m interested to see if it shifts the number a bit (as my other recent workouts were more focused on length rather than aerobic pain).
In my case, the highest number the device has reported is 57, which is a bit below my actual measured VO2Max of 63.6 Though, that measurement was a few years ago – and things certainly may have changed.
So what good is the VO2Max data? Well, that data is directly turned around to give you predicted race times. These times are based on a simple lookup table against your VO2Max and age/gender. Meaning that it doesn’t take into account whether or not you’ve actually run 18-20mi before that 26.2 mile marathon – it just looks at your aerobic capacity. It also doesn’t take into account the realities of race day (i.e. hydration, nutrition, brain-farting, etc…).
Still, it’s somewhat interesting. In my case, it gives me the following estimations:
Which, is actually pretty much in-line for my current marathon PR at 2:54. And for that matter, the rest of my times are within 30s of my actual PR’s. However, that’s merely speaking to potential. In my case, I know I could have run faster that day (marathon). By the same token, I’m sure I was in better marathon shape that day than today.
Still, it gives you a ballpark, and in my case the greater ballpark is still somewhat accurate.
Next we look at two inter-related features: Recovery Check and Recovery Advisor.
Recovery Check is designed to assess your recovery level after the first 6 minutes of the run, and it’ll display a message to you shortly thereafter:
Whereas Recovery Advisor is a post-run message that tells you how long you should wait before attempting another hard run workout.
Further, the watch then counts this down and you can always access the current ‘clock’ to see where you stand:
The goal here with Recovery Advisor being to reduce injuries. Many runners (both new and not-so-new) tend to incorrectly schedule workouts to not give enough rest between hard running workouts. This in turn leads to injury – especially following long runs and the like.
Treadmill Running & Internal Accelerometer:
The Garmin FR620 includes an internal accelerometer (in the watch) which enables the unit to measure both pace and cadence without the need for an external footpod (as most watches previously required).
This internal accelerometer is automatically configured while running outdoors with the GPS enabled (there’s no additional manual configuration). My ability to test this particular feature has been somewhat limited, as only the final firmware enabled my unit the ability to record this data (as opposed to just viewing it). That said, one of the easiest ways to test this is by simply running it through a straight forward pyramid test on a treadmill after a run outdoors (to get the unit calibrated via GPS).
For this test I did a very straight forward treadmill test after completing a short warm-up. The recorded test includes the following:
1 Minute @ 12KPH (it took about 15-20s for the treadmill to get to full speed)
4 Minutes @ 13KPH (7:26/mi, 4:37/km)
1 Minute @ 14KPH (6:45/mi, 4:17/km)
1 Minute @ 15KPH (6:26/mi, 4:03/km)
1 Minute @ 16KPH (6:02/mi, 3:45/km)
1 Minute @ 17KPH (5:41/mi, 3:32/km)
1 Minute @ 18KPH (5:22/mi, 3:20/km)
1 Minute @ 15KPH (6:26/mi, 4:03/km)
2 Minutes @ 10KPH with letting treadmill stop last 10 seconds. (9:30/mi, 6:00/km)
After that first minute, the following 4-minutes at 13KPH provided a nice steady chunk of graph to look at. Further, that pace is just a nice average running speed for me – similar to a long-run pace. And, looking at the graph and paces in that section, it did exactly that. The paces there were within 3-5s/mile – perfectly suitable.
Then, I would increase the pace by 1KPH (metric treadmill) each minute. In theory this would provide a very clear step-ladder of sorts of paces. Here’s what it actually showed: Not much of anything.
In fact, it actually reported me going slower. Now, what’s really interesting here is that you can very clearly see my cadence increasing on the cadence graphs – incredibly clear step-ladder there:
As you see above, once I hit the 5-minute marker, and each minute thereafter my cadence naturally increases (this is common/normal as you speed up). But the pace accuracy drops outs. And, if you were to look at the final two minutes where I was at 10KPH (9:30/mile), the unit actually has me closer to 8:30/mile.
Now, what’s interesting here is that I saw this same sort of trend with the TomTom watch and its internal accelerometer. It was quite good at tracking paces right around my normal running range (i.e. 7:00-7:45/mile). However, as soon as I dropped below 7:00/mile it fell apart. It’ll be interesting to see data points from other users on this and see what patterns look like.
Now of course do keep in mind that calibration of treadmills across gyms and fitness centers is horribly bad (really, it’s rather ugly actually). So that could impact individual tests. However, in my case, we’re talking nearly 2:00 min/mile difference, and the fact that as I came closer to 5:00/mile in pace, it was actually reporting I was getting even slower than my baseline pace. I assure you, my little heart begs to differ.
I suspect what’s happening is some portion of my arm swing changes at these higher speeds and thus throws off the pace metrics. However interestingly, the cadence metrics (coming from the HRM-Run at this point) actually tracked quite well with a footpod I had streaming cadence to another device. Here’s the two right on top of each other:
You see a bit more noise in the footpod data, which is interesting in that it shows just how clean the HRM-Run data is for cadence.
If the accuracy of the internal accelerometer for pace though isn’t good enough for you, you can always pair any ANT+ enabled footpod to the unit. For example, one like the below:
You’ll dive into the sensor area and then pair the footpod:
Once that’s done you can go ahead and specify the calibration factor if you know it:
At that point you’re pretty much good to go. Likely when in indoors mode you’ll want to switch off GPS, which is again just a quick tap of the top GPS icon to set it to off. At this point it’ll provide pace, distance and cadence while indoors.
Workout Creation & Training Plans:
The FR620 supports the ability to create manual workouts that you’ll follow on your device and be prompted for each step of the workout. These workouts can have a variety of targets (such as pace, cadence, heart rate and speed), and can have preset durations such as time, distance or just simply pressing the lap button.
The workouts are created on Garmin Connect and then transferred to the device via Bluetooth or USB.
Below, you can see my creating one of my workouts. You can create a multiple of steps, and include embedded repeating steps (such as Work + Rest intervals). The Garmin Connect workout builder is pretty much the easiest and most complete interval builder out there. Incredibly simple to use.
Once you’re done with the workout, you’ll see all the steps listed.
Upon completion you can go ahead and send it to your device via USB or Bluetooth Smart (by pulling it from the Garmin Connect Mobile app):
Additionally, you can also add it to your Training Calendar. The Training Calendar on the device will then automatically show you your scheduled workouts on the day it’s scheduled.
On the unit these workouts will show up after tapping the little Trophy in the middle of the screen and going into the workouts area:
You can preview the steps for each workout as well there:
Garmin Connect also includes training plans for a variety of different goals (5K to Marathon) and sports (Bike/Run/Tri), as well as levels.
Each Training Plan has specific workouts in them which are automatically added to your calendar after you’ve clicked the ‘Schedule’ button. You can easily remove all workouts as well and change plans. The scheduler will allow you to specify either a start or finish date (i.e. race day) and all of the workouts then align to that date.
Here you can see the calendar view:
Finally, on your unit these will show up in your Training Calendar view right next to workouts, after tapping the little trophy:
Structured workouts like those included in the training plans (and via the workout builder) will walk you through each step of the workout, automatically counting down the time allocated for each step and letting you know what the goal is for each step:
If you exceed a threshold, it’ll alert you immediately, like the below. Though strangely, it doesn’t actually tell you whether you were high or low – just simply that you were out of bounds for that portion of the workout. (To clarify: It always shows you the view above, but when the pop-up alert happens as seen below, it doesn’t say “High/Low” there).
Lastly, you can cancel a workout at any time by just simply tapping the three lines on the right side and hitting cancel.
Cycling Functionality:
The Garmin FR620 does not contain a cycling function/mode, nor any way to connect to speed/cadence sensors while cycling. Which differs from the FR610 that both had a cycling mode as well as had the ability to connect to ANT+ speed/cadence sensors.
It does however contain the ability to switch the display metric from pace (usually displayed as minutes/mile or minutes/kilometer) to speed (i.e. MPH/KPH). You can do this via the the Settings > Activity Settings > Data Screens menu, and then within one of your data pages you can select the data field you want to change and change it to Speed.
At this point the unit will display speed (MPH or KPH depending on your preferences) as one of the data fields.
You can also just swap things over to show speed across the board:
The only challenge with this particular workaround though is that by default the workout will still be uploaded to Garmin Connect as a ‘Run’, rather than a ‘Bike’ workout, which means that it’ll incorrectly trigger both PR’s on the unit (i.e. fastest 5KM) as well as incorrectly triggering those on Garmin Connect. You can clear these on the unit itself by going into the PR section and manually removing them.
And on the Garmin Connect side you can go ahead and modify the workout type to be ‘Cycling’ which will then address the issue there.
(Update: Garmin has confirmed that in ‘Spring 2014’, the unit will receive a firmware update that enables a cycling mode with support for the ANT+ Speed/Cadence sensor. Remember that ‘spring’ does technically go well into June.)
Navigation Functionality:
Like the FR610, the FR620 does not contain any form of navigational/course routing. However, unlike the FR610, it doesn’t contain any ‘back to start’ type functionality that the FR610 had around getting back to the start of you run by providing basic compass style directional navigation. The FR610 also provided current GPS coordinates, which the FR620 doesn’t provide. Finally, it provided saved locations. Which also isn’t available on the FR620.
Garmin has stated that they may look to add back some of these features in a future software update, but that they aren’t going to be available for launch.
For users that need these functions, the better choice would be the Fenix/Tactix watch form-factor lineup, rather than the running-specific watches. The Fenix watches focus on navigation, running, and exceedingly long battery life (upwards of 55 hours). They do lack however areas such as training plans, interval, and workout functions. Though, they do contain a cycling mode with full support for ANT+ speed/cadence sensors. Alternatively, the Suunto Ambit 2/2s are good choices in the navigation department, though lack the same training plans and workout functions (and kinda-sorta-barely has an interval function). But, the Ambit 2/2s do make for much better triathlon watches than the FR220/FR620.
Use as a day to day watch, backlight:
(The FR220 at left, the FR620 at right)
The FR620 can hang out in non-GPS mode for 6 weeks, acting as a standard day to day watch. In this mode the screen is automatically locked, and unlike the FR610 simply having your shirt brush the touch screen won’t switch it back into GPS mode.
Instead, you’ll need to tap one of buttons and then you’ll have to touch the touchscreen center unlock button:
From an alarms standpoint you can create a single daily alarm. You are not able to configure it for specific days of the week and/or additional alarms:
In time mode, you can actually configure the background to be black (with white text), or white (with black text). The time will be automatically pulled from GPS, unless you use the manual mode to set it manually.
Finally, the unit has backlight which can be configured to turn on for a specified time, or configured to stay on at all times. For me running in the dark I just turn it on at the start of the run and utilize the ‘Stays On’ option so it’s always there for quick and easy glancing:
Additionally, you can also set the unit to automatically illuminate if/when you either press a button or if any alerts appear (i.e. lap notifications, pacing alerts, workout alerts, etc…)
ANT+ Weight Scale Connectivity:
While the majority of Garmin fitness devices used to support connecting to a small number of ANT+ enabled weight and body fat scales, the FR620 no longer continues that tradition. Based on my discussions with the product team, there are no current plans to enable that functionality on the FR620 (or, the FR220). That said, they noted they will continue to listen to consumer feedback on the issue.
I suspect the primary reason for this is simply the number of users using those weight scales today (unfortunately barely a rounding error on a tenth of a percent at best). Added to that the fact that most of the WiFi scales today far exceed the functionality provided by the ANT+ scales.
Of course, that doesn’t help users of past Garmin devices that have purchased those ANT+ scales solely for the purpose of connecting them to Garmin devices (the only company that truly ever lit up that scenario via ANT+ ). Given it would be Garmin’s goal to convert those users into FR620/FR220 users, I would think that it might benefit them to as a gesture of goodwill to look at an update down the road to connect to the scale (it’s just a firmware change).
As a side effect, this pretty much kills any ANT+ scales going forward. Which, shouldn’t really be a major surprise. Even Bluetooth scales aren’t really a great solution. Neither protocol really fits the bill for scales compared to WiFi, especially since virtually nobody would travel with their scale – meaning that it’s always going to be hanging out in a single place with easy WiFi access.
Waterproofing:
The Garmin FR620 is fully waterproofed to 50 meters (150ft). And, unlike most past Garmin running specific watches (usually minimal IPX7 waterproofing), the FR620 is more than fine on your wrist while swimming (though it won’t capture any metrics).
In my testing with the unit in various water-filled situations such as brief swimming bouts, running long runs in the rain, and showers, I’ve seen no issues. With the similar body designed FR220 I’ve spent even more time in the water, doing openwater swims in salt water as well (for up to two hours in the water), without any issues.
Going forward into December I’ll be bringing both the FR220 and the FR620 down to 33m (~100ft deep) in an indoor facility designed for exactly this sort of thing, to test out the waterproofing myself. Should be fun!
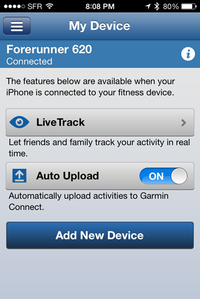
Live Tracking & Mobile Phone Upload Functionality:
The Garmin FR620 includes the ability to connect via Bluetooth Smart to your mobile phone to upload workouts immediately upon completion, as well as to provide streaming live tracking of your run to family and friends. You can share out the link automatically via e-mail or social networking sites like Twitter and Facebook. This of course does require your phone be present with you the entire run for live tracking during the run.
We first saw this technology in the Garmin Edge 510 and Edge 810 last January. In that case however, the units used older Bluetooth chips which meant compatibility with older phones. With Bluetooth Smart being used here in the FR620, you’ll need an iPhone 4s or newer in order to take advantage of the uploads and connectivity. At this time, Android is not supported. Again, Android is not supported today. This is largely because the Android Bluetooth Smart story/support has been a complete cluster until recently (notably, Android OS version 4.3). Thus, it’s really only been the last couple of months that we’ve see that hit handsets, and even now for example, Samsung users in the US on AT&T only got it last week. Remember that Bluetooth Smart is a subset of Bluetooth 4.0. So it’s not only a case of ensuring your phone physically contains a Bluetooth 4.0 chipset, but also that the handset is running Android 4.3. And of course, beyond that, getting the app to support it (which, it doesn’t today).
At any rate, Android aside, here’s how it works on the iPhone.
First up is the pairing. Unlike other Bluetooth devices, you won’t be doing this from the Bluetooth Control panel (beyond ensuring Bluetooth is simply enabled on your phone). Instead, you’ll do it from the Garmin Connect Mobile app (download it first, it’s free). Then, once you’ve got that installed and signed into your Garmin Connect app, you’ll start the wizard:
Meanwhile, on the phone you’ll go into the Bluetooth settings to get that all enabled and paired:
Once you’ve got those two pieces completed, you’ve got a few options. The primary use here is really on the Live Tracking side, which the FR620 does as long as your phone is within Bluetooth range of your FR620. In this mode you’ll create a Live Tracking session for your run. This can be named anything you’d like, or, if you leave it as the default it’ll just autogenerate a name based on the date.
Next, you’ll setup who you want to invite. In my case, I’ve configured it to always send a notification to my Coach, my wife, and myself (just for the heck of it). This is sent via e-mail and gives a link that they can click on (more on that in a second). Additionally, you can configure notifications to Facebook and Twitter. You’ll see an option to extend sharing. I always set this. This means that upon completion of the activity your friends/family will still be able to see that you’ve finished for up to 24 hours. Otherwise, it’ll kill the session as soon you press Stop/Save.
Once that’s all ready to go, you’ll go ahead and start the live tracking session. Note that you need not start it at the same time as pressing the watch start button. This allows you to start it on your phone, and then stash your phone away (armband, CamelBak, Spibelt, etc…). Think of this like starting your car. It doesn’t actually go and drive anywhere until you put it in ‘drive’ (in this case, pressing start on the FR620 for your activity).
Once you’ve started, you’ll see two little icons at the top indicating that Bluetooth is connected.
Meanwhile, your friends and family will receive an e-mail with tracking information:
When they click on said link, they’ll be brought to a simple tracking page:
This page also works just as well from a mobile device as well (screenshot courtesy my coach):
The page can be switched between MPH/KPH and Pace, as well as through the different formats such as kilometers or statute.
The live tracking updates every 30 or 60 seconds (I’ve seen both), and will graph your ANT+ data as well, including heart rate, cadence, and if you have the HRM-Run, that information too (vertical oscillation for example, added in the last few days). If you hover over any of the sections on the graphs you’ll get stats about that particular data point.
Additionally, you can swap between standard maps and satellite maps.
Along the way it’ll plot markers every mile. It doesn’t show any lap information you’ve set however, it just beats to its own drum:
Overall, the tracking seems to be working quite well. I’ve been tracking my wife’s runs, and my coach has been tracking all my runs the last 7-10 days or so without issue.
Upon completion of the activity a banner will display that the user has completed the run:
And, upon completion the activity will be uploaded to Garmin Connect via the Bluetooth Connection on the phone. This is accomplished when the ‘Auto Upload’ option is enabled. Note that it first uploads from the device to the phone, and then from the phone to Garmin Connect. Below, you see it uploading first from the FR620 to the phone. Then, once that’s complete (takes about 30 seconds), you’ll see a little ‘Up’ arrow icon, which then indicates it’ll move over to Garmin Connect online.
Now, I have noticed a few oddities/bugs with the app in my testing.
– I can’t get it to Tweet out my run for Live Tracking, no matter how hard I try. It says it’s going to, but it never does. In poking around Twitter, it appears other peoples are working fine, so perhaps it’s just me. I’ve tried deleting the app, deleting my Twitter account of the phone, and everything in between. Multiple times over. No love.Update: I got this fixed. It turned out I had to revoke the App from the Twitter.com Settings page (not my phone), and then re-set everything. Good to go there!
– I’m getting intermittent failures on the run actually uploading to Garmin Connect (post-run, live tracking is fine/separate). I’m reasonably sure this was working just fine the first few days, but now it seems to be failing to upload the workouts. Update: Now, this seems to be working just fine for me again as of Nov 19th, 2013.
– Added: Calibration of footpod: In my testing, I had calibration values shown when I used the footpod. However, in recent builds, it doesn’t seem to be updating the calibration value from outdoor GPS runs. Thus you have to manually calibrate (a pain, involves math, kinda stupid). If you use the footpod in the current firmware with GPS, you’ll get inaccurate data because the footpod will be set for 1000 (likely incorrect for you), and will override GPS.
Note: For Android support, according to this post from Garmin’s product support team, they are targeting “Q1 2014” (i.e. Jan-March 2014). As expected, it’ll require a Bluetooth 4.0 capable handset, along with Android Jelly Bean 4.3 OS installed on it.
WiFi Connectivity Functionality:
The FR620 is the first Garmin Fitness unit to include the ability to transmit data via standard WiFi connections. This allows you to upload completed activities, firmware updates, as well as download training plans and custom workouts.
In order to get everything cooking you’ll need to download the Garmin Express Fit app, which is how you configure your WiFi networks.
Once that’s completed and you’ve got your FR620 connected via USB, you can open the application to get started:
It’ll then have you sign-in to Garmin Connect to connect the watch to your account. Once that’s complete it’ll bring you here, ready to set things up, clicking ‘Yes’ would be the proper answer for a successful journey:
Next, you’ll be able to start adding WiFi networks:
You can see them listed out, or you can manually type one in:
Here’s what it looks like once you’ve added a few in:
After clicking OK, a few seconds later the unit will get the settings transmitted to it via USB.
It should be noted that you can also click the little dropdown box to access a setting to automatically clear transferred workouts from the device. I personally don’t do this. The device has approx 4MB of memory (aka 4,000KB). Each 1hr of workout is approximately 100KB, thus, you have 40 hours of workout time on the device. I like to grab those raw FIT files before they disappear. So I’d rather just clean them out manually later.
Next, go out and do a workout. When you return and finish the workout you’ll notice two little icons at the top of the screen:
These icons indicate the unit is uploading wirelessly. Note that WiFi isn’t enabled 24×7, only shortly after the workload completes. This is to prevent battery drain.
If you miss that ‘window’, you can simply tap the connect button on the unit itself (it’s the lower right button), which will then trigger connecting to WiFi to upload workouts and transfer data:
I found that the upload process doesn’t seem quite as fast as I would have expected – about a minute. But that’s fine. If you just do it when you first walk in the door it’s more than completed by time you get to your computer.
Computer (USB) Upload Functionality:
In addition to WiFi and Bluetooth Smart uploads (as discussed in previous sections), you can also just simply plug in the Garmin FR620 and upload the data manually (or, send the data to 3rd party sites).
The unit enumerates as a standard USB mass storage device – just like a USB thumb drive. This is ideal as it requires no special drivers, and works on practically any device in the world. The workouts all hang out in the ‘Activity’ folder.
Once you’ve got it plugged in you’ll go ahead and crack open Garmin Connect and then click on the ‘Upload’ button, which brings you to the below page. From there just click to ‘Upload all new activities’.
The upload process only takes a few seconds and then shows you which runs you’ve uploaded to click on.
At which point, your activities are online and ready to analyze. Simple tap the ‘View details’ link, which will conveniently move you into the next section.
Garmin Connect Online:
After you’ve completed uploading the data to Garmin Connect, you’ll be able to pull up the activity and drill into details. This includes maps, charts, and summary information.
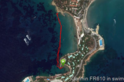
By default you’ll start off at this page, within the ‘Details’ tab of the activity analysis section. Here you’ll see a full overview of your activity with maps that can be customized to use Bing, Google, and OpenStreetMap as providers, and then the satellite or standard map views depending on the locale and provider:
As you work your way down the page you’ll see the summary metrics along the left side. While on the right side you’ll get pods for each of the different metrics the FR620 recorded during the run. These metrics will vary slightly based on what ANT+ accessories you may have paired (such as the HRM-Run ANT+ strap, a regular ANT+ HR strap, or an ANT+ footpod).
You’ll see above that I have laps created every mile. This was because I had Auto Lap on, which I typically enable for long runs. For interval runs I generally control that manually and press lap as I iterate through each of my workout sections. In either scenario though, the laps show up here.
As I dive further down I get to the FR620 HRM-Run specific features, such as Vertical Oscillation and Ground Contact Time. On the left side you’ll see weather which is pulled from a local weather station after the fact via a data provider (it’s not from the unit itself). Also, you’ll notice that elevation correction is automatically enabled since the FR620 doesn’t include a barometric altimeter.
Beyond the detail page seen above, there’s also a laps page, which you can dive into more detail about each of the various laps that you’ve triggered:
And the last section being the ‘Player’ view, which allows you to replay back your run and see performance metrics such as pace and cadence at any point along the route.
If you’d like to poke around at one of my recent FR620 runs, you can use this Garmin Connect link here to do so.
3rd Party Site Compatibility:
The Garmin FR620 outputs files in the standard .FIT file format. This means that it’s fully compatible with just about any 3rd party site you’d want to use. Said differently, if your 3rd party site doesn’t accept .FIT files, it’s probably not worth using.
The better/more interesting news here is that the additional Running Dynamics data that’s added to the .FIT file doesn’t ‘break’ any 3rd party sites I tried. Those 3rd party sites haven’t yet been updated to read that data, but they don’t choke on it either. I’ve successfully uploaded to: Training Peaks, Strava, and Sport Tracks.
One item I will point out that’s fairly annoying is that Garmin has decided to produce the .FIT files with a completely useless name. Previously they had the date and timestamp on the name of each file, making it easy to figure out what was what.
Now, it’s just garbage. This is the same as the FR220, annoyingly.
Firmware Updating:
Like most units, the FR620 supports updates to the firmware over time as Garmin releases new bug fixes or additions to functionality.
The FR620 is however the first Garmin unit to be able to handle these updates over WiFi, as well as traditional USB. Further, it along with the FR220 also can receive the updates via Bluetooth Smart from your phone. During a discussion I had with them a month ago, Garmin noted that they really wanted to move towards a platform like the phone where updates are more visible, rather than the existing Garmin Connect system where you really have to know an update is available and go out of your way to apply it.
As you can see above, once an update is available it’ll show up on your unit when you switch into run mode. At which point you’ll have three options.
First, you can simply install it right then and there. Takes only a couple minutes and all your settings are saved.
The second option (seen below), is to defer the update until you’re ready. You might want to do this if you’re just about to head out on a run (Tip of the day: Never update anything – watch, nutrition clothes, etc… – the day before race). The unit will re-prompt you the next time you switch into run mode.
The third option is to simply dismiss the update, which tells it to not bother you again.
Once you’re in a good position to update, just press ‘Install Now’ and the update progress bar will show you how much of the installation has been completed.
Looking at historical firmware updates for Garmin devices, you tend to see more updates just after release, than a year or two down the road. Further, you don’t tend to see massive new feature sets (like an iPhone), but rather, smaller adds.
In the case of the FR620, they’ve previously talked about the potential to bring back things like the FR610 cycling mode – so I suspect we may see that as a good example of a firmware update. Also, you tend to see more functionality adds in the higher end products such as the FR620, than you do in the lower-end products like the FR220.
Bugs and Miscellaneous:
In recent reviews I’ve been adding a bugs section to cover things that I stumbled upon. Because I’ve had the watch for a bit now, I’m really only focusing on bugs that I’ve seen on the final firmware. Remember a ‘bug’ is different than ‘by design’. For example, the lack of a feature is something I highlight within a given section is considered ‘by design’, whereas something not really working right is listed below.
– The internal accelerometer pace data while on a treadmill seems suspect at faster than your norm paces, and slower than your norm paces.
– I’m having some issues with the Garmin Connect mobile app. It’s unclear how many of these are specific to me, or widespread.
– The pace alerts (high/low alerts) seem overly sensitive to trigger, though I need to re-validate this after the Saturday firmware update (no release notes) – [Update: Nov 6th – This appears to be fixed for me in the 2.30 FW release.]
– The PR’s don’t appear to take into account existing Garmin Connect PR’s, rather, are only device specific.
Now, this doesn’t mean this is all the bugs out there. This is just the ones I saw during my running and/or use. As a single person I can’t possible test every possible feature in every possible combination to reproduce every possible scenario. Sure, I’d love to – but companies have entire teams of testers and they still miss things. So I do the best I can to note what I’ve seen above.
Pros and Cons:
While there’s a lot of text here that covers a lot of fairly important details, here’s the super-duper slimmed down version of that:
Pros:
– GPS accuracy seems to be quite good, unit finds satellites very quickly with pre-caching
– Incredibly lightweight for a GPS watch (or any unit)
– Waterproof to 50m (finally!)
– WiFi uploads are awesome, with Bluetooth a good substitute when required
Cons:
– Not convinced the treadmill (internal accelerometer) paces are accurate at all pace ranges
– No cycling, navigation, weight scale functionality
– Some people dislike the color choices offered
Comparison Tables:
Before we wrap things up I’ve put together the comparison charts of all the features of the FR620, compared to the older FR210 and FR610 – as well as the new FR220. You can of course create your own comparison tables using this link with any of the products I’ve previously reviewed.
The tables are updated dynamically and thus if/when things change that’s represented automatically in this section.
Final Thoughts:
Overall I’m quite happy with the FR620, and it’ll quickly become my go-to GPS running watch (I’ve previously always used my FR610 as my GPS running watch). And, The Girl has also laid claim to a unit for her as well (she’s been using it as well). Though, she wants a purple one, just like the purple FR220. I love the WiFi upload functionality, and am looking forward to the integrated live tracking once the app is updated/released. The only challenge with the WiFi upload functionality is that I still need to plug in the FR620 to get the raw .FIT file up to TrainingPeaks (3rd party site).
The Running Dynamics pieces with the HRM-Run are ‘interesting’ right now to look at. I’m not sure what training decisions can be made based on them, but in the meantime it’s fascinating to start making correlations. More importantly however is that Garmin has finally made a heart rate strap that actually works without spikes or dropouts. Heck, that in and of itself is worthwhile.
There are some downsides though – the lack of cycling mode will be a problem for some (admittedly, not me). And the loss of the ANT+ weight scale support is also a Debbie Downer for many ANT+ scale owners. Further, lack of any navigational support (such as ‘Back to start’) is sorta odd for a GPS watch. Though again, I suspect use of these features is just very low overall.
For me though, it’s pretty much exactly what I want in a GPS running watch. A well waterproofed unit that just simply works, day in and day out – with little maintenance overhead and full integration with 3rd parties.
Found this review useful? Or just want to save a bundle? Here’s how!
Hopefully you found this review useful. At the end of the day, I’m an athlete just like you looking for the most detail possible on a new purchase – so my review is written from the standpoint of how I used the device. The reviews generally take a lot of hours to put together, so it’s a fair bit of work (and labor of love). As you probably noticed by looking below, I also take time to answer all the questions posted in the comments – and there’s quite a bit of detail in there as well.
I’ve partnered with Clever Training to offer all DC Rainmaker readers exclusive benefits on all products purchased. By joining the Clever Training VIP program you get a bunch of money-saving benefits, which you can read about here. By doing so, you not only support the site (and all the work I do here) – but you also get to enjoy the significant partnership benefits that are just for DC Rainmaker readers. And, since this item is more than $75, you get free 3-day US shipping as well.
Additionally, you can also use Amazon to purchase the unit (all colors shown after clicking through to the left) or accessories (though, no discount). Or, anything else you pickup on Amazon helps support the site as well (socks, laundry detergent, cowbells). If you’re outside the US, I’ve got links to all of the major individual country Amazon stores on the sidebar towards the top.
As you’ve seen throughout the review there are numerous compatible accessories for the unit. I’ve consolidated them all into the below chart, with additional information (full posts) available on some of the accessories to the far right. Also, everything here is verified by me – so if it’s on the list, you’ll know it’ll work. And as you can see, I mix and match accessories based on compatibility – so if a compatible accessory is available at a lower price below, you can grab that instead.
Product
Street Price
Amazon
2013 Recommendations: Running GPS Watches
2014 Summer Recommendations: Running Watches
2014 Winter Recommendations: Running Watches
Garmin 220 Replacement Band (Purple/White, Black/Red) - Compatible with FR220/FR620 $25
Thanks for reading! And as always, feel free to post comments or questions in the comments section below, I’ll be happy to try and answer them as quickly as possible. And lastly, if you felt this review was useful – I always appreciate feedback in the comments below. Thanks!
Finally, I’ve written up a ton of helpful guides around using most of the major fitness devices, which you may find useful in getting started with the devices. These guides are all listed on this page here.
I swim, bike and run. Then, I come here and write about my adventures. It’s as simple as that. Most of the time. If you’re new around these parts, here’s the long version of my story.
You'll support the site, and get ad-free DCR! Plus, you'll be more awesome. Click above for all the details. Oh, and you can sign-up for the newsletter here!
Here’s how to save!
Wanna save some cash and support the site? These companies help support the site! With Backcountry.com or Competitive Cyclist with either the coupon code DCRAINMAKER for first time users saving 15% on applicable products.
You can also pick-up tons of gear at REI via these links, which is a long-time supporter as well:
Alternatively, for everything else on the planet, simply buy your goods from Amazon via the link below and I get a tiny bit back as an Amazon Associate. No cost to you, easy as pie!
You can use the above link for any Amazon country and it (should) automatically redirect to your local Amazon site.
While I don't partner with many companies, there's a few that I love, and support the site. Full details!
Want to compare the features of each product, down to the nitty-gritty? No problem, the product comparison data is constantly updated with new products and new features added to old products!
Wanna create comparison chart graphs just like I do for GPS, heart rate, power meters and more? No problem, here's the platform I use - you can too!
Think my written reviews are deep? You should check out my videos. I take things to a whole new level of interactive depth!
Smart Trainers Buyers Guide: Looking at a smart trainer this winter? I cover all the units to buy (and avoid) for indoor training. The good, the bad, and the ugly.
Check out
my weekly podcast - with DesFit, which is packed with both gadget and non-gadget goodness!
Get all your awesome DC Rainmaker gear here!
FAQ’s
I have built an extensive list of my most frequently asked questions. Below are the most popular.
You probably stumbled upon here looking for a review of a sports gadget. If you’re trying to decide which unit to buy – check out my in-depth reviews section. Some reviews are over 60 pages long when printed out, with hundreds of photos! I aim to leave no stone unturned.
I travel a fair bit, both for work and for fun. Here’s a bunch of random trip reports and daily trip-logs that I’ve put together and posted. I’ve sorted it all by world geography, in an attempt to make it easy to figure out where I’ve been.
The most common question I receive outside of the “what’s the best GPS watch for me” variant, are photography-esq based. So in efforts to combat the amount of emails I need to sort through on a daily basis, I’ve complied this “My Photography Gear” post for your curious minds (including drones & action cams!)! It’s a nice break from the day-to-day sports-tech talk, and I hope you get something out of it!
Many readers stumble into my website in search of information on the latest and greatest sports tech products. But at the end of the day, you might just be wondering “What does Ray use when not testing new products?”. So here is the most up to date list of products I like and fit the bill for me and my training needs best! DC Rainmaker 2024 swim, bike, run, and general gear list. But wait, are you a female and feel like these things might not apply to you? If that’s the case (but certainly not saying my choices aren’t good for women), and you just want to see a different gear junkies “picks”, check out The Girl’s Gear Guide too.