As a general rule, I don’t review things that are bike components (in the traditional bike component aspect). Instead, as you’ve seen to date, I focus on sports technology products. However, the Aero HC was somewhat of an interesting duck – it was part aerobottle (for triathletes), and part bike computer holder. And it’s that bike computer piece that really interested me in trying it out.
With my trip to LA a couple weeks ago, I met up with the Profile Design crew at Panera Bread and got handed off one of their new and almost available Aero HC systems to try out.
Unlike most gadgets, a water bottle system isn’t something that takes a terribly long time to form an opinion of. So in the last couple weeks and a bunch of rides – I’ve got a pretty clear idea of what I like and don’t like. Because I want to be transparent about my reviews, once I finish up with the system (here after clicking publish on this review), I send it back to them in the Long Beach. Simple as that. Sorta like hiking in wilderness trails – leave only footprints.
Lastly, at the end of the day keep in mind I’m just like any other regular triathlete out there. I write these reviews because I’m inherently a curious person with a technology background (my day job), and thus I try and be as complete as I can. But, if I’ve missed something or if you spot something that doesn’t quite jive – just let me know and I’ll be happy to get it all sorted out. Also, because the technology world constantly changes, I try and go back and update these reviews as new features and functionality are added – or if bugs are fixed.
Unboxing:
This may be the fastest and least unboxing ever seen here in an in-depth review. Minimalism has its benefits.
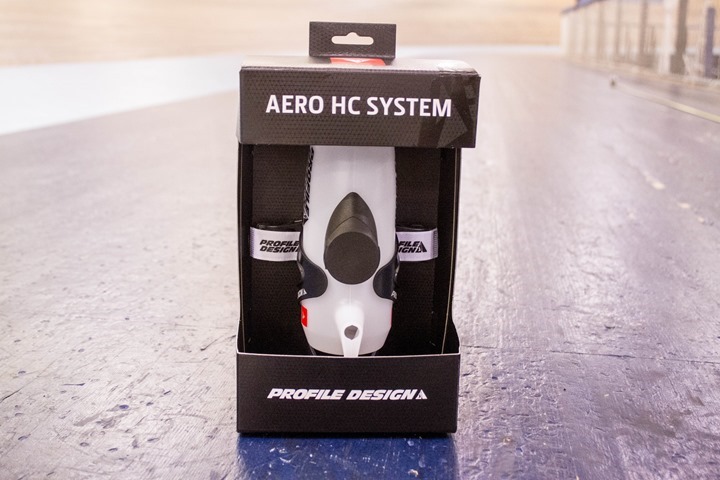
Here’s the box, it’s cleverly designed such that the bottle stands upright using zip ties. I assure you, once you snip these zip ties, it’s impossible to ever make it look so pretty again.
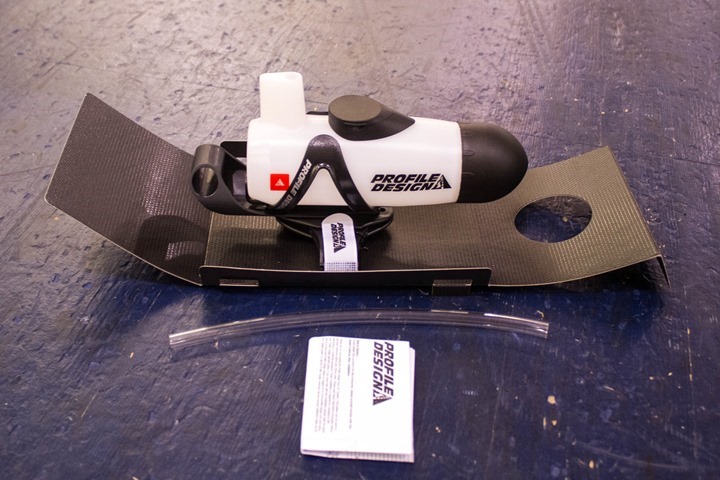
After getting rid of the external shell, you’re left with the below. You’ll see the bottle sits within the holder, and the strap is external to it. There’s also some paper junk. Though honestly, if I needed the paper junk we’d probably have other issues.
With that, our unboxing is complete.
You’ll notice that the unit was actually unboxed at the velodrome (where we did aerodynamic testing). Just happened to work out that way, and way easier than bringing the box back home on a slew of flights.
That said, I did take some component shots later on once back home – just to make things a bit clearer.
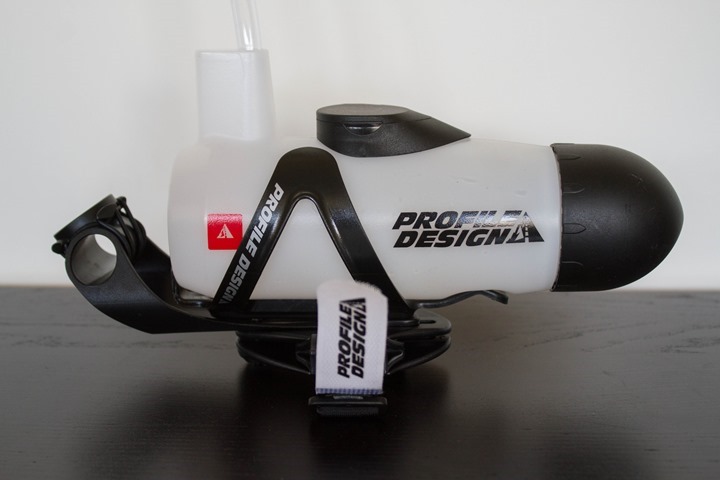
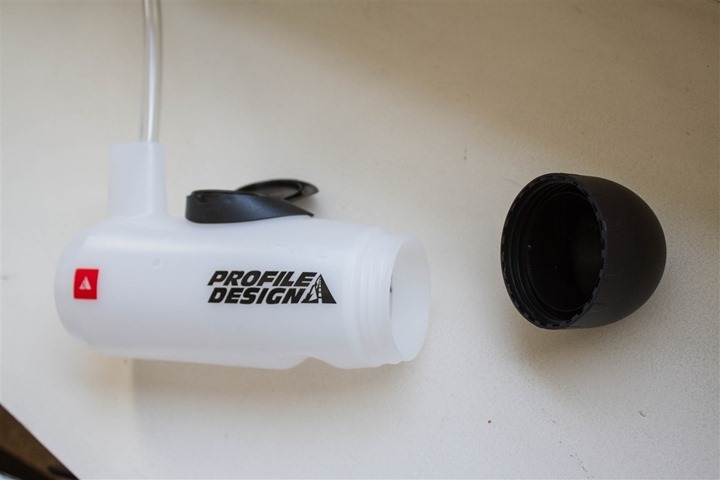
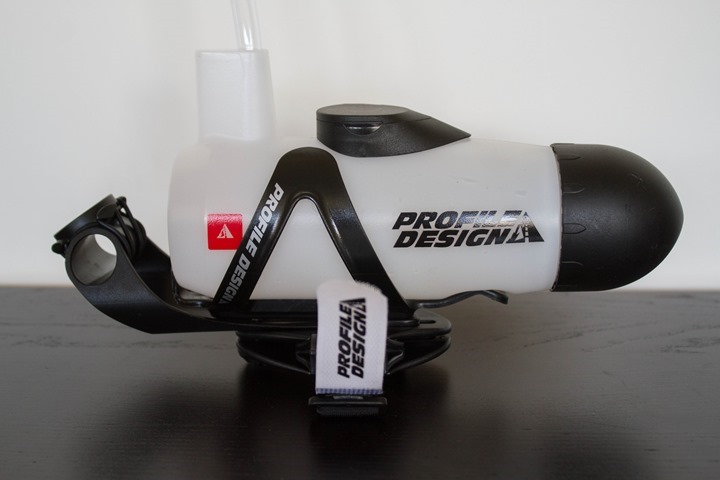
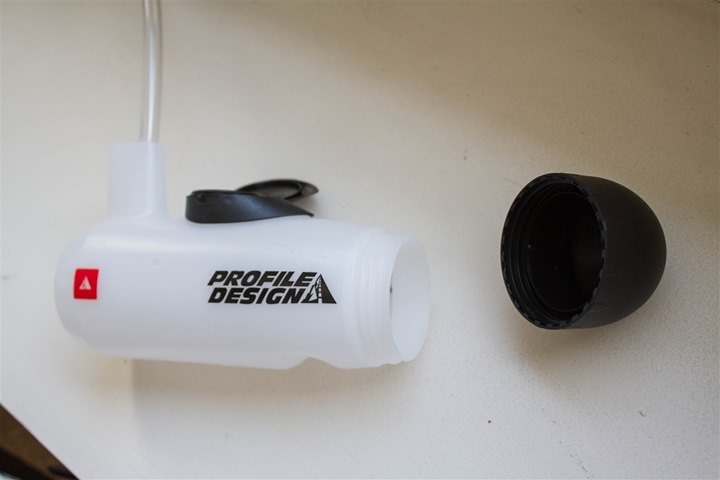
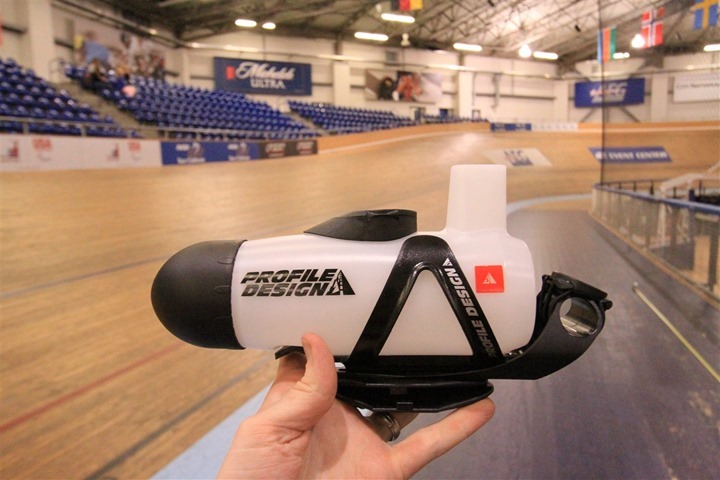
Here’s the bottle itself:
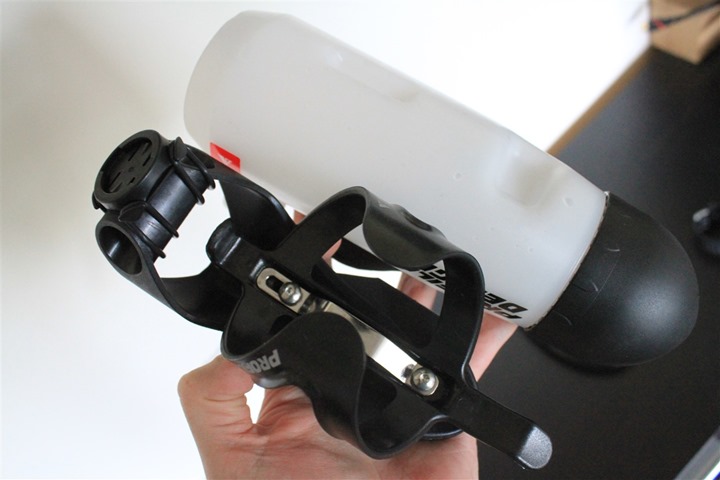
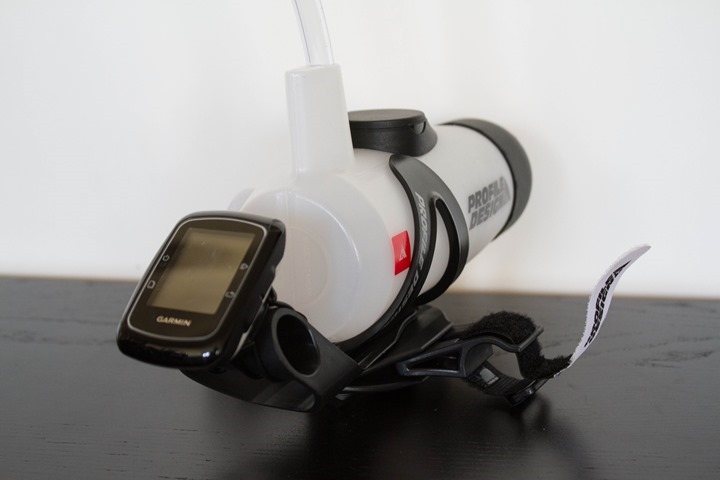
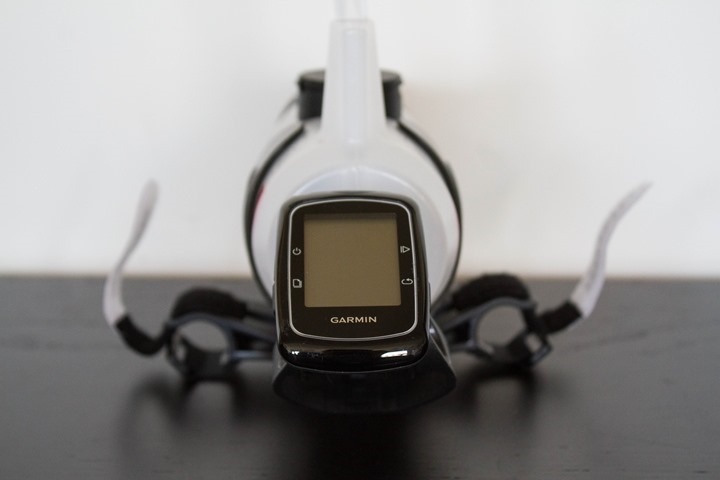
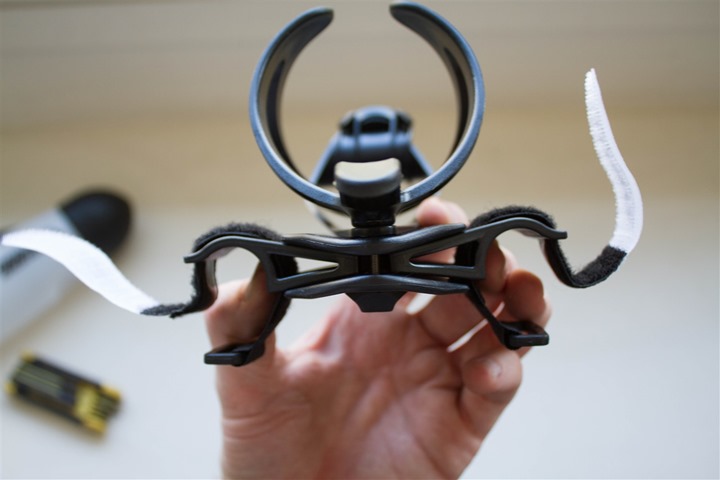
Here’s the bracket system:
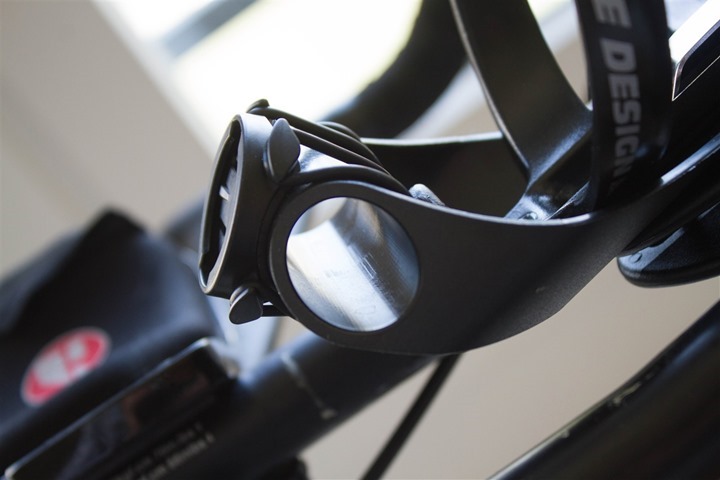
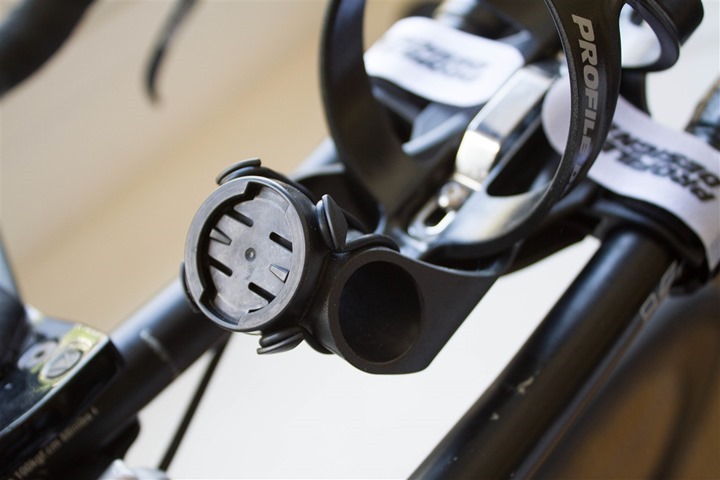
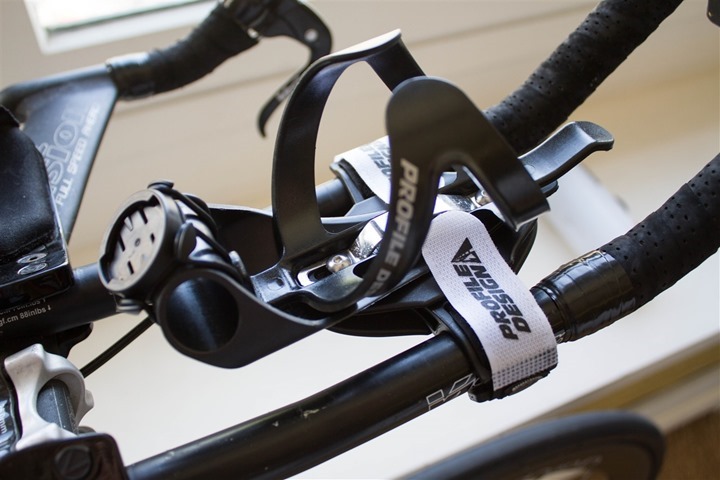
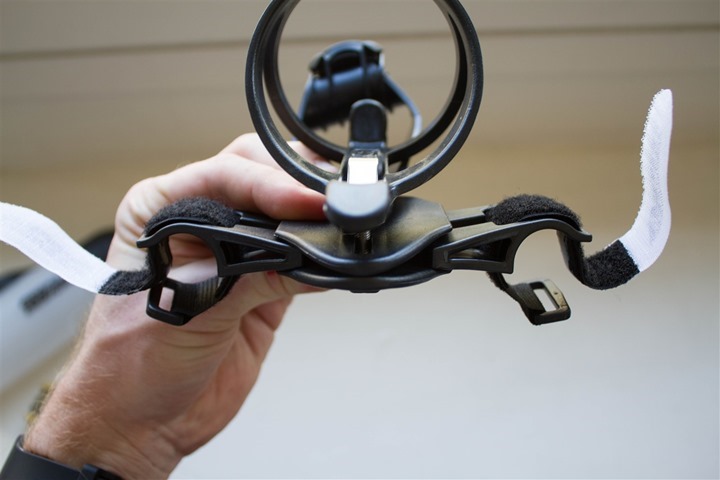
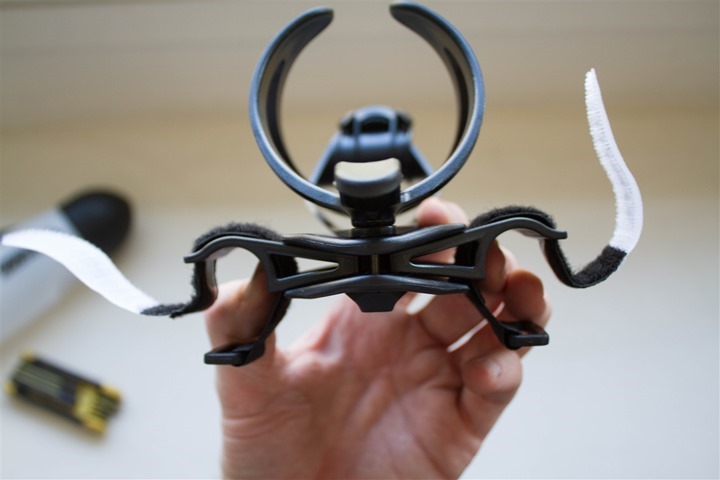
And a closer look at the bike computer mount. Note (PLEASE!) that the Edge quarter-turn mount is something I’ve added on top of it. You’ll have to add your own mount to it.
And finally, the whole thing just sitting there:
With that, let’s get onto installation.
Installation & Configuration to bike:
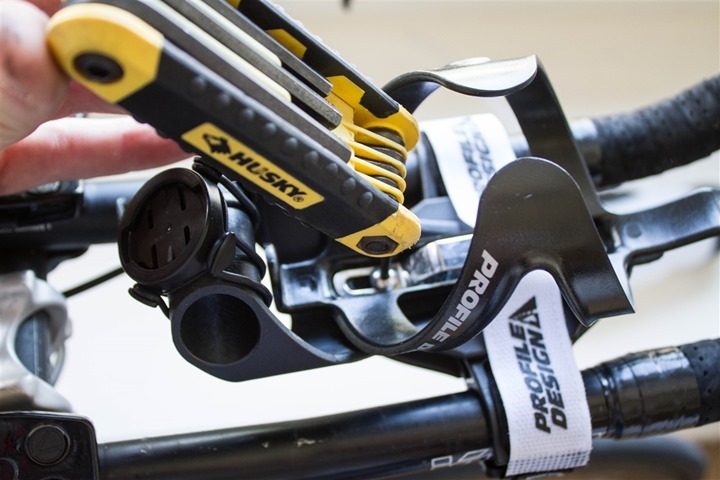
Installing the unit is pretty straight forward. First up, you’ll need a hex wrench. Given you have a bicycle, you likely have a hex wrench.
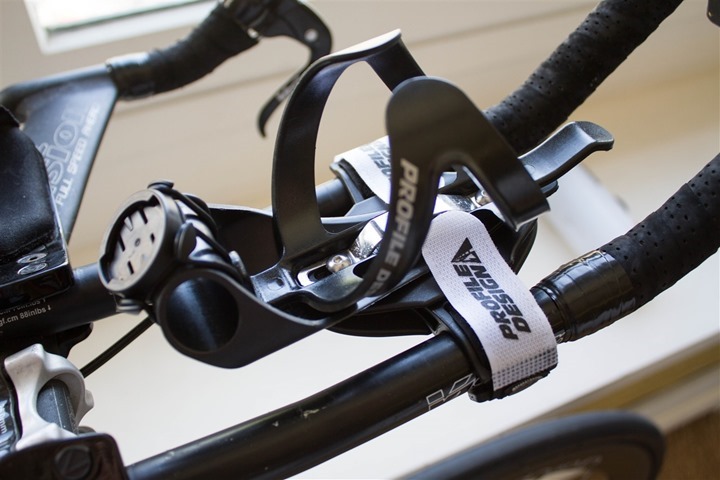
With that, there’s two bolts of note, or rather – two bolts in total. They control two different items. First is the front/back sliding of the computer mount. And second is the width of the wings that clamp onto the bars.
You’ll go ahead and hook the wings onto your aerobars. This is done using simple Velcro on the wings. And this works fairly well:
The challenge I ran into here though was that the wings have a minimum width – and my bars were configured in a more aggressive position (read: tighter together). As such, they didn’t fit at first. This required me/us to increase the width of my aerobars – which ultimately would have an impact on aerodynamics (more on that later).
Here’s the minimum they go:
And the maximum they go:
Once you’ve got the bracket in there, you’ll simply tighten up the two bolts to lock everything in place.
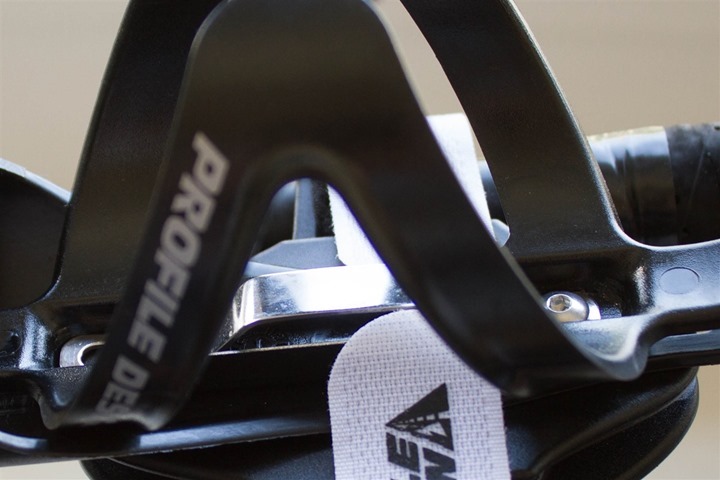
One item worthwhile noting is that you’ll see a small silver strip. This strip pops up into the aerobottle, which has a notch on the underside. This helps to keep the aerobottle sitting upright and straight, versus potentially rotating around. Note however that any water bottle can fit into this slot, as then the little metal piece simply presses up against the bottle helping to keep it in place.
And you can see that bottle cut-out below:
Now that we’ve got everything in place, let’s take a look at usage.
On-Bike Usage and Notes:
Once you’re up and riding, the first thing you’ll likely want to do is drink from the unit. The handy dandy straw is your friend here. As noted above, the straw given to me wasn’t the final production straw – but pretty close. The final production straw will be just a touch more rigid.
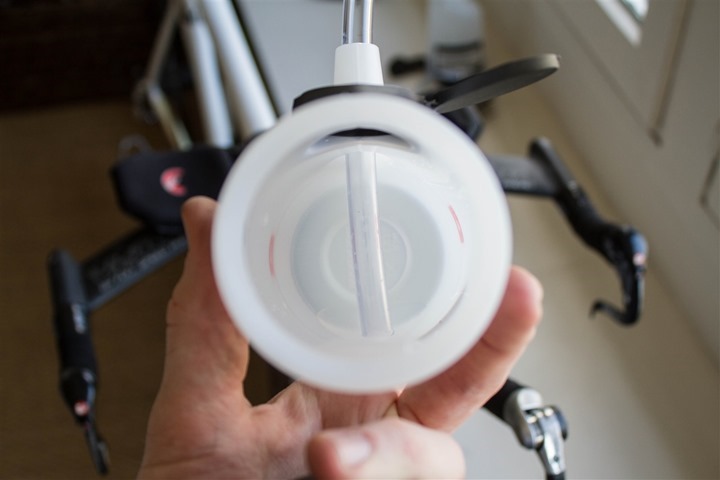
The straw doesn’t bend too much within the bottle, so it just goes down to the base (some straws will bend and lie flat). That’s fine though, I had no issues getting out virtually all of the liquid in the bottle.
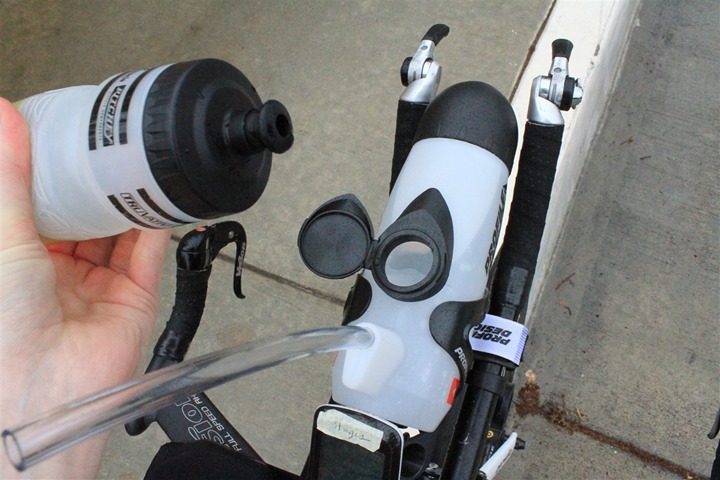
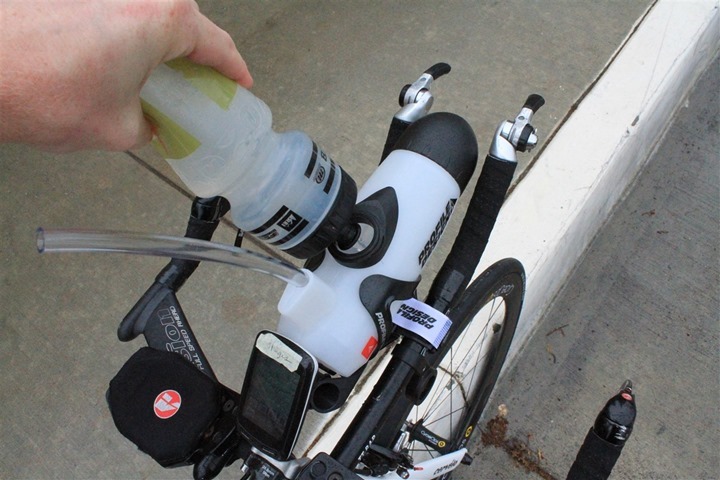
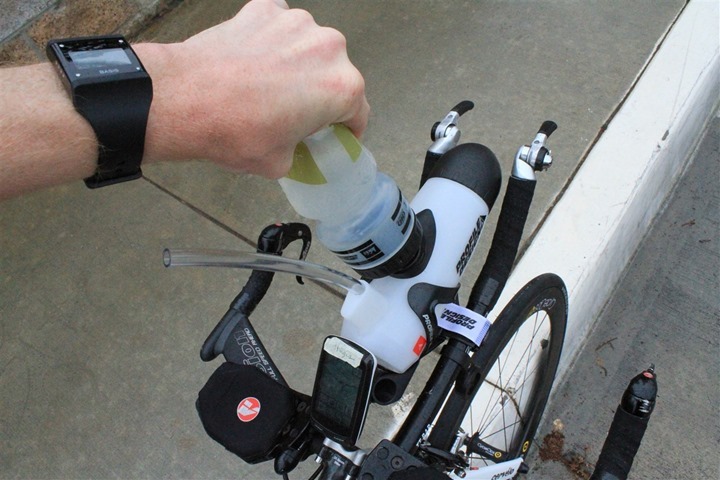
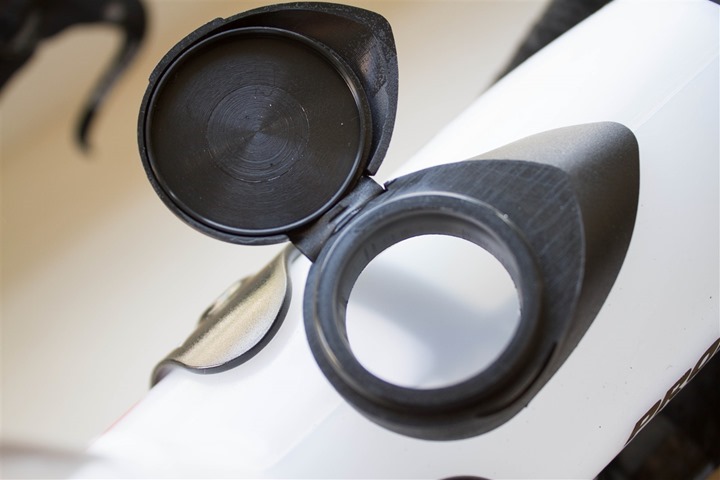
When it comes time to refill the bottle, you simply pop-open the little cap on top and pour it in from your source bottle.
The hole is pretty big, so there’s no issues in missing. But it’s not overly large that liquid sloshes out while you’re doing this if you hit bumps. The bottle holds 28oz, which is about as big as any water bottle you’ll find (most are 24-28oz, with 28oz being the absolute max).
The cap itself is sturdier than it looks. The Profile Design team noted that some folks have expressed concerns about the cap and potentially breaking off. They said in their testing with real-life triathletes acting as beta testers, they haven’t seen any issues. Obviously, time will tell on that one – but it does seem sturdier than it looks. The little rubber hinge is actually fairly firm and thick rubber:
Next, the most important piece for why I’d be writing about it here: The bike computer mount. We’ve already covered the actual install/configuration piece, so now it really just comes down to usage.
And that’s where everything kinda falls apart.
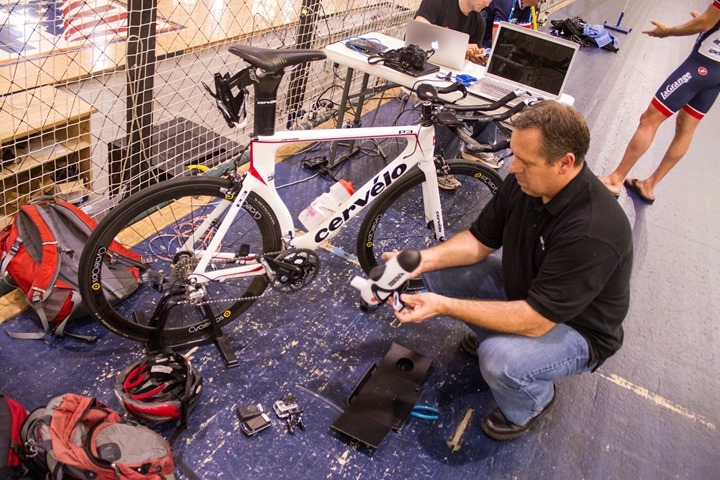
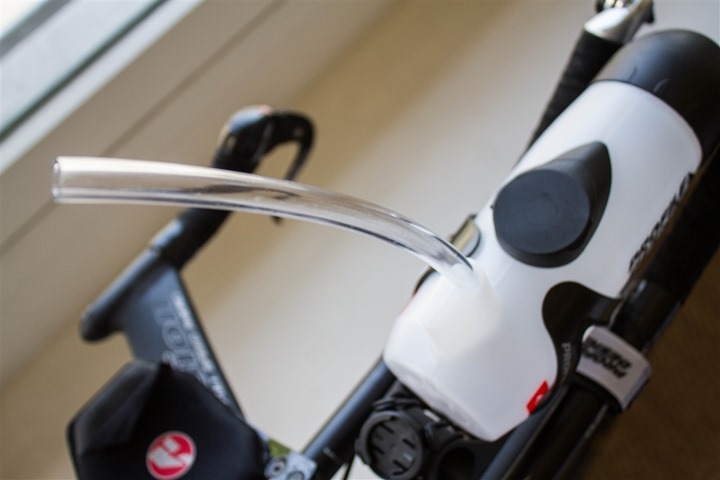
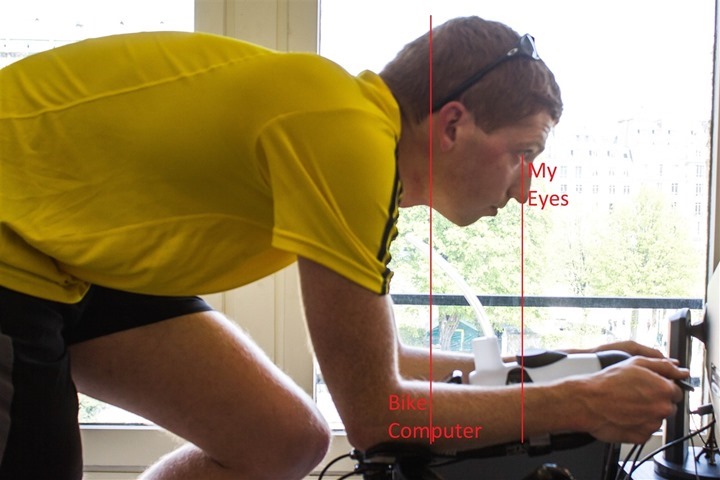
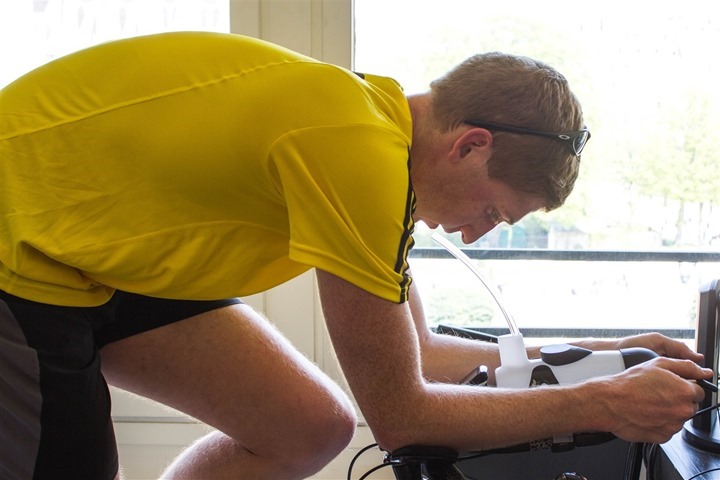
See, while it’s a great holder, I can’t actually see the computer screen from where I am. In aero position, even with the bottle slid fully forward, the bike computer simply isn’t visible without completely ducking your head down and pulling slightly back. You can kinda understand this relationship below. This is inside on a trainer, because it was easiest to get good photos of.
In this configuration, the bottle and bike computer mount is as absolutely far forward it would go.
As you can see, my head is forward of the unit already. If I place my head down and look back towards myself, I can see it. Otherwise, no love. And doing that frequently means my aero-helmet is going straight up in the air.
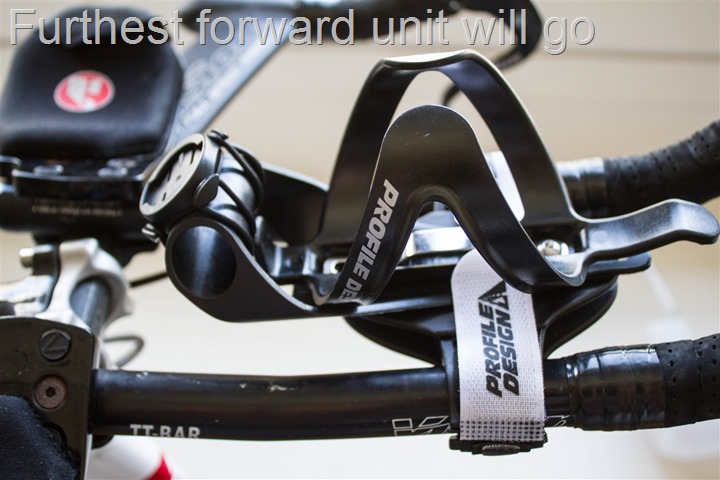
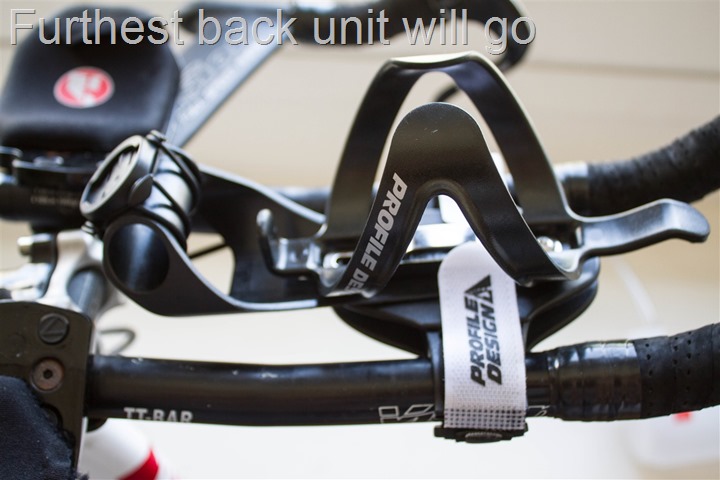
Again, yes, the unit is adjustable forward and back – but your limiter here is the bottle pushing up against the aerobars. In other words, you can only put it so far forward. Here’s the difference between the furthest forward and furthest back it goes:
So while I love the idea in theory, in execution it just doesn’t really work unless you’re sitting up. And of course, that sorta defeats the entire purpose of aerodynamics.
Finally, the unit is dishwasher safe. That’s just a simple requirement for just about any food related item in our household.
Aerodynamic Testing:
This is the first time in a review that I’ve had a section on aerodynamics. And before I get into it, I do want to point out something important: Aerodynamics only matter if you don’t bonk first. Meaning, in a long distance race such as a half-Ironman or Ironman your first priority should always be nutrition over aerodynamics. Because quite frankly if you don’t get in nutrition, you’ll burn off more time limping along than any fast bike components will help you.
Thus, whenever you look at triathlon focused nutrition accessories, you have to understand that most do come with a penalty. But the question is, how does that penalty compare with other offerings – and how does that penalty compare with not remembering to take nutrition because it’s ‘out of sight, out of mind’?
With that…
The second item of note is that this is not only the first time I’ve included aerodynamics in a review, but also the first time that I’m including MY OWN aerodynamics testing in addition to the manufacturer supplied testing. Yup, I did aerodynamic testing of the unit while riding with it. A small preview of that experience here.
As I noted previously, it’s INCREDIBLY important to note that in aerodynamic testing the results really are highly personal. As we showed on the track with other products, for some people they work great, and for others not at all. Your body, your bike, and a lot of other factors impact that. I know that the vast majority of folks will probably still ignore everything I’ve written in this section – but I feel at least compelled to note it.
My Aerodynamic Testing:
As I noted in the initial configuration, we had to open up my aero position (read: increase the width between my aerobars). As a result, we ended up doing additional re-baseline passes of my aero position. This was to be able to compare the pre-position change, then post-position change, and then the difference when adding in the water bottle. Note that because the straw wasn’t final, we actually left it out in the testing. It’s well known the straw would have made the situation worse, so keep that in mind.
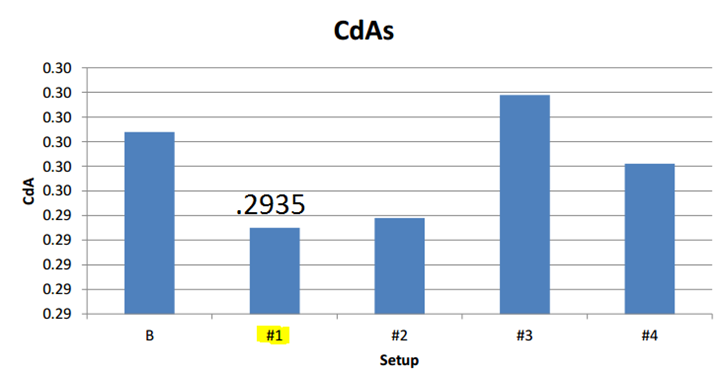
First up, the numbers prior to changing my position to accommodate the aerobars, they’re in column #1 (not B). In case you’re wondering ‘B’ was a run with just a regular non-aero helmet.
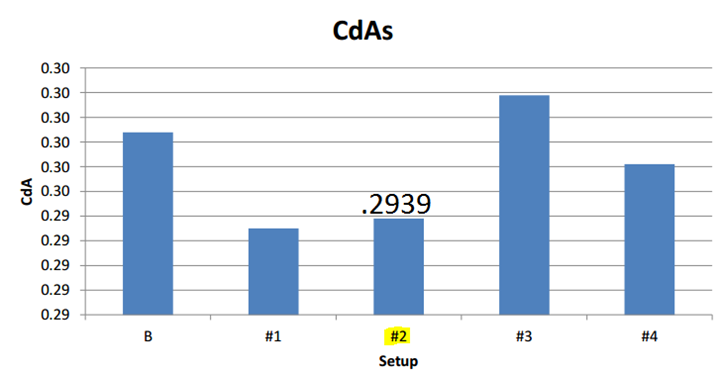
Now, here’s how things looked once we changed the aerobar separation width to accommodate the bracket system.
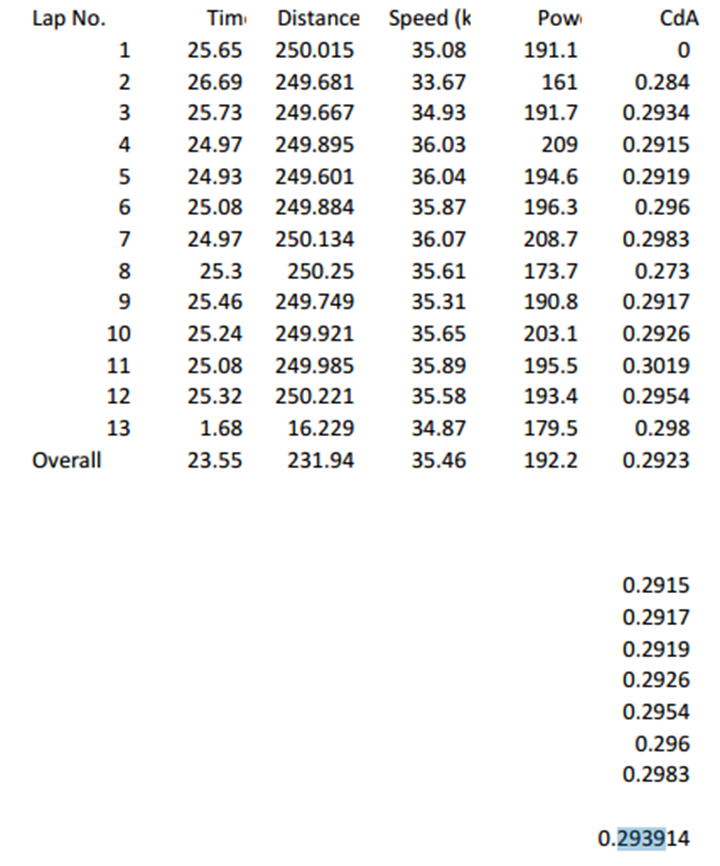
I should point out that these numbers are actually the average across the median subset of 13 laps that I did with each setup:
Each test set is done the same way. They all start off with calibration laps, and then they get into the normal laps.
The reason we did 10+ laps each is simply that I’m human. As such I’m not a robot and it’s plausible that no matter how hard I try there may be tiny variations lap over lap in my body position – despite my attempts at making things look exactly the same.
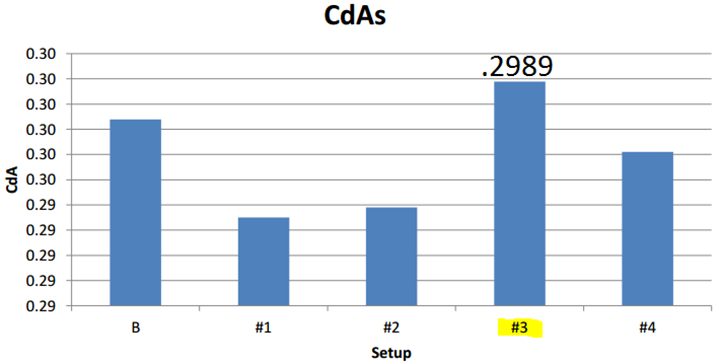
Next, we’ll add in the Profile Design Aero HC system, as we did that, here’s what the numbers looked like:
This was the biggest jump of the day – pretty significant actually.
Again, we see an increase in drag of 0.005. Of course, in most cases anytime you add something to the bike you’re going to see a jump on drag. There are exceptions of course, but in general – the more things for wind to hit against, the more it’s going to impact your performance.
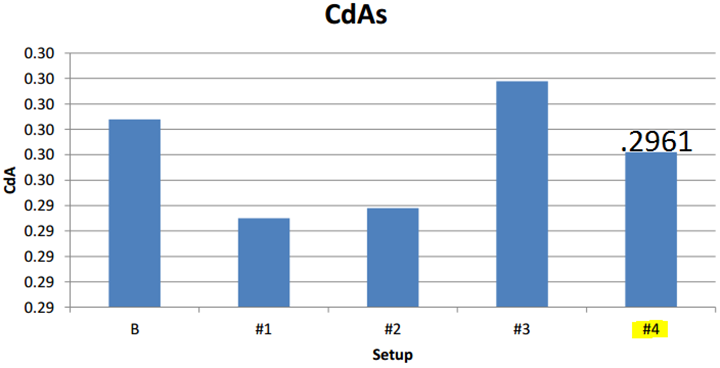
Next was the question of was it the bottle or the bracket causing the drag. So, we swapped out the bottle for a standard water bottle that was just sitting on the sidelines.
And then ran the test again:
Very interesting. The bracket definitely causes drag – but so does the bottle. About half of it comes from the bottle, and half from the bracket.
Looking at the bracket, you can fairly easily see why. The front edge of the bracket is hardly aero. In fact, it’s a bit of a thick compilation that looks more like a cheeseburger than a wing. This is due to the semi-complex interlocking plate system that’s used to lock everything onto your aerobars. In talking with the guys helping me with the aerodynamics testing, this is a pretty big drop in aerodynamics. Not exactly ideal.
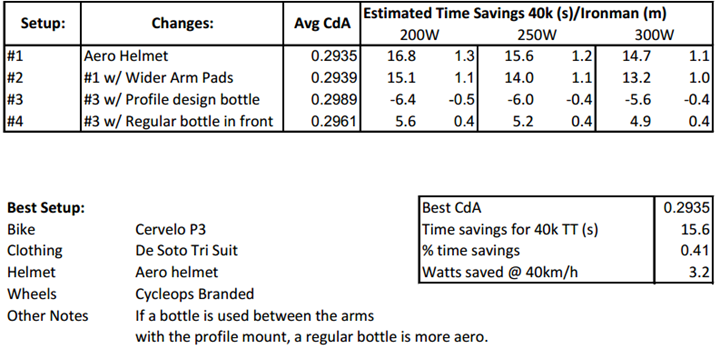
Now what does this really all mean in actual performance? Well, here’s some numbers that were run:
As you can see, the fastest setup was a barebones time trial bike. By increasing the width of my aerobars to accommodate the bottle, I took a hit. Then I took another hit when using the whole setup. I reduced my ‘disadvantage’ though by swapping out the bottle for a standard water bottle.
If you look at the time savings, you’ll see that in an Ironman we’re talking a fairly small amount though – roughly about a 1.5 minute hit to have the nutrition up there in this particular configuration (again, I only tested this setup). A minute is nothing in an Ironman – even for the top Kona pros. What is far greater is the impact of not taking nutrition, which can in the blink of an eye go from one minute to tens of minutes or even hours in an outright bonk situation.
Of course, as I noted above, this is just a test of me on my bike. There are many things tested on a bike where the individual rider greatly impacts the aerodynamics (i.e. a helmet) of the entire situation. However, for the most part, this is almost exclusively forward of the rider, thus there’s very little that’s likely to change person to person in this case. Bike to bike may change however, but this particular component is forward of almost the entire bike as well.
Manufacturer Supplied Testing:
Next up is the Profile Design supplied wind tunnel testing. This testing compares the Aero HC system to other systems made by Profile Designs line. Below, you can see their results.
Test Results Part A: Aero HC, Aerodrink, BB Brckt/KA1
For clarity, these are the systems being compared. The key difference between the Aero Drink and the BB/KA1 is the base bracket system vs just rubber bands.
Looking at these first results, we see that the fastest setup is no hydration at all on the front bars. The slowest option would be the old-school Aerodrink system. The Aero HC sits roughly in the middle of those two. Neither fastest or slowest.
Test Results Part B: Aero HC, HC Mount/KA1, BB Bracket/KA1
And again, the systems being compared for visual reference:
Like before, there’s more drag with the Aero HC than no hydration system at all. And the Aero HC in this case was on par with the HC Mount system.
Now, what these tests (neither mine nor theirs) tell you is how it compares to other products. I didn’t test other products that day unfortunately, nor did Profile Designs supply testing against competitor products. Within the Profile Designs supplied tests, a Scott Plasma bike with Profile Design Armada 24 wheels and a Profile Design Aeria bar was used. Note that no rider was used (just the bike by itself).
Summary:
The Aero HC is one of those products that I really wanted to like. It seemed like the perfect idea to solve two problems: Aerodynamic water bottle placement on aerobars, and bike computer mounting.
Yet, it sorta failed to do either. In all honesty, I can somewhat get past the idea of it being less ideal aerodynamically – because at least I would be getting in both nutrition, as well as being able to cleanly pace via power or some other metric for long distance racing (both critical to success at long course triathlon). And in fact, it’s probably the easiest aero-bottle I’ve drank from or refilled (as well as the cleanest system). But since I can’t even see the bike computer, that pretty much kills the benefit of it.
Now, do keep in mind that everything here is heavily applicable to my fit – and my be different for yours. This is an excellent example of a time to support your local bike shop and go there with your bike and ask to see how it fits with you. If it does fit and you can see your bike computer – than perfect!
Ultimately, I don’t really have any good suggestions on how to address the issues with my fit. Flipping it around would solve the readability issue, but make the aerodynamics issue probably far worse. It’s almost like the bottle needed to simply have a quarter-turn mount built right onto it and then inset a bit – so it could accept the Garmin Edge and Forerunner 310XT/910XT quick release units. That would likely have fixed the readability issues (though increased compatibility issues). In talking with the Profile Design folks – they did actually consider this, but were concerned about compatibility issues of both the system as a whole, as well as the flexibility of the system.
As always, if you’ve got any questions – feel free to drop me a note below in the comments and I’d be happy to try and answer them.
Thanks for reading!
FOUND THIS POST USEFUL? SUPPORT THE SITE!
Hopefully, you found this post useful. The website is really a labor of love, so please consider becoming a DC RAINMAKER Supporter. This gets you an ad-free experience, and access to our (mostly) bi-monthly behind-the-scenes video series of “Shed Talkin’”.
Support DCRainMaker - Shop on Amazon
Otherwise, perhaps consider using the below link if shopping on Amazon. As an Amazon Associate, I earn from qualifying purchases. It doesn’t cost you anything extra, but your purchases help support this website a lot. It could simply be buying toilet paper, or this pizza oven we use and love.



So all in all pretty rubbish product…Thank you for the great review!
Wow, I really wish I had read your review before I bought this!
I’ve come to the conclusion that the only way I can get this to work for me is to:
a. mount my garmin edge sideways, so its flat, and learn to read sideways (possible, but annoying)
b. mount my 910xt watch instead of my edge (workable, but a bit annoying)
c. give up the idea of a bottle BTA – the main reason I started with the bottle between the arms was hearing that it provided aero gains. This seems to not be the case, at least in your testing.
I do like the convenience of a bottle there though. And I’m reluctant to use behind the saddle,
so I’d be left with 2 on frame regular bottles,
Seems like a great bottle as long as the fit works for you, like you said. If your head was further back then you would be able to see it. Regardless of that- I think its probably the nicest BTA bottle out there today and probably more aero than the other options. I will buy one and try it out for myself.
Any suggestions on how to address the readability issues of the bike computer either with this unit or another? I have a Garmin 910xt that is currently mounted on the stem, less than ideal but with the addition of any horizontal bottle setuo(what I really want) it needs to be moved. I had hoped this product would suit me but after reading the review I’m not sure. Are there any other between the aerobars bottle setups that make provision to hold a bike computer that may allow for a more forward computer mounting?
I have a simple 3T mount (basically a round tube that bolts between the aero bars) mounted in front of an xlab torpedo mount in reverse (read: bottle removed towards me).
Computer is directly in line of site and no issues with bottle removal at recent 70.3.
I have the whole thing mounted backwards – with they straw toward the front and the black bottle cap facing me. That was the only way I could drink out of the bottle without totally taking my eyes off the road. So the Garmin arm was in a position that allowed me to see it easily. HOWEVER, it vibrated so much that I had a hard time reading the numbers. So I removed the Garmin arm and put my 910XT back on the aerobat where I can press buttons with my fingers without removing my hand off the aerobar, and it doesn’t vibrate any more.
Since I have my Edge currently on the stem, moving it forward to the HC mount would already put it in a better position for me to read it. This is a clear case of what Ray talks about where individual fit will be different. I suspect for me that the improved (though not necessarily ideal) position of my computer, coupled with easier access to nutrition, may result in this product being worth a try for me. I think I’ll put in a call to my LBS…
When testing was the bike counter attached to the bottle holder? Was it attached to the aerobars when the bottle holder wasn’t there?
Cervelo come to a different conclusion about a bottle on the aerobars:
link to lavamagazine.com
But the position they tested seems different from yours in that the hands were close together with elbows apart vs it looking like your arms are parallel. So the water bottle in their test filled in the empty space behind the hands decreasing turbulence there.
Seems like they are only worried about aerodynamics from what the air first hits and ignoring the impact of rough air behind an object. (if a fairing was added between the bike computer and the bottle it could be better. Why do you think adding a Bento box can be more aerodynamic? It can smooth out the air behind the stem
That bar chart I think would be more useful as a cat and wiskers style chart (i.e. show the range of the measurements that went into that average).
Yup, the bike computer was on there during the tests (Edge 500).
Their position is very very aggressive there, like you noted. It may work for some, but I’m not sure that’s realistic for an Iron-distance.
But in many ways, that’s what was so cool about the aero-testing – to be able to see what works for some and not for others. Which is one of the reasons why I’m actually not as concerned about the aero piece. As the Lava article points out, aerodynamics mean nothing if you’re dehydrated. I’m more focused on the inability to see the bike computer as my primary issue with my fit.
The only position change I was refering to was making more of a v shape with your forearms rather then having your forearms be parallel. This may make your elbows stick out more so not completely sure it it would be more aero overall but would increase the aeroness of the water bottle. Don’t think that would be harder to hold for a longer distance ride.
Should also point out the importance of biomechanics. Sure, having your arms right next to each other may be the best for aerodynamics but that can restrict how much you can breath in as you wouldn’t be able to expand your chest/lungs as much.
Even more than that – also an issue for digesting food. I talked at length about it with the Aero guys, and they talked about many cases where triathletes kept trying to get to more aggressive positions, but not realizing that at certain angles their body simply isn’t going to digest food properly. For a 40K TT it’s one thing, but for a 4-6 hour jaunt, it just doesn’t translate from wind tunnel/track to treadmill.
Also – picking up one final thing in the Lava article (that you didn’t mention but I figured is worthwhile noting), they note that the ‘wind tunnel doesn’t lie’. That’s sorta true, but sorta. The tunnel can be deceptive. If a person isn’t on it, then it’s not really as useful. Helmets is a great example of that where we saw how on one person the helmet was great, and another was horrible – and the next person completely the opposite.
Wind tunnels don’t lie, but they aren’t realistic representations of what any given consumer will see. That ultimately takes testing – which unfortunately today is expensive and difficult. Further, wind tunnel data given is almost always paid for by the company making the product, and thus you only see the good data.
I’d love to be able to expand out and start doing more testing in a more independent manner. Just that today, the logistics of such are difficult. Someday…
I agree wind tunnels aren’t perfect as they only measure one exact measurement which is not that real world. But to me they are interesting in how they can point out some generic concepts/ideas of things that work and things that don’t work. Can be hard applying that to the real world though which is where how you got tested is much better for an individual athlete.
Ever try using an iBike? I hear one of those when used with a “real” power meter can be used to calculate drag of the bike. No where near as accurate is that track but easier to get access to as you can use it whenever you want.
Thanks for the pictures and review! When I saw this bottle at the Oceanside HIM I asked the guys about the computer position and they insisted that they did tons of testing and that it was ideal. It just looked like it would be out of view. I’ll stick to my A2 bottle and “Sprinkler Riser Home Made Computer Mount” (Patent Pending) :)
This review is a major disappointment – I so hoped someone had found a solution to this problem.
I effected the same kind of solution as Brian – A2 plus home made mount.
Hi Ray,
I use the Xlab front system with an A2 Speedfill right now and it has 2 flaws – can’t see my Garmin 500 (thereby somewhat negating the money I spent on my power meter) and the second issue is the A2 bottle slides off centre. The silver strip on this system would appear to have resolved my second issue. Regarding the visibility of the computer (Garmin 500), could you mount it on the bottle itself, just past the refill port?
Keep up the great work!!!!!
Alan,
I took one look at it- and figured out the computer position problem. I put my computer out near the end of my aerobar stalk. Also happens to be right next to my hand- so I can push buttons. My torhans has it’s issues as well, but is basically working for me.
So- what is the minimum aerobar separation distance that the AeroHC mount can handle?
Ray – I have the same problem and this is my solution link to kingcage.com Top cage mount works great and there is a lot of room left for the computer
Did you do the aero testing with the straw?
Actually, that’s the kicker. We didn’t. It wasn’t final, so we left it out. Obviously, any impact of the straw would be greater on aerodynamics.
Hey Ray, which watch are you waering on foto img_3912 :-)
That’s the Basis watch. Check it out in ‘The Queue’ up to the right.
When on aero position, your eyes are allways further forward from your mouth. That si what defeats the pourpose of this system.
Isn’t a regular bottle zip tied to the bars more aero and a good enough reminder to take nutrition?
Hmmm. It would be interesting to eliminate the computer mount from the back, flatten the front of the bottle, and add a nose cone to the front of the mount with a mounting bar inside. Kind of like a mini motorcycle fairing. I would also switch positions of the drink tube and fill port. These changes would have you looking just slightly downward to see the GPS, and would make it easier to access the straw. The front of the nose cone would possibly extend beyond the bars as you would need a gap for the GPS mount.. But, that might improve aerodynamics.
Just turn the mount back to front, then inset the bottle in the same direction?
You can turn the entire mount around (with bottle), but the included bottle is unable to go in the opposite direction as the mount due to the little edging of the mount at the (normally) rear of the bottle holder.
I’m curious abou the round opening on which the garmin is attached. Could a shorter than normal salt dispenser be slid in there w/o much additional drag?
Not sure on the drag side (probably fine as it’d be protected by other things. But the max dimensions of said tube is 2cm wide. The length is about 6cm on the bottom and 3.5cm on the topside (it’s angled on sides).
I’ve always liked the idea of the bottle between the aerobars setup, but the question of where to put the computer has kept me away from it. I was kind of hoping that this would be the solution, and while my position isn’t as far forward as yours it still looks like it would be a problem (computer is on a Profile OCM about an inch and a half ahead of the stem).
Any idea if they have any plans to sell just the mount part (ie minus the fancy bottle)? It looks like it would work decently in the reverse position (ie computer in front) with just a standard bottle or the Speedfil A2?
Also, in the pictures you show the Garmin tilted on a 45 degree angle. Was that just you trying to get it further forward, or does it not move far enough out to mount the computer parallel to the ground?
When I put it flat, I had to scoot the Edge further back, otherwise it conflicted with the bottle. It was a wash either way as far as which worked ‘better’ – in the sense they both didn’t work better.
The only other option would have been to make the bars yet even wider, so that the front of the bottle could poke out even further – but then that would have blocked hand positions around the brakes.
I think if you would have pulled the mount back a bit and tilted the garmin flat, instead of 45 degress, then you would have been able to see it better. also, not everybody uses a garmin and I think you would be able to see a smaller computer just fine- I think the takeaway from your article is that you just have to try it for yourself and see if it works.
The Edge 200/500 is the smallest bike GPS computer on the market today. The only units smaller are some of the non-GPS cateye units.
When I put it flat, I had to scoot the Edge further back, otherwise it conflicted with the bottle. It was a wash either way as far as which worked ‘better’ – in the sense they both didn’t work better.
I’m often told I have my head up my ass — seems like I’d be able see the computer just fine.
Turn it around and use a longer straw?
Potentially, aerodynamics are questionable on turning around the entire bottle.
Depends on your hand position, if your hands are touching each other so so blocking wind from hitting the front of the bottle then reversing the bottle will make it more aero as the pointed nose will decrease the turbulence of the air coming off the bottle
It seems to me that the Profile Design bottle itself is as good as, or better than, any other between-the-arms bottle on the market. The problem is the mount. A standard bottle cage and zip ties would work with a more narrow bar spacing. You’d lose the computer mount, but that doesn’t sound like a big loss.
I am surprised that you’re recommending using the Garmin quick release mount for the 910 XT given its propensity to be spun loose during the mass-start swims.
It’s a bit of two problems. The bottle had more drag than a standard water bottle, and the mount has a lot of drag.
As for the quick release. I tend not to recommend folks swim with the FR910XT/FR310XT on their wrists during races unless it’s below a wetsuit. For the FR310XT it’s a pin problem, for the FR910XT is part pin and part twisting off.
That said, while there are certainly cases of twisting off – it’s actually very very rare from what I see and hear about.
Moving to the bike then, the quick release kit is really the only good way to forward mount it unfortunately.
I cannot comprehend how a standard bottle could cause more drag? The PD one has an aerodynamic nose on it, just doesn’t make sense?
Good review. Xlab is getting ready to release their new front-mount Aero bottle. I would interested in seeing you test this product in the same manor for a product comparison. Xlab may have an aero advantage with their mounting system as it is not as obtrusive as Profile Design’s and from what has been released on their Facebook page, they have a foldable straw. If the bottle is as aero as Profile’s, they will certainly have a leg-up, in terms are aero advantage. Now if they only think to include the computer holder….
Would love to see a review of the new X-lab system as well.
Clumsy design. Very little flexibility in the computer set up and the width of the dome lid on the end restricts how narrow you can have your hands. I zip tie a gorilla cage between my aero bars far enough back that the bottle is almost completely shielded by my hands and arms. I mount my computer using a piece of 18mm diameter PVC tied between the extensions with the ends shaped so my Garmin 500 sits low between my wrists at an easy to read angle. With 55mm between the inner edges of my extensions where my hands are, none of the currently available tt computer mounts work.
I know it’s been discussed many times before but I still don’t get the perceived advantage of a bottle with a straw that you have to keep decanting another bottle into. Surely just replacing a bidon and quickly drinking from it every 15 minutes or so is both easier and more aero, all things considered.
For most people, having a straw sit right in front of them prompts them to drink. It may not matter for an Oly, but for Iron-distance, I’d guess that the vast majority of all poor performances in that race category have to do with nutrition, not physical readiness.
That’s interesting since for me it kind of works the other way around. I only have power and time displayed on my computer and my nutrition is on a 15 minute schedule. Torpedo mount bottle is only water and and xlab aero bottle on frame has all of my nutrition.
Great review! I was looking forward to this one when I saw that you where meeting with Profile Design. However, I am kind of bummed with the result of the product Profile Design put out. I was hoping this would solve my BTA bottle situation because a lot of the system out there don’t just fit the mold I need. The biggest bummer is the computer mount. That would of been a game changer for most riders who need nutrition up in there cockpit and the ability to see there Garmin…but It seem it feel short of the mark. Thanks for reviewing this products and pointing out these issues before a sank some money into one.
Did Profile Design take your recommendation of changing the computer mount or making the braket more Aerodynamic? If so I may just wait until v2.0 is released to the public. They may have the kinks figured out by then.
We discussed it via e-mail exchange, but that’s a long way from making any sort of product change decision.
That’s interesting since for me it kind of works the other way around. I only have power and time displayed on my computer and my nutrition is on a 15 minute schedule. Torpedo mount bottle is only water and and xlab aero bottle on frame has all of my nutrition.
Yeah I am sure it will be a while until Profile Design makes changes. I am just going to stick to my BTA Speedfill System for now. In time some one will figure out a better design that work with a computer mount.
@Jezza I was just using “nutrition” as a broad term for anything you would use during a race such as water or even electrolyte cocktail to drink BTA while is aero position.
While it may not work for an ironman distance as it may be hard to refill quickly but wouldn’t a hydration pack under a jersey be more aerodynamic and give easy access to water?
Yeah, the challenge there is then transition though – both putting it on post-swim, and taking it off pre-run.
Longer o rings can be found @ a hardware store (old school), and then the Garmin bracket could be fixed around the water bottle between the fill port and the bullet end.
I see the issues with the computer mount and visibility with the 500/510 and 800/810. But, seeing as a 910xt is much smaller, wouldn’t the visibility be better since there would be no tilt required? Did you get a chance to test with one?
Just loaded it up. It’s a touch bit better (and does allow it to get flatter). But for me (and – the ‘me’ part being important), it’s just still too far back to be any sort of line of sight or easily viewable.
what is the actual c to c measurement for minimum bar width ?
6.75cm
In ‘Test Results Part B’ the purple (outer-worst) label should read BB Bracket/KA1 instead of HC Mount/KA1. Based on your narrative the HC Mount sits in the middle of performance but the label places it on the worst side; similar with Blue line that should be assigned to HC Mount
The charts you see are copied/pasted as-is directly from Profile Designs.
As far as differences go, two things to keep in mind. One being that different bikes/situations. And second being that one doesn’t have access to any other tests that they may have done at the time.
I wish someone built a helmet with a photo chromatic (changes with lighting conditions) visor with heads up display on the inside of the visor. So you would not have to look away from the road. Power, speed, hr, intervals right there. Hey, add leds to the back for increased visibility and a integrated/flush HD camera front and back will capture unethical and unruly drivers and I’ll be the 1st inline to buy one.
As for the computer mount, between the nose and the bottle fill cap, add a cavity/recess that allows for the average commuter to sit nearly flush with the bottle sides.
A straw creates drag but not as much a reaching for a bottle and drinking from it.
Here is my setup on a Speedfil A2 with mounting an 910XT
link to dl.dropboxusercontent.com
link to dl.dropboxusercontent.com
I had also a hope that the Profile mount should be good but now perhaps only the bottle or still use the A2.
Perhaps Nathan new bottle (Andy Potts using it) when it is released this summer.
We’re talking 1 or 2 minutes lost in a worst case scenario… Are you guys doing routinely an IM in less than 8 hours? And it’s as if there’s only drag to care about. 4x750ml bottles= 3l, or 3kg! How many watts do you lose when it’s time to ride up that hill? Howmuch do you weigh? Furthermore, you won’t even stay in an actual aero position for the whole leg… Get serious. Please.
Regarding the Profile Design thing, what i’d like to know is wether the load over the front wheel disturbs the way you turn or stay in a perfect line? Are there vibrations induced?
That’s why i do love better rear hydration systems safely hidden behind the saddle…
BTW, Ray: do you plan on going to Belfort on the 1st of June for the long distance Triathlon world championship?
I normally worry less about aerodynamics than some. However, it goes both ways. Eventually, all things add up. A few minutes here on a water bottle, a few minutes on an aerohelmet, a few minutes on the right cage setup.
For an all-aero course like Florida it might make the difference between a Kona slot or not (actually, it probably would). For a more mountainous course like Canada, likely not. And of course, if you’re talking a 10-17hr Ironman person, then less so.
As for Belfort, not at the moment. I have to be in Guangzhou that day. :(
regards HUDs oakley and the like are now making them for Snow goggles, wouldnt be hard to move the tech across to a helmet based system link to oakley.com
Remember they sneak-peaked something on the bike side a month or two back…
WIll this bottle fit in a standard bottle cage? If so, will they sell the bottle separate?
When is it available?
Yes, it fits in a standard cage. And yes, a standard bottle fits in their cage.
Additionally, yes, they will sell all parts separately (bottle, bracket, and combo). Right now they are fulfilling combo packs first, with estimate of summer or so for individual parts.
good review as usual
Will add that I think the utility of the device is definitely a fit related issue. I had the speedfill version of the device which I couldnt get to work without having to contort my neck into weird positions. This one fits like a dream. I am on a specialized shiv which is a more relaxed position and maybe this has a lot to do with it.
Should also add that computer mount is useless being way too far back to allow any useful mounting of a bike computer.
Just picked this up after reading the review. So I wasn’t surprised when it didn’t fit between my aerobars but geez it’s too big by almost 2 inches. I would think it will be too wide for a lot of people. I simply tossed the mount to the side joining a sad lot of other profile design products and put the bottle into the x-lab-gorilla cage that was previously holding my speedfill. My issue with the speed fill is that the straw is too floppy and too far away for me to get it easily so this will probably help that for me. We’ll see. Trying it out tomorrow.
Nice review and toughs! I know the problem with the computer, at the moment I’m using a Profile Design Aquacell with a “custom” homemade computermount to keep the computer in sight, and free from my hands
topview with SRM PC5
link to fbcdn-sphotos-a-a.akamaihd.net
side/topview with Ergomo CPU
link to fbcdn-sphotos-b-a.akamaihd.net
Using it with SRM in a race
link to fbcdn-sphotos-d-a.akamaihd.net
I want to switch to the HC Aero, because it lookes cleaner and less bulkier (and more aero because there is no parting sticking out below the aerobars. But yes, there is that isue with the computer, so I’ll have to make a adapter for it as well, as small as possible to keep the draglost to a minimum.
Feel free to share this pictures with profle design, maybe they can use it to make something working for there next product.
Note to your review: Of course, adding a bottle like the HC aero or Aquacell tot your aerobars is increasing the drag, but:
-you can drin for one hour without leaving the aero position (so, no lost in aerodynamics of spilling energy for reachin a bottle (with al your weight resting on one arm instead of two.)
-you don’t forget to drink
-you can carry an additional 750cc of water with you (handy on your trainingrides.
Another note: placing the HC aero bikemount on the other side of the bottle, may intervere with your hands, because it’s sitting to low to the aerobars
PS. English is not my native language.
in addition:
When the bottle with be available as bottle only, you can use it with this HC mount from profile
link to profile-design.com
I think with this system you can go for a lot smaller setup in comparing to the original bracket.
Question: what is the minimum width in mm or cm of the original bracket?
Min width for the bracket to fit between aerobars is 6.75cm.
if your normal set up is close enough together to sit the bottle on top you could zip tie it down and lose the bracket altogether, so allowing unlimited for and aft placement, bottle option only would be nice ;)
In regards to mounting of the bike computer… I have an Edge 500 and I mounted it for a while behind my xlab aero mount using the Barfly TT mount. However lately I have found myself looking down way too much at the bike computer, so today I moved the torpedo mount back to where the end of the bottle is at the stem, and moved the bike computer between my wrists on the front using the same mount. aerodynamically speaking is this bad, good or indifferent? I am racing oly distance this year. I can send you a pic if you want.
It’s hard to say to be honest. It depends on how much your hands block everything. We looked at that a little bit in the aero testing, and a lot of it comes down to hand position there and how that impacts the bottle behind it.
I am trying the barfly mount so that the Edge 500 sits just under your wrist outside the TT bars. Looks like it will work well because you do not have to look backwards to see the screen.
I used the steer tube as the mount for my xlab front bottle mount. I only use the carbon plate and xlab cage and there is no need for the bracket or straps. Use the steer tube bolt through the cage, carbon plate, and then into the headset. It is very secure. The beauty is I have my garmin 810 on a barfly mount in front of the bottle on the aero bars. I took my bar tape all the way around the barfly mount. It is hidden from the wind behind my hands. I do not have to move much at all other than look down slightly to see my numbers on the garmin. I would post a picture, but I do not see an attachment option here.
Joshua
You can post a link to the image on an image sharing site like link to imgbox.com or if you want more choices: link to en.wikipedia.org
Here is my setup… and yes the bottle clears just fine. link to i.imgbox.com
Richard,
Exactly like mine except my bottle is mounted a little farther back. Looks good. Easier to see you garmin not to mention safer out in the road not having to look down.
I have been trying to figure out how long this system is. From the back of the computer mount to the tip of the aero bottle? Also, how wide is the bottle itself. I saw the mount can go from 80mm – 120mm. Thanks.
At it’s longest extension, from back of computer mount to tip is: 29.5cm Shortest: 26.5cm
Width of bottle itself: 7.5cm
As noted, it fits any standard bottle.
Hi,
Is there any reason you couldn’t buy the bottle on it’s own and zip tie or similar it in place on the tribars? It looks like a decent bottle you could use in the aero position, but not being able to use my garmin 705 is a bit of a deal killer for me.
Tom
The soon-to-be-released “Speedfil Z4 Bottle Cage with Garmin Arm” looks interesting and positions the Garmin much farther forward. There is no baseplate whatsoever, just zip ties, so presumably no aero penalty from the “thick cheeseburger” design of the Profile unit. Note: in some of the promotional pictures for the Z4, the bottle is facing rearwards (putting the Garmin forward) and in others the bottle is facing forwards (putting the Garmin toward the rear). Not sure whether the bottle truly can be mounted either way or just the advertising photographer was clueless.
Thanks for the review. Sadly, I had already purchased this system before I read your rundown. It probably would have been enought to turn me away.
However, in buying one and using it (briefly) I have one more huge deal-stopper of a flaw. The cage doesn’t hold the bottle securely. Going down a slight grade with some bumps, the bottle just constantly tried to work its way free and finally did when I couldn’t reach forward to grab it without crashing. The bottle then obviously falls directly into the path of your front wheel. Not good. So, aside from near death experience, I also lost half my hydration for the ride. Just went and bough a X-lab torpedo mount and it works great. I used a small peice of carbon tube strapped to the mount for my computer mount, also great. I can post pics if anyone is interested.
I’m a woman who is 5’3″ and rides an XS Tri bike. Real estate in my cockpit is so limited that I have a hard time fitting everything there. I’ve used an Aerodrink system for the past 2 years WITH BOTTLE REVERSED so the straw will be further forward and I can take a drink out of it without totally looking down. I’m sure it’s making my bottle totally not aero but that’s the only way to carry a bottle with a straw for easy fuel access. I just purchased this Aero HC system. But for the same reason, my mechanic had to turn the whole system around so the straw will be further forward and I can take a drink out of it without taking my eyes off the road. While I liked that my Garmin 910XT was in front of me (vs. on one of the aero bars with the Aerodrink set up), it vibrated a lot, plus it’s actually easier to push the buttons when it’s sitting on my aerobar than in the middle. Anyway, which of the two not-so-ideal set-up do you think is more aerodynamic? Aerodrink bottle turned around and set up in its original bracket, or the entire HC system turned around between my aerobars? Or are you aware of any other possible set-up? I’d like a straw/tube to drink out of and easy refill. Do you think A3 bottle turned around would be a better option?
I wish I had read the reviews before I bought the Profile Design Aero HC Bottle and Computer Mount. I agree with your review. I can’t easily see my computer and the straw is too close. Also, I don’t like that it’s not insulated. I’m stuck with it for now. I’m going to try turning the whole unit around as suggested above. The XLAB Torpedo system is what I wish I had bought.
FWIW, I am pretty happy with the Speedfil Z4 Bottle Cage with Garmin Arm. I have no idea what constitutes “backwards” but I have installed it with the Garmin Arm going the opposite way than intended. This puts the Garmin almost at the top of the water bottle, definitely easy to view, and the straw back by the aero bar, out of my field of view. I added a small screw to hold the Garmin arm since it does not “snap” into the holder that way.
Very interesting. I am going to buy the speedfil Z4 bottle cage with Garmin Arm and your idea of installing the Garmin Arm just the oppositeway than intended is brilliant !
For the record, this won´t fit the Aero handlebar “Aura pro” by 3T…I´ve just discover this by myself :(
Won’t fit 2013 Cervelo P3 with T3 Aerobars. You don’t need to be a rocket scientist to figure that one out.
So is this final, no fixes available to get the Aero to fit onto the P3?
Have you compared this to the Xlab version and what are your thoughts? Sorry if I missed that in the comments above.
I like the XLab version. I’ve been using it lately, and while I can’t comment on the aerodynamics of it, I can say that I can at least see the Garmin screen clearly.
Can it be mounted on a mono bar like the Speed Concept?
I think it’d be too long for it, depending on how long specifically the fork section of your mono-bar is.
Because the bottle is still not available as bottle-only I made this one (
link to triathlete.nl
some plexiglass (carbon fiber is better of course), tie-wraps, screws, a bottle cage, bottle, and a high5 zero tube (with a straw from an aerodrink). The SRM computer perfectly in sight, no leaking water and easy to refill the computer is not centered because of the wire this SRM is using, it is too big to fit in otherwise.
Commenting solely on my experience with this I can say that the mount is basically worthless. However, since I have a 910XT I can simply keep it on my wrist if I need to monitor my metrics constantly. Vibrating and unsecured bottles is a constant complaint of all of PD water bottles. Two of my friends had their bottles fall off while riding! However, from my experience these mounts were improperly installed to begin with. There should be very little movement in the bottle when it is properly mounted with the top bracket installed.
Check out my solution to the computer mount here (google translated):
link to translate.google.com
Claes
Nicely done!
have you got a look at the speeffil z4 yet?
looks promising,
just worried that my edge 800 may catch a bit too much AIT in tyhst position.,
Just dropped and broke the cap of my profile design hc bottle. Seems like the local bike shop doesn’t sell the bottle alone, whereas one can purchase the xlab torpedo bottle alone. I like how you can tuck the straw down for the xlab bottle, anyone knows if the xlab torpedo bottle can fit on the profile design hc mount?
Great Review. I hadn’t tried this particular bottle, but i have two others from Profile Design. Most recently I purchased the “FC Hydration System”. The computer mount is great on this model, and I love that it has an integrated storage box in the front. However after riding with it I’ve found that the mounting is not good, no matter what I put into the storage bin, it will pop out, and unless I have a profound misunderstanding of the world, you pretty much have to remove the whole bottle and mount to wash it. Further, the bottle never really gets tight on the bars. It’s a long shape connected at two points only, so it sort of rocks back and forth. I’ve elected to return it because it’s hard to clean, complicated to remove/re-install on bike, and the storage bin doesn’t work. Additionally, they say it’s a splash proof top, but the front of my bike, coated in sticky sports drink, tells a different story.
Have you seen this thing:
link to amazon.com
I like the idea having the bike computer in front of you. However, it might disturb your aerodynamics even more.
No, I haven’t tried that one unfortunately. You may want to check out the Slowtwitch forums, as sometimes people bring various units into wind tunnels to test, or have other aero testing done.
First, why is 0.2934 left out from your “median subset”? It falls within the selected range. Never mind that though.
You go to the trouble of doing repeat measurements so why not calculate the measurement error? You can’t just assume that differences between numbers are meaningful no matter how many trials you averaged. And while we’re at it let’s do proper outlier rejection by attempting to identify the source of the outliers instead of just removing points that don’t make us happy. The first exercise will reveal problems that are somewhat fixed by the second.
The appropriate error is called the standard error in the mean, and, contrary to popular belief, is not the same thing as the standard deviation. It is the standard deviation divided by the square-root of the number of measurements. Without a good reason and/or outlier bias correction, this should be first calculated using the full data-set. That gives an error of 0.0022
Assuming all the setups had similar errors, and they should, the difference between setup 2 and setup 3 is 0.005 with an error in the difference of 0.0031 (sqrt(2)*0.0022).
This means the setup 2 and setup 3 are 1.6 sigma different, which is at at the borderline of being meaningful, especially when there are more than two things being compared (increasing the odds of a meaningless fluctuations somewhere). Basically, I’d say this is quite suggestive of a difference, but hardly conclusive. The other differences, aside from B, are all so small as to be completely meaningless.
It is interesting that the median subsets do have lower standard errors than you’d probably expect relative to the full data sets. This suggests some systematic and indeed may justify outlier rejection, but doing it arbitrarily only increases doubt in the conclusions.
However, what I see is that the two lowest points rejected were taken at much lower power levels. It’s most likely that rolling resistance was not perfectly accounted for when estimating CdA and so different power levels give a little different results. That then gives *** a good reason*** for outlier rejection and swings things back the other way. However, notice that the highest result was achieved at a power that falls right in line with the other results and so there is no good reason to reject that one, but the result at 209 watts probably should be rejected. The highest result also didn’t deviate as badly though. I’m not sure why you removed only one on the high end and two on the low end, probably related to the errant removal of the 02934 point.
Ideally you should study power vs CdA more to verify this or even correct for it, but for now, if I select data by power from 190 watts to 203 (there are big gaps beyond that either way), then I get a standard error of 0.0012, and no rejection bias correction is needed since I selected based on a separate variable.
This probably improves the meaningfulness of your results, however I do get a different average of course, of 0.2944, using this subset. All in all that’s looking more like a 2 sigma difference (which still won’t net you a Nobel prize in physics), but you’d have to re-analyze set 3 and other data too really, and if they don’t have data in the same power range, 190 to 203 watts, then you’d need to tackle the power issue directly to make it all convincing. You might not even have the data you need to be able to do that.
In the end, the popular wisdom of repeat measurements is neither always sufficient nor always necessary to make conclusions. You still have to quantify the random and systematic variations and understand what level of difference is meaningful, and what is noise. Sometimes that can be done with no repeats based on previous understandings. Sometimes even with many repeats, it doesn’t mean a difference is real.
In general, when I’m working with aero people, I usually defer to them for some of the math people. Mostly because if you were to ask anyone in the cycling aerodynamic industry who is the smartest and most knowledgeable person about testing bike components from an aero standpoint, they’re going to say Jim.
That’s then backed up by almost every WorldTour Pro cycling team working with him on aero testing, and then most of the top-line pro triathletes too. Plus Olympic teams.
Next, we don’t need to study power vs CdA, because the CdA number is derived by having the power number. These systems work by knowing power.
Finally, when talking cyclists around a track as humans, you can’t simply make it a math game of repeating endlessly. As a human, you can’t do that perfectly each time, especially if testing multiple things. Thus, you iterate to the level that’s appropriate to capture the data you need reliably for the entire day.
Thanks for the reply.
CdA is derived from power yes, but to do that requires assumptions that are imperfect which can lead to power-dependence in the results, and almost certainly will at some level, and it clearly appears that you have that in your results. You think it’s a coincidence that your two lowest power readings also showed the lowest CdAs? I very much doubt it. These are small effects but the differences you display are in the range of your fluctuations, so to say anything meaningful you’ve got to do the statistics and the corrections very well. You did a great job for a sports product reviewer. I’m a Ph.D. experimental (ie applied, not theory) physicist with 20 years of data analysis experience with publications, and I agree it’s not fair to expect a cycling enthusiast reviewer to have things that dialed in. On the other hand you have to recognize when the results you’re showing are at the level of the fluctuations and if you can’t get hard core about statistics and analysis at that point you maybe just have to say “these differences are within the observed fluctuation levels and may be suggestive at best”.
It’s actually probably good that most “popular wisdom” as I said is to just use the standard deviation and not standard error, because the standard diviation is bigger, and more conservative, and using the smaller standard error requires really nailing the details. If you just took a standard deviation, you would have simply concluded the differences were not large enough to be conclusive, which is a safe statement. Doing it really right, I suspect you can say there’s a strong suggestion of a meaningful difference in the case of the largest deviation, but it’s still probably only that, and yeah, not necessarily worth the work just to eek out evidence of a “strong suggestion”. As you imply, it’s sports product reviews, not the Higgs boson.
I found exactly the same problem on my own setup, love the hydration system but can’t use it because I can’t see the Garmin on that mount. Have you found any better system since this?
Best option is to use it backwards,both the mount and the pipe will be in the right place and you will cover the flat surface with your hands and bike computer.
I know im late to the show but I just bought it and im having a problem with speedbumps. All the liquid seems to pour out. Anyone found a solution for that?
I must say that this is the worst investment I have made for my bike.
My first tri with it was yesterday and it ruined my day for so many reasons!
1 – The whole unit vibrated so much that it kept pushing the start/stop button on my Garmin!
2 – As it was not entirely horizontal, the water at the lower end of the bottle was not accessible by the straw once the bottle was half empty
3 – Due to vibrations on a some rough road surface, the straw slowly dislodged then eventually flew out completely
4 – And here is the worse bit! My Garmin also dislodged and disappeared into a ditch. $500 in the hole!
Never buy one!
Sorry to hear of your troubles! What the heck tri was that with such awful roads? Almost sounds like an off-road tri.
1. I inserted a small discarded piece of car tire I found on the road between the arm and the bottle. Rock solid. Prevents vibration. Obviously, anything world work.
2. With all due respect, that’s an installation error. You can angle it however you want.
4. How did the Garmin quarter turn without you noticing such that it could eject? If you are saying the whole arm ejected, I put a tiny screw in mine to hold it, mostly because I use it backwards.