Well, an inside look at my bike cardboard toolbox anyway. Actually, it’s half split between a cardboard box and a plastic bag from the grocery store. With a few oft-used items in a 4-cup measuring cup, sorta like how people put pens in a mug. I have an official bike toolbox, but this won’t all fit in it, so there’s some other bike junk/parts in there right now.
Of course a better question is how exactly I got to this post. See, it all started here:
With, yes, a blowtorch.
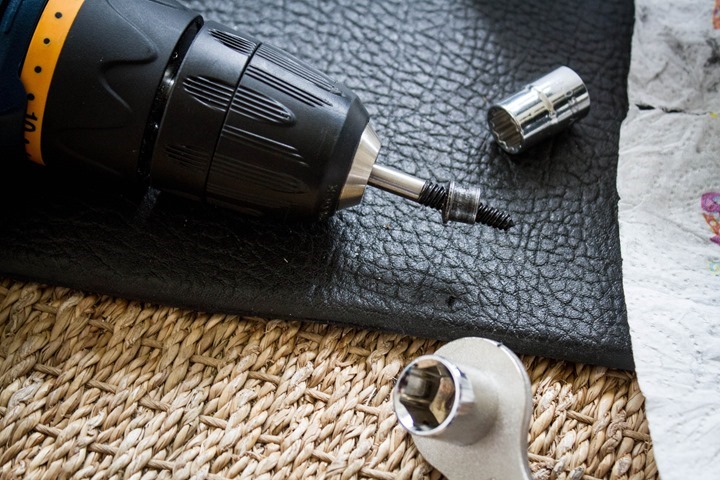
I was in a bit of a losing battle to remove two stuck chainring bolts that were spinning endlessly. While I eventually won that battle with another trip to the hardware store to buy a screw/bolt extractor kit, it got me thinking about all the tools I had lying around that I use to fix things on my bike.
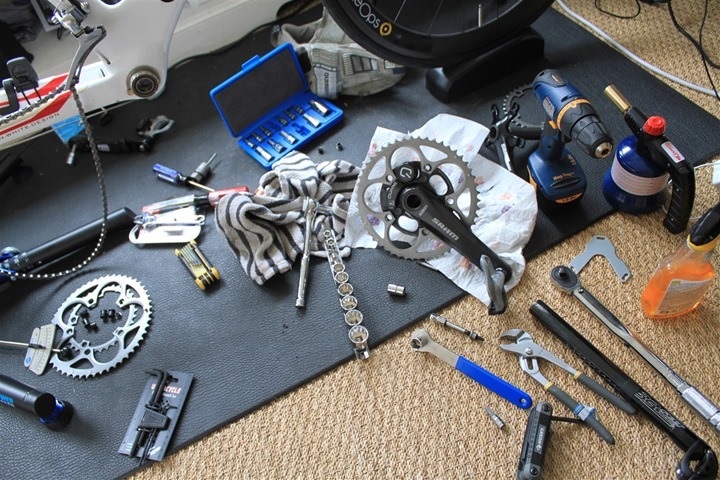
So since I had already created a bit of a mess I decided to just go all-in and lay everything out. Which, is how I ended up at this:
But, what are all those tools? Well, let’s go through them all one by one. And then I’ll talk about the ones I actually use on a regular weekly basis.
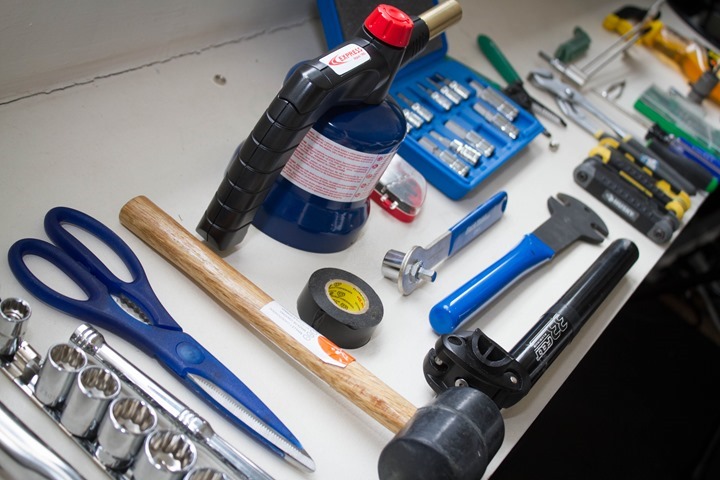
Ok, section #1, from the left:
Torque Wrench: Used for correctly tightening bolts and other parts on bike, allows you to set a torque value and ensure you don’t over-tighten.
Sockets for Torque/Socket Wrench: To accommodate various socket sizes, though I pretty much only have ever used one of them.
Socket Wrench: Used for tightening bolts and parts on bike with no regard for correct torque value.
Ikea Scissors: Because it was cheap.
Rubber Mallet: For removal of parts (such as the Rotor Cranks), when pure pressure just won’t work. Safer than a regular hammer.
Electrical Tape: Look, it’s there, sometimes stuff just happens and you need a quick fix.
With that, we’ll continue sliding to the right.
Next section we start getting into a few of my more commonly used items.
Blow Torch: When the going gets really rough, sometimes you just need to apply fire (or rather, heat). This is best found at Home Depot or equivalent (the relocation company actually confiscated mine during the move over, so I re-bought this for about $12).
Crank Bolt Wrench: A proper tool for removing a crank bolt, haven’t really found it necessary though given the hex bits and the socket wrench.
Pedal Wrench: Of a few pedal wrenches I have, easiest way to remove pedals (though, a hex wrench works as well).
Spare Bike Seat Post: Awesome tool for applying extra leverage. It fits over virtually all of the items above, extending the length of the ‘arm’.
Hex Bits for Socket Wrench: Perhaps the most useful set I bought, as it pretty much covers any bit I’d need on a bike.
Screw/Bolt Extractor: Like the blow torch, sometimes you just need to mine it out of there – and the bolt extractor is your last line of defense.
Ok, two more sections and we’re done!
Next, we have loosening and tigthening tools that most folks have hanging around.
Hex Wrench Set: My most used tools in the kit. Period. Lasting me for close to 10 years thus far.
Channellock (adjustable wrench): For odds and ends, usually holding one item while tightening it.
Wire Stripper/Cutter: Often for snipping zip ties, or sometimes electrical cables used for testing items
Screwdivers: There’s a larger Phillips Head screwdriver, a smaller Phillips Head screwdriver, and a Revolights removal screwdriver.
And last but not least, the final section.
Tire irons: For removing bicycle tires off of wheel frames (must have).
Jewelers Screwdriver set: For tiny screws.
Tweezers: Every once in a while I need to place a small part somewhere, this works for that.
Torque Wrench #2: This one actually shows you your current torque value (I actually have two similar variants of this, I like the one I linked to better than the one in the photo above, as it measures a higher torque value)
PowerTap Cap Removal Tool: If you have a new G3 hub, this allows you to remove the cap (though, you can make do with the adjustable wrench and some patience/practice).
ROTOR Crank Removal Tool: For removing the ROTOR Crank Arm from a crank spider.
Cassette Lockring tool: For removing a cassette from a wheel assembly.
Nail Clippers: Best tool for removing zipties that secure anything onto your bike, usually can avoid scratching.
Goo Gone: For removing gunk built up in places on the bike where normal cleaning just isn’t working.
Phew! Ok, I didn’t exactly buy it all at once, just sorta a pile of stuff that’s accumulated over time. And come to think of it, I also have a few other tools like a chain cleaner tool and a cassette brush that were off in hiding while this was taken. And of course, this doesn’t include any of the electronics tools and/or testing pieces. This is purely for getting stuff on/off the bike.
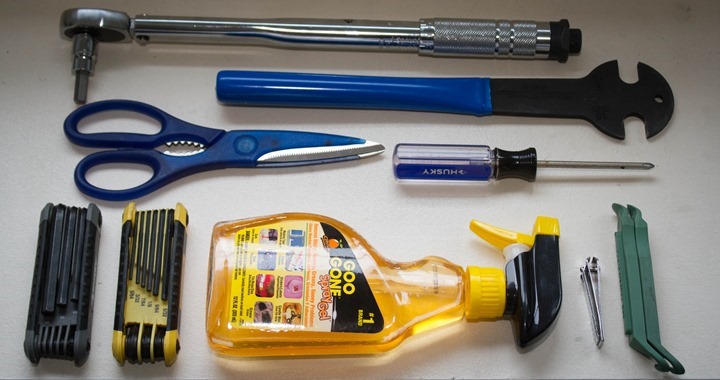
So what do I actually use semi-frequently? Well, here’s my most common go-to pile.
This is just a quick recap of the parts in that picture:
Goo Gone: For removing gunk built up in places on the bike where normal cleaning just isn’t working.
Hex Wrench Set: My most used tools. Period. Lasting me for close to 10 years thus far.
Screwdivers: There’s a larger Phillips Head screwdriver, a smaller Phillips Head screwdriver, and a Revolights removal screwdriver.
Tire irons: For removing bicycle tires off of wheel frames (must have).
Ikea Scissors: Because they were cheap
Pedal Wrench: Of a few pedal wrenches I have, easiest way to remove pedals (though, a hex wrench works as well)
Torque Wrench: Used for correctly tightening bolts and other parts on bike
Nail Clippers: Best tool for removing zipties that secure anything onto your bike, usually can avoid scratching.
Now again, you don’t need to go out and buy all these things. In general, you can get away with a good hex wrench set for the vast majority of items. I tend to be in the unique position having to swap cranksets and/or other bike parts on a semi-regular basis for testing, hence why I have much of what I have.
Further, if you become friends with your local bike mechanic you can further minimize interaction with the above tools. On the flip side, I’ve learned quite a bit for me being a computer guy, by doing much of my own maintenance. That’s been even more so evident since my move to France, where trying to converse about bike parts with a local mechanic (let alone getting my bike to the mechanic) is somewhat difficult language-wise.
As for that bolt extractor set, yes, it was a piece of engineering beauty that saved the day in that first picture. Boom! Bolt removed!
Plus, I even got a next 1-mile round-trip walk to the hardware store out of it…
As always, thanks for reading!
FOUND THIS POST USEFUL? SUPPORT THE SITE!
Hopefully, you found this post useful. The website is really a labor of love, so please consider becoming a DC RAINMAKER Supporter. This gets you an ad-free experience, and access to our (mostly) bi-monthly behind-the-scenes video series of “Shed Talkin’”.
Support DCRainMaker - Shop on Amazon
Otherwise, perhaps consider using the below link if shopping on Amazon. As an Amazon Associate, I earn from qualifying purchases. It doesn’t cost you anything extra, but your purchases help support this website a lot. It could simply be buying toilet paper, or this pizza oven we use and love.


I also have a couple of old toothbrushes nearby. Really handy for the cleaning jobs, especially the spokes and the wheel rims.
No housing cutters to deal with brake and shifter housing? (not to mention they are much better at cutting thick wire like brake cables)
Electrical tape I find very useful when I rewrap my handlebars
Nah, that’s beyond my typical skill level of fixing my bike (though, I do need to dive into that as things have become shifty as of late…).
I was in the same boat as you, those awful chainring bolts. Rusted all through. That time I actually drilled them out. And later I got a special tool to hold them, since they have two tiny gaps in the backside. I always bring my tools when I am bike car, I know what I have with me and what I can fix.
Love that FSA uses torque screws for their chain rings. So much easier to deal with then that weird slot like tool Shimano uses as it doesn’t slip as easy. (though have to say multi function screw drivers tend to suck when you need lots of torque so had to get a dedicated torque screw driver)
Suprised Ray doesn’t have any torque bits
No chainwhip? How do you use that cassette remover without a chaninwhip?
Eeek ,somehow missed that in the photo. In a box still from the move. Just added note above. Thanks all!
Do you have a repair stand that you use? or is there one you’d recommend?
Park Tool makes a good, solid, reasonably priced one…and it is much easier to do work when then bike is up in the air. Highly recommend.
I had one, but upon my move I just didn’t have room for it and gave it to my neighbor. Instead, I just place it on a trainer – pretty much works for almost every scenario.
Ditto the chainwhip comment!?
Great kit! One possible addition you might like – Grease Monkey Wipes. Gets your hands clean without burning off a layer of flesh (or leaving a thin line of grime) because they actually got the strength, etc, just right.
I always knew you had a screw loose.
link to i70.photobucket.com
no chain whip?
Goo Gone is a must have in the house! Also- why did the relocation people take your torch?
aren’t permitted to move with flammables, usually same rule with compressed canisters. my last move they took away my fire extinguishers…which really didn’t make sense to me at all.
Have you considered setting up an Amazon webstore for DC Rainmaker-approved products? This would allow your readers to easily find items that you use and like. (I know posts like this and your annual “Gear I Use” posts do this, but a simple storefront would put everything in a central, easy-to-find location.)
+1 to this
Or put your affiliate links in the article, as you deal with each tool (obviously stating at the beginning of the article that they are affiliate links). Means that people can simply buy the item without having to remember its name and/or find it in DC’s A store.
I recall that one of the feedback items from Ray’s survey was that people weren’t aware of the money off offer for his US shop partner (sorry the name escapes me – I’m in the UK) or his Amazon affiliate link. Affiliate links in a useful post like this are good way of reminding readers in a non-salesy fashion (because they’re disclosed and Ray obviously uses the product).
Seems only fair that Ray makes a little bit back for all the value he provides (particularly in those monster product reviews…).
The tool geek in me feels the need give you a few tips:
That’s not an adjustable wrench, it’s a polygrip or slip joint plier. Use them sparingly, they will damage any surface they´re used on. There´s always a better suited, less destructive tool for the job.
Torque wrenches are sensitive and if you abuse them they’ll go out of calibration. Don’t use them to loosen bolts, never ever use them as a hammer and always reset them to zero when done. They are expensive to calibrate. For cheaper torque wrenches it’s usually a better option to buy a new one. They are most accurate around half or 2/3 of their torque range and not very accurate at the extremities of their range. Thus you often need several torque wrenches to accurately tighten both low torque and high torque bolts.
Stay clear of that type of screw extractors/easy outs! If you must use one, put them in a tap handle and work them gently, don’t put them in a power drill! You risk breaking the screw extractor. Conical screw extractors like those will expand the bolt making them even harder to unscrew. There are less conical models that are slightly better.
I recommend the following to extract stubborn bolts:
– Tap the head of the bolt to try and break the bond in the threads. An impact screw driver is ideal.
– Apply heat, cold and suitable chemicals.
– Weld a nut on top of the bolt.
– Screw extractors should be your very last resort. Only use them if you don’t have access to a welding machine and are prepared to scrap the part with the stuck bolt in it. Stay away from the conical ones and buy high quality screw extractors.
I highly recommend adding an impact screwdriver to your toolbox. It’s the first tool I reach for whenever I suspect a screw might be hard to unscrew. If you use e.g. a regular philips screw driver on a stubborn screw you’re likely to slip and damage the screw making it even harder to extract.
How would welding be good for a bike part? Don’t you risk heating the part the screw is in too much? (pretty sure many of the parts a heat treated)
So one of the first pictures shows the torque wrench pretty much coming out of the bottle of gunk remover. I glanced at that picture then had to go into a meeting. Halfway through the meeting for some reason I remembered that picture and for the life of me couldn’t figure out what it was. Drove me crazy. Glad to now see it’s two different items.
Nice Lowe’s commercial!
But really, you need some T-Handle Allen wrenches to make it look like you know what you are doing! My “bike” tool kit is really just scavenged from my auto tools
And a +1 on that’s not an adjustable wrench. It’s what’s usually know by a diluted trademark – Channel Locks.
I don’t like the T-Handle ones quite as much as I’m more of an Alton Brown kinda guy when it comes to wrenches. I want one set that doesn’t become separated (read: lost) with all sizes in one place from really big (removal of crank) to really small.
And you’ve got the whole, if it ain’t broke, don’t fix it. You’ve had it for like a decade!
And what you bring with you when you for a long ride?
Just a small bike wrench multitool, two tire irons, two CO2 cannisters, and a CO2 nozzle, plus a spare tube.
And now The Girl’s kit for the bakery?
That’d be far too large for one post. It’d make my in-depth reviews look tiny.
Most (all?) torque wrenches come with a tool case.
I’d strongly recommend keeping the wrench in its case. They’re quite delicate items and they will go out of calibration if they’re knocked around with other tools.
I’m a competitive track rider, so I’m frequently changing stems and bars for different events. All that stuff is made from carbon these days so am accurately calibrated torque wrench is essential to avoid cracking (over-tightening) or slipping (under-tightening).
Your wife’s creme brulee torch is all the blow torch you’ll ever need!
To the person who asked about proper bike cable cutters…you’ve obviously never paid close attention to the photos of Ray’s bike!
Then crank wrench is obsolete, as we no longer use square taper bottom brackets and self-extracting crank bolts. An 8mm allen, or better yet an 8mm allen socket, is all you’ll ever need.
The pedal wrench is also close to going the way of the Dodo; most modern pedals do have the hex head built into the axle (accessible from the back side) and if they don’t, a 15mm spanner has less chance of slipping and marring the surface.
Guessing he probably uses the Channel Locks to hold the cassette removal tool in place; about the only place I could think of where that would be warranted. I use a crescent wrench, but that’s probably just a preference thing.
Some of the new pedal-based power meters make the rear-entry option with the hex a bit dangerous.
Indeed on the Channel Locks, also useful for getting a good grip on said stuck bolt (one came out that way).
Ray,
Where did this tire iron description “For removing bicycle tires off of wheel frames” come from? Never heard of a “wheel frame” myself, but maybe that is a regional or tri-terminology?
Consider using a fabric or rubber strap wrench to hold onto any cylindrical part initially in place of channel locks. In most cases it will be enough. Channel locks should be a last resort and consider replacing the part afterward.
Respectively, a friendly former pipe fitter/plumber.