Tonight I had the opportunity to go out for a ride testing out the new Brim Brothers power meter, Zone, which is mounted into the Speedplay cleat baseplate that’s attached to your cycling shoes. The Brim Brothers Zone has long been of interest to many in the cycling world, as it would make moving your power meter from bike to bike as simple as walking from bike to bike.
I happened to have work meetings that took me to Dublin (Ireland) for two days, and thus got in contact with the team at Brim Brothers to see if we could arrange a test ride. While they aren’t quite ready to have me with test units day to day yet, but they did give me as much time as I wanted tonight to wander around on my own and ride with the Zone system. Squeezed in between other meetings I had in the evening, I got out and got a nice hour ride with Zone, plus a bit of testing in an industrial park beforehand to ensure I understood everything.

I was glad that they were fine letting me use my own ANT+ recording devices (a Garmin Edge 800 and Garmin Edge 500) to record the data streams from the power meter, which I’ve included below (and raw files at the end). They supplied the bike, and shoes pre-configured. They were good to have me use my cycling shoes, but given the tight timeframes of my schedule, we decided to let them go ahead and have me use a pair of theirs validated and setup upon my arrival.
The Zone power meter is cleat based, which is different than pedal based. As you probably know, the cleat is the piece that stays on your cycling shoe, whereas the pedal is the piece that remains on your bike. At present, they are utilizing a Speedplay system for the design. Down the road they’ll tackle other pedal/cleat types, but for now their focus is on the Speedplay units.
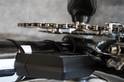
The entire system is divided into two sets of components. First is the cleat itself, which is where the core of the power meter system is. It’s here that the stresses are measured, ultimately giving you wattage.

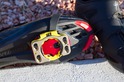
This is then transmitted via a flat wire to the transmitter pod, which is located on the top of the shoe. It should be noted that the transmitter pod seen here is a prototype, and won’t be clear in the final version and may change shape slightly. In addition, on this particular shoe, the wire is slightly longer than normal and thus wrapped on itself. Normally that’s not the case.


The flat wire you see on the side has been a bone of contention for many watching the progress of the power meter, with concerns about it potentially being sheared off. Over the past couple years I’ve seen a fair bit of progress in their design, to the point that this wire really is almost completely flush against the shoe. Sorta like that fancy speaker wire you can put on your walls and paint over and be invisible. That’s not to say that you couldn’t still find a way to rip it off, but at no point during tonight’s ride did I worry about it.
Given that the wire is on the outside of the shoe, it’s probably in a less vulnerable place than the inside (which could brush up against the frame). That said, their goal is that the wire is both flush enough, and well sealed enough against the shoe that it could take a brush against the sidewalk curb without any issue.

Back to the pods. The pods are rechargeable (one for each shoe), and simply snap in and out of the base that remains on your shoe. They get about 15 hours of battery life on them. So basically, when you go and charge your GPS unit, just charge your pedal pods too.

Note that today the pods are technically interchangeable, though, they are specifically set/intended to be Left and Right. Meaning, the left one is labeled left, and the right one labeled right – and thus, you’d place them in their corresponding slot. Though, as I found out tonight – they’ll happily hang out in whichever home you put them in (with the prototype units). I noticed that a bit into the ride the pods had been put into the wrong slots – so that left was right, and right was left. Not a huge deal for me tonight, and something they’re planning to ensure just takes care of itself (aside from me simply reading the labels).


With the basics covered, let’s get onto the ride. As noted before, I had about an hour to wander. They were fine with me going longer, but I had meetings following it I had to get back to. For my wanderings, I started off in an office park area, and then headed out into a bit more of the suburbs. Once beyond the initial traffic, I was more or less nonstop. Up and down hills, and generally enjoying all that Dublin had to offer for a rather cold night ride away from traffic.

The first thing we’ll tackle is pedal balance. Pedal balance is the balance of your power output between your left leg and your right leg as exerted on the pedals. Though in this case, the cleats. This is displayed as a percentage, such as: 53% – 47% – and is always out of 100%. The first number is your left leg, and the second number your right leg. While riding, I generally saw my pedal balance between 50 and 55% on either leg, with a slight dominance of my right leg (again, remember that for tonight, the data was flipped left/right leg, so the left leg number shows higher). Many power meter compatible analysis platforms now show this data, such as Garmin Connect, Golden Cheetah, or Training Peaks. Below, Garmin Connect:

From a head unit perspective, a smaller number of head units support pedal balance. Today, that’s limited to the Garmin Edge 500, Garmin Edge 800, Garmin FR910XT, and the CycleOps Joule GPS. I’m not aware of any others that support left/right today.

Today there are no ANT+ compatible units on the market yet that actually transmit true measured left/right power. Those that will transmit true measured left/right power include the Brim Brothers Zone, the Garmin Vector, and the ROTOR 3D power meter. This is notably different than the newer 2012 power meters that transmit calculated left/right power, such as the newer SRAM Quarq Cinqo’s and the post-September 2012 Power2Max units. Those two units utilize stroke segmentation to attempt to determine the leg driving the stroke, versus measuring it in two places. This is easily tricked by simple single-leg pedaling.
Finally, at the power meter level, the data is transmitted with two pieces to the head unit. The total power is transmitted, along with the right % power. From there, simple math can be done to determine actual values. All ANT+ units work this way. The only non-ANT+ unit that measures left/right power today is the Polar/Look Keo Power System, which does so over W.I.N.D. (not Bluetooth or Bluetooth Smart). The Polar/Look Keo system measures it at the pedal.
Ok, back to the Brim Brothers Zone and my percentage numbers.
Lacking any way to back up the power balances technically, there’s no way I could discern something like 52% versus 57%. That said, I can (and did) do slow shifts in left/right balance in my stroke, and could easily see it shift balance across the two sides. Like shifting sands in an hourglass.
A far more clear test of this is simply one-legged pedaling. In this scenario, I would completely detach one cleat from the pedal (just hold to side), and remain pedaling with the other leg. In doing so, you should see the power go to 100% – 0%, which is what I saw. I did notice one brief split-second reading of 97/3, which is probably why it’s not quite a perfect 100%.

(As noted later, the reason why you see the right balance so much higher in general is that it currently defaulted 0w to 100% right balance, a bug.)
In addition to left/right tests, I did some random intervals up some climbs as I found them. Take Interval 6 for example, which was a steady-state push up a hill. IN this case, I think the 319w average was probably fairly accurate, as was the balance at slightly off-center at 58.6%. But I wouldn’t agree with the 1,303w max.

Going to something a bit more generic, here’s what the ride file looked like for the ride itself. You can see that for the segments where I was uninterrupted, the data is actually pretty smooth and clean (such as from around 19 minutes to 26 minutes – a climb as you can see on the graph below.


Ideally, I would have had more time, and be in a more controlled environment – as variations become far more instantly visible on something like a trainer.
Of course, as you can easily see the data’s not yet perfect. It’s not a finished product, and thus there are bugs. As Barry Redmond (one of the Brim Brother founders) noted to me tonight – “If it was perfect, we’d be selling it today.” Which is a fitting and appropriate comment for not only the Zone power meter, but many other promised power meters for the upcoming 2013 season – including the Garmin Vector, Stages Power Meter, ROTOR power meter and numerous others. Ultimately, I have no doubts that all of these products will come to market, and do so with satisfactory accuracy and reliability. None of these companies are any different than Polar/Look in their ability to bring this technology to market. All of them face the same challenge though of solving those last final nagging bugs.
If we look at the Zone ride file, there were some bugs I saw. For example if I stopped pedaling, it shifts the pedal balance to be 100% to the right unit. While power wattage correctly shows 0w, the balance shows 100/0. Obviously, this is a relatively trivial item to fix in the grand scheme of things (statement: If 0w then pedal balance = null), but it is indicative that they aren’t 100% there yet.
Additionally, I felt that the power readings seemed high in general to me. The unit does support calibration (which was done), but the readings still seemed to trend a bit high. There were also two unexplained spikes. At one point it listed my maximum recorded power point at 1,303W – which was likely about 400-500w higher than reality for this ride. Looking at the detail of that one second in time, you can see a strange drop, followed by a spike in cadence corresponding to the spike in power.

During steady state efforts the power values were clean however (even if they felt skewed high), as you can see in the above graphs a bit higher. Which is better than being choppy or highly variable. Of course, I didn’t have another direct force power meter on the bike to gauge whether or not my guesstimate on being high was accurate or not.
With everything said, what were my key takeaways from tonight on a prototype unit?
1) It’s not perfect, but it does seem to be generally stable while riding. There weren’t any obvious dropouts (minus the two one-second spikes noted), nor complete weirdness in balance during steady-state riding. The balance appeared and felt accurate once pedaling.
2) There are some cleanup bugs around balance transmissions (i.e. left/right) where 0w faults to 100% right.
3) As a whole, the system is silly easy to use. Turn it on, and off you go onto any bike. There’s nothing different about this bike, it’s just standard Speedplay pedals.
4) It simply pairs up with ANT+ like any other power meter.
4) As noted above, in general, some of the wattages seemed to trend a bit high based on my gut feeling.
4) I’m not as concerned about the side connection wire as I thought I’d be. But I reserve my judgment until I’ve had some time with the unit in day to day conditions.
Of course, this is merely a point in time. A single ride. Nothing more, nothing less. At some point, I’m sure they’ll send over a unit to test longer term. At present, they don’t yet have a definitive publically releasable timeframe or price, though they are getting closer on the release side.

Many folks ask if they should ‘wait’ for the Zone – or the Vector, or the Rotor, or any other fill in the blank power meter. And my answer is largely the same each time. If you need a power meter today, go out and get a power meter today. If you feel like you can wait – then consider waiting. In general, I think we’ll see far more units on the market this spring, than we have on shelves today. But that also means many more months of waiting and lost time training with a power meter. And, the same will be true in the spring, when we look towards the fall and find yet another batch of units either being readied or prepared for announcement at the likes of Eurobike and Interbike.
As always, if you have any questions, feel free to drop them below.
Note: My full Garmin Edge 800 file is viewable on Garmin Connect here (and downloadable). Please do remember the notes above regarding the bugs around power balance. Additionally, don’t overthink some of the data in low-speed situation, as I was literally dodging and weaving rush-hour traffic. Thus, with one pedal clipped in, and one clipped out, data may look inconsistent during those first 10-15 minutes. And here’s the PowerCal file for fun.
FOUND THIS POST USEFUL? SUPPORT THE SITE!
Hopefully, you found this post useful. The website is really a labor of love, so please consider becoming a DC RAINMAKER Supporter. This gets you an ad-free experience, and access to our (mostly) bi-monthly behind-the-scenes video series of “Shed Talkin’”.
Support DCRainMaker - Shop on Amazon
Otherwise, perhaps consider using the below link if shopping on Amazon. As an Amazon Associate, I earn from qualifying purchases. It doesn’t cost you anything extra, but your purchases help support this website a lot. It could simply be buying toilet paper, or this pizza oven we use and love.