
A few weeks ago when Zwift announced their new running track within Watopia, a bunch of you were curious about the NPE Runn device I showed briefly within that post. But then yesterday Zwift sent an e-mail out to about a third of a million people talking about the Runn, and a cruise ship’s worth of you migrated here for questions. So ask, and you shall receive!
Runn serves exactly one purpose: It turns your dumb treadmill into something a bit more bright. The small pod simply attaches to your treadmill and then broadcasts itself as a smart treadmill, allowing apps like Zwift to get your current speed as well as cadence. It even transmits the treadmill’s incline too, though no apps yet take advantage of that today.
For those unfamiliar with North Pole Engineering (NPE), my guess is that if you went into any major chain gym in America, you’ll probably find NPE devices hidden away behind the scenes. They’ve become one of the core players in the fitness communications realm on things like ANT+ & Bluetooth sensor connectivity and bridging in gyms, but also chipset/communications work and solutions behind the scenes for companies like Wahoo, Orangetheory, Kinetic, Scosche, Garmin, and many more. You’d probably be surprised how many sports tech paths lead to this Minnesota company. But this product is all about the consumer, not the industry.
Finally, note that I did buy this unit myself. As noted I had previously beta tested a prototype of the Runn over the course of the fall. And then I recently bought a final version at full retail price ($99) for myself and the DCR Cave. That’s what you see here. As always, I don’t do sponsorships of any type with companies that make the products I review. If you find this review useful, hit up the links at the bottom or on the sidebar to help support the site.
What’s in the box:
NPE has never exactly been known for their swanky box or packaging designs, and the Runn continues that trend. Their mantra would probably be “Just the facts, ma’am”. The box simply says North Pole Engineering on one side, and Runn on the other.


Crack open the box flap and there’s a simplistic note sitting atop it:

That note reminds you to fully charge the unit up before first use, as well as their e-mail address in case you’ve got any feedback or issues.

Below deck there’s a tray of stickers. This box is basically my toddle’s dream: Two different sticker packs and something with blinky lights.

The red ones are double-sided tape and used to attach the Runn device to your treadmill, while the silver stickers are used as mini light reflectors on the treadmill belt itself.


There’s also a short manual with the handful of steps you’ll need to know.

Then, of course, there’s the device itself, which is technically two parts – the pod and the pod holder.

Plus the micro-USB charging cable:

The pod easily unclips from its holder, and if you look at the underside of it you’ll see the two little optical sensors at the top (right picture, upper edge). It’s the measurement of the time it takes for the little sticker to go between the two points that’s determining the speed. Since this distance is known, figuring out the speed is easy.


We’ll talk more about these later. Then on the back you’ve got the micro-USB charging port under a protective rubber flap and the single power button:

With that, we’ve exhausted all there is to exhaust in this box.
Installation:
We’re gonna keep this section short. Because frankly, it’s easy and short.
If you didn’t charge it yet out of the box, now’s a good time to do so, unless you plan to simply leave it plugged in all the time.

Now, find your treadmill. I suspect this step will be easy. Next, you’ll need to find a smooth spot on your treadmill to mount the unit. Grab the mounting piece and find a spot big enough, ideally not near where you’ll clip it while running. In my case, I went towards the very back. As a pro tip, you’ll want to ensure you’ve got a spot that’s smooth and ideally doesn’t have any curvature or slant to it.


For example, you can see how on my treadmill there’s a slanty part that looks like it got the Chicken Pox. That ain’t no good! Sure, with enough creativity you could make it work (I did briefly on the earlier prototype), but it won’t be super stable. Physical stability is ideal for accuracy and stability of your pace.
Once you’ve got your spot, place the tape on the back of the NPE device, and then remove the other part of the double-sided tape. Plunk it on your spot:


And then attach the unit to it. You’ll want the pod a bit under 1cm from the belt, so pretty darn close. I find it useful to put the treadmill on a low speed while doing this, so you can hear in the event it rubs anywhere.

Next, you’ve got these little silver stickers. These are what the unit uses to reflect light off to measure speed. You need a minimum of one, and ideally a maximum of 2 or 3. I used one during most of the prototype phase without issue, and then also used 2 and 3 with the production device. I didn’t personally see much of a difference in responsiveness, but if you’re mostly at slower speed, it’ll make more of a difference.
Remember, it’s not measuring the time between the stickers, but rather the time it takes a single sticker to pass from the 1st optical sensor to the 2nd optical sensor. The more stickers you have means there’s more data points to gather speed upon each rotation.

In my case my treadmill has this pattern on the belt. While that’s great for traction, it’s horrible for stickers. That means that in some cases the stickers would last about 4 rotations before flying off. I had a bit more luck later by really cleaning the sticker spot first, and then pressing the crap out of the sticker into the groove.

Instead what you can just as easily do is take a little bit of white-out and make a mark as well. That works just as well for me and NPE says that’s perfectly good too. It basically just needs a white-ish surface to reflect the light off of:

Finally, go ahead and plug the device in. It’s got an internal battery that lasts 10-12 hours according to NPE. I never used that bit. I just left it plugged in the entire time. The cable NPE provided would probably drive a large pickup truck, since it’s a bit short. But since it’s just a standard micro-USB cable, I just grabbed a longer one out of the bin of 148 micro-USB cables I have. Plug it in and then forgot about it for the rest of your life:


Finally, you can use NPE’s GymTrakr app to do quick tests of the sensor, as well as even record workouts and save history from it. It wasn’t something I spent much time testing though, as like many sensor-focused apps from sensor companies, if the device works properly, you’ll probably be using other 3rd party apps 99% of the time anyway.
With that, done.
Usage with Zwift:
I’m going to mainly focus on Zwift here, since I’m pretty sure that’s what approximately 99.3% of you will use it for. But it’s not technically limited to Zwift. In fact, that’s sorta the beauty of following industry standards – it’ll work with any apps that support these standards.
The Runn currently broadcasts three core values:
A) Your current pace
B) Your current cadence
C) The treadmill’s current incline
It does this on two protocols:
1) ANT+ FE-C (for fitness equipment control)
2) Bluetooth FTMS (for fitness equipment control)
In addition, it supports the broadcasts itself as a standard running footpod, it’ll show up on both ANT+ & Bluetooth Smart, allowing you to pair it to virtually any Garmin/Suunto/Polar/COROS etc running or multisport watch. That’s because none of those watches support FE-C or FTMS, so you wouldn’t be able to use it with them directly yet.
However – in my testing this function wasn’t showing up. NPE says (after publishing) you need to have the unit either plugged in via cable, or double-tapping the button. I had the unit plugged in, but I’m not sure if I tried double-tapping before or after pairing. At this point I’m on a trip to the Tour Down Under, so will have to check again when I get back.
Go ahead and crack open Zwift. It doesn’t matter what platform you use – it supports them all. I’ve tried it on Apple TV (Bluetooth Smart), Windows PC (ANT+), iPad (Bluetooth Smart), and iPhone (Bluetooth Smart). You’ll see the option to switch Zwift into the ‘Run’ mode if that’s not your default.

Next, you’ll see the Runn sensor listed automatically as a ‘Run Speed’ sensor. In my case, I had both the production unit you see as well as the prototype nearby. You’ll notice how the icon is technically a little treadmill, and not just a plain footpod. That’s because it’s using that fitness equipment protocol instead of the footpod one.

Once you’ve selected that, you’ll see the Runn sensor showing. I turned on my treadmill so I could show you the speed bits, so you see it showing 6MPH there (if you have Zwift set for non-Americana, it’ll show metric).

However, we’re not done yet! Next, let’s pair up the cadence side of things. You’ll see the option there, simply select it and tap OK. Because I was using an iPhone for these screenshots, you’ll see that it shows just the Bluetooth Smart connection. If using an ANT+ enabled computer/etc it’ll show ANT+ too.

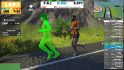
And with that – you run. It’s frankly as simple as that. Below you can see my pace showing up on the left side and upper middle (8:01/mile and 7.5MPH), as well as the cadence (Steps/Min at 172). Cadence is using the vibrations of your (or my) gigantic footsteps through the belt and shaking the treadmill as I do. Given how sensitive accelerometers are, this is probably equivalent to the ease of detecting an 8.0 earthquake.

A couple of weeks back when I did my first Zwift structured track workout I used it then too – and it worked great. In that case I was using it with ANT+ and my laptop precariously perched above the treadmill on a cabinet. I did see a few dropouts there, but in talking with NPE they suspect that might be more to do with the specific ANT+ USB stick I was using and the wonky location of my laptop. NPE says they’re looking at a few options there as well though if they see it become a more widespread issue.

One of the fascinating things that the Runn will show you though is just how accurate (or inaccurate in my case) your treadmill is. Unless a sticker flies off, the Runn is a fairly simplistic device in terms of how it works. It’s gonna show the correct belt speed. The question is: Does your treadmill show the right belt speed?
Of course, treadmills are known the world around at being inaccurate or variable, and mine is no exception. For example, at relatively steady and long-run type paces, my treadmill is pretty much spot on with no issues. But, when I ramp up the pace and start throwing down intervals like the above, my treadmill has a rough go of life.

The actual belt speed wobbles quite a bit. And it’s something you can absolutely feel (and see in the charts above). My treadmill has quick selection options along the side, enabling me to quickly tap a given speed (shown in KPH here) and it goes straight there within a few seconds. But what I felt, and Runn confirmed in data, is that the speed oscillates and meanders quite a bit. Upwards of a few KPH easily at these higher speeds. I’d then have to manually put the treadmill faster to get it to the target speed.

So while some may prefer ignorance is bliss on this sorta thing, having Runn is great here, because it allows me to ensure my intervals actually hit the exact pace I want – not some less useful slower (or faster) pace.
Now as mentioned earlier, the Runn transmits your incline, and even allows you to zero it out with a calibration option too, in case this is somehow out of alignment. However, no apps that I’m aware of today actually support this feature. And even once implemented the main usage would probably be around displaying incline difference reminders. Note that you can change the incline zero (baseline) via calibration via a simple button procedure. I did this for my first unit but didn’t see any meaningful difference on the final production unit with my specific treadmill.
That’s because the unit doesn’t integrate directly with the treadmill. Meaning, it won’t change the incline on your treadmill per what Zwift (or any other app) says it should be. This is mostly because treadmill companies are super hesitant to let 3rd party companies or apps change the treadmill incline or speed (the primary concern is speed). In fact, NPE actually has gym modules that integrate better with treadmills – though unfortunately mine doesn’t support that module port type (Random backstory: Four years ago Wahoo partnered with NPE initially for this module, and then sold it all back to them, so it’s all NPE now).
In any case, once you’re done with your workout, then like normal you’ll get all your stats on your run just as you would have with a footpod.

I’ll add some more accuracy comparison charts here over time, but honestly that’s kinda like comparing the weather on your phone saying it should be raining, versus just looking out the window and seeing it’s not yet raining. Using a footpod or a wrist-based accelerometer will introduce some variance. For many people – it’s stable enough. Whereas with this, as long as you’ve got your stickers (or white-out) in the right spot, there’s very little chance of measurement inaccuracy.
Treadmill belt speeds can and do shift slightly within each ‘rotation’ of the belt. It’s one of the arguments that Stryd, for example, has made on why a footpod might be a better fit for some people indoors. But Runn gets around that by simply allowing you to add more stickers, which increases the sampling rate per revolution. I think it’s far less likely that within that split-second gap between the sensor detecting the next sticker that you’re going to find an appreciable difference in speed, versus the far more common scenario of just having a footpod that’s not perfectly calibrated at all the speeds you’re trying to track (most footpods become less accurate the further away from your calibrated pace).
In any case, at this point, that’s about all you need to know about the Runn.
Footpod vs Treadmill Sensor:
I’ve seen a few questions on comparisons to a footpod, and which one is a better choice. As always, the proper answer is ‘it depends’. For example, if you want to go outside, then no amount of Runn creativity will help you there (ok, I suppose one could get absolutely crazy creative with markings on the ground…but don’t tempt me!). So for that, a footpod like the Zwift Pod or Stryd will be better.
But if you’re focused purely on treadmill usage, then the next question is whether or not it’s a treadmill under your control. If you primarily run on a gym treadmill – this isn’t super ideal, since you’d need to place stickers on it and a mounting pad. On the flip side, if you live in an apartment building with just 1 or 2 treadmills, you could probably get away with applying the stickers, and then instead of using the tape, just use Velcro to be able to quickly attach the sensor to the treadmill (certainly, one sticker strip of Velcro will have to remain). So if you don’t own it, then you’ve gotta balance those aspects out vs just using a footpod. (This is where the previous TreadTracker was great, sadly, it’s been discontinued)
Last then, is the case of owning your own treadmill and deciding whether Runn or footpod is best there. For me, I’m going to go Runn. The reason is simple: I don’t have to dork with it. Just like a stationary trainer or indoor bike, it’s just sitting there ready for me. No charging required (since I just leave it plugged in), and no calibration required. I know some footpods claim no calibration, but there’s kinda a mountain of people showing that’s not entirely the case.
With the Runn, it’s a very straightforward concept. There’s no need for calibration for most people. It’s just measuring belt speed with two optical sensors. That actually has advantages of the earlier TreadTracker, because that measured it via a small wheel that could potentially see bumps/drops due to footsteps bouncing the belt. With the optical sensor, I haven’t seen that be the case. And of course, the Runn sensor is a heck of a lot cheaper than the Stryd footpod, though, more expensive than the Zwift footpod.
Finally, if in a multi-user situation, then the Runn really excels, because it’s there for everyone. No need for multiple footpods each with their own calibration values.
Summary:

NPE’s made a name for itself in the consumer space by filling these protocol and connectivity niches with reasonably priced solutions. They did it with CABLE, WASP, HeartBeatz, and now Runn. In all of these scenarios (except for WASP), technology will eventually eliminate the need for this product. And I suspect that’s alright with NPE – it’ll have moved on to the next thing.
With Runn it’s filling the gap of decades of treadmills out there that can’t connect to much of anything. Treadmills that people are highly unlikely to replace. Heck, even boatloads (the vast majority) of brand new treadmills these days don’t transmit pace or cadence on proper industry standard protocols.
I’d love to see a way to mount it underneath the treadmill (to minimize chance of damage), and of course, I can’t wait for Zwift to do something with the incline data. For example, they could show when there’s a mismatch between the prescribed incline in Zwift, and what the treadmill is showing.
In my case, I’m looking forward to the Runn sensor always being there, and just having a high ‘just works’ factor. I’m all about ‘just works’ devices.
With that – thanks for reading!
Found This Post Useful? Support The Site!
Hopefully you found this review/post useful. At the end of the day, I’m an athlete just like you looking for the most detail possible on a new purchase – so my review is written from the standpoint of how I used the device. The reviews generally take a lot of hours to put together, so it’s a fair bit of work (and labor of love). As you probably noticed by looking below, I also take time to answer all the questions posted in the comments – and there’s quite a bit of detail in there as well.
If you're shopping for the NPE Runn or any other accessory items, please consider using the affiliate links below! As an Amazon Associate I earn from qualifying purchases. It doesn’t cost you anything extra, but your purchases help support this website a lot.
And of course – you can always sign-up to be a DCR Supporter! That gets you an ad-free DCR, access to the DCR Shed Talkin' video series packed with behind the scenes tidbits...and it also makes you awesome. And being awesome is what it’s all about!
Thanks for reading! And as always, feel free to post comments or questions in the comments section below, I’ll be happy to try and answer them as quickly as possible. And lastly, if you felt this review was useful – I always appreciate feedback in the comments below. Thanks!


Great article, I bought this unit last week after reading your article on zwift. I installed it without issue. But it does work with my Garmin 945 without issue, and it shows up as a footpod, and works great.
Thanks a lot. That’s exactly what I wanted to ask! (Using an F945)
I’ve zero interest in watching ‘myself’ run around a cartoon track. I just want to know accurately how far and how fast I’m running on my treadmill, very much preferably sent to my garmin. If this is the case I’ll be buying one.
The cheapest place I’ve found to buy is from zwift as it was 20 £/€/$ cheaper than anywhere else rather than direct from NPE or other website
How are you connecting to your F945, per Ray’s comment above, it does not yet broadcast as a footpod?
Hi,
The Runn officially supports the Stride Based Speed and Distance Monitor ANT+ profile which allows the Runn to connect to the Garmin Watches (like the F945) as a Footpod sensor to transmit speed, distance and cadence data.
The Runn also supports ANT+ FE-C profile to transmit speed, distance, cadence and incline data.
Thanks,
-North Pole Engineering Support Team
I’m a bit confused… Ray notes in article this is coming later via firmware update… Or is he referring to something different?
We sent a separate communication to Ray looking to clarify this point. The Runn does currently support that capability. You will need to either double tap the button on the back of the Runn or plug in the Runn to the USB Cable to turn ANT on in order to connect it to your Garmin watch as a footpod.
Thanks,
-North Pole Engineering Support Team
Yeah, I’m e-mailing back and forth on that one. My production one was plugged into cable the entire time, and I tried scanning with multiple watches (935/945/VA4) and Zwift app and didn’t see the footpod profile.
I don’t remember off-hand whether I tried double-tapping before or after scanning. Either way, once I return from Australia I can re-confirm on that one. I assume the double-tap will fix it.
Double Tap. It’s rule #2 of Zombieland. :)
Ray, I see you made some changes to your article to reflect this, but the amended paragraph doesn’t make sense any more.
Also, although as you say Zwift doesn’t show any changes in incline reported by the Runn, it does pass them through to Strava so your Strava activity will show your ascents (not sure about descents, my treadmill only goes up!)
I’m pretty happy with my Runn – my only observations would be that the instructions are a bit bare – they’re more of an installation guide than an actual user guide. There’s probably not much to add, but just some basic stuff like how you actually turn the unit off and on is missing, whether you need to press the button once or twice, what the different light combinations mean etc.
As for calibration, my Runn was originally showing an incline when I was stood on the treadmill (but none if I got off it), which I think is because it’s on thick foam mat so it probably drops at the back when I’m on it. As I don’t generally trust the accuracy of my treadmill, I would have liked to be able to calibrate just the incline, but the speed/incline has to be calibrated together so my Runn speed is now calibrated to my treadmill speed which I would have preferred avoiding. It would be good to know if there is a way to reset to the Runn back to factory calibration, at least that way if I did still need to re-calibrate for incline I could first calculate some offsets of the treadmill speed (which I should have done first time round!)
Hi Neil-
RE: Changes
The only things I changed was that NPE says it should currently be broadcasting the standrad footpod profiles.
I didn’t change anything about incline, as I don’t think you’re actually seeing what you think you’re seeing. ;) Zwift passes that data to Strava, but that’s not from Runn. Rather, that’s just Zwift passing their own specified incline data within the route you run (whether or not your treadmill actually changes anything).
Good idea on separating out incline vs speed separation, and I suspect NPE would be open to that kind of feedback. Also agree on documentation. There’s very little there.
I *think* what you’re saying about incline doesn’t match my experience. Take a look at link to strava.com – most of this is on the flat running track, but I played around with the incline on my treadmill which corresponds to the climb profile showing in Strava.
And sorry, the paragraph I said didn’t make sense does seem to make sense now, so maybe it was just a bit early for my brain.
Thank you for clarifying.
Will the device always require to be plugged in or are there plans to update this in the future? I dont want more cables so a bit of a deal breaker for me.
It doesn’t need to be plugged in now, it’s got a rechargeable battery and can easily be removed for charging
If the treadmill drops at the back when you’re on it… doesn’t that mean that it does have an incline? What happens if you lay a spirit level on it?
It’s not clear that recalibrating it to be zeroed out in that situation is actually correct.
Yeah, I take your point and you’re probably right that actually I am always running at a very slight incline. I think it was only something like 0.1 – 0.2% though, so it’s more about me being anal than anything else.
Would you test this again? Maybe set your treadmill to 5%, run the track, and see how the Strava data looks? Elevation gain still won’t show up on the watch of course, but using Zwift as a middleman isn’t so bad (as long as Zwift running remains free).
I was trying to get it to work with my 945 as well. It showed up in there as an FP but it was like the 945 didn’t recognize the speed values. I will have to try it again then because my 945 is horribly inaccurate with treadmill even with the Stryd FP. Which doesn’t make sense since the Stryd is accurate on Zwift on my iPad. Unless maybe my 945 isn’t truly using the Stryd for speed and using its own accelerometer. Hmm?
@Jan – I’m slowly recovering from a badly broken leg at the moment so I can barely run at the moment, never mind maintain a 5% climb! However, I think this should be enough to convince you:
link to strava.com
I had the treadmill set to 0 incline for the whole run except for the second km, where I did the first 250m at 2 incline (that’s not %, my treadmill uses an arbitrary scale), the second 250m at 4, third 250m at 0 and finally 250m at 6. You can see the Strava profile clearly reflects that. You’ll notice that it doesn’t record any of the Zwift/Watopia virtual inclines as this was a pretty hilly course but it just shows level (apart from when I inclined my treadmill), so it seems that Zwift deals with incline very differently between running and cycling.
I just tried syncing to my 945 and it worked right away! I was messing with the GymTrakr app, which is a complete mess. Just getting the speed/distance into my Garmin directly is much better. Pace popped up right away when I started the treadmill. I just added the Runn as a footpod in the Garmin settings.
To calibrate just the incline…after returning to factory calibration settings, is your treadmill at least speed consistent that you could set your treadmill to whatever speed is required to register 5.0 mph in the gymtrakr app and then don’t change your treadmill speed setting while you do the calibration?
Does it show your incline / elevation on Garmin Connect ?
Yes, you have find and add the Runn Connect IQ Data Field.
I just tried this but doesnt seem to work… I added the field and it displayed 320+% incline… I saw there was a settings tab but there’s no direction on what ‘Device Number’ should be entered… I assumed ant+ ID but once I added the ID the field updated to 0.00%.
Here’s a video on how to do it: link to youtube.com
Thanks – I’ve added the field just fine. But once I add the field it displays 327% incline.
I pulled up the gym tracker app and confirmed its displaying correctly there but not on the watch.
If you open GarminConnect on your phone, go to Devices > Watch > Apps > Data Fields and click on the Runn app, you’ll see there’s a settings screen with a Device Number field. It’s auto populated with a random number. I updated it to the ant+ id of the Runn unit but then my watch displays 0.00%.
So not sure why it’s displaying the wrong value even though it seems to be broadcasting correctly.
I had a similar issue and NPE advised to set the device number to 0. Once you restart the activity on your watch the field will automatically be updated to the NPE Runn unit ID number.
Yep – I noticed that happened once I removed the ant ID I typed in… still, my watch displayed 327%…
I took the Runn out of the mount and moved it around and noticed the % never changed in my watch. This was the case on both my F945 and F6.
Seems pretty straight forward, as in it should just work, but doesn’t seem to be the case for me.
When you use the Gymtracker app does the incline amount change? My first Runn unit was always stuck at -0.1% on watch and Gymtracker. NPE replaced my unit.
It does change in the app just not my watch.
And the app does show the correct %.
There is a known issue with current firmware that will be fixed the Runn doesn’t transmit cadence over Ant+ unless the run is also connected to something over Bluetooth (like Zwift). I wonder if that’s also the case for incline?
They released a connect iq data field for slope on watches. Haven’t had a chance to try it yet.
Hmm, I’ll give it a try without connecting to Zwift as each time it was connected.
Thanks for the heads up.
Hi Magnus, I recommend reaching out to their Help Desk at support@npe-inc.zendesk.com
They’re really responsive and will help you sort out the issue you’re having with your Garmin and Runn!
Does it integrate with elevation on Garmin connect or its own IQ fields ?
No it does not integrate with the native elevation values on Connect IQ. It only comes up as info for the IQ Field in Garmin Connect. For this same reason if you output the FIT file from Garmin Connect to another platform such as Training Peaks or Golden Cheetah this information will not get transferrred.
They have a youtube video on the incline for the Garmin watch. I am not sure what info this puts in for your runs, but thought I would share.
link to youtube.com
Do you know if it works with the 920xt??
Yes, it does! You can check out the watch compatibility here: link to npe-inc.zendesk.com
Ray, is it possible for you to check if you can pair your runn with coros pace via ant+?
My pace 2 sees the pod using Bluetooth but not with ant+.
Just a 2025 followup: NPE Runn is for sale but it seems like Android support has not been maintained. The available version is not compatible with my ~year old Android 16 phone. Community forums on the NPE website return a 404 on android chrome.
This sensor doubles cadence while walking. I don’t know if a recent firmware update has addressed the issue since I can’t run the app. Disappointing.
I assume the speed measurement is based on how long it takes the sticker to move between the two optical sensors?
Correct.
Does this mean there has to be a fixed distance between stickers? Do the instructions say “place stickers 1m apart” or you input the distance between stickers?
Never mind, the answer to my question was explained below.
Garmin watches stopped supporting the ANT+ Fitness Equipment profiles after about 2013. Which was disappointing, but only cycling trainers ever really supported it anyway. So I doubt Garmin will add those profiles back just for this treadmill unit.
link to thisisant.com
Garmin’s absolute weakness is indoor training machines
Apple Watch does a lot better with recent/modern indoor training machines (via Apple Gym Kit)
To be fair, what you saw in 2013 is actually a very different profile to ANT+ FE-C today.
It’s now about Garmin adding support for them to wearables (I’m not advocating that either), rather, NPE simply adding in support for the standard ANT+/BLE Footpod profile, which all Garmin wearables support, and NPE has said they plan to implement very shortly.
Biggest number off machines beside bikes: C2 indoor Machins with PM 3,4 or5 Monitor (rowers, bikes,…)
As we are moving towards the realm of treadmill controlling 3rd party accessories (I hope at least for incline) I wonder how the training SW like Zwift could introduce a “trainer difficulty” for treadmills? I wonder if I set it to 50% it’ll half the in-game incline? Just throwing thought around :D
I asked about curved manual powered trendmills and this was the response I got back from Tim at NPE
Yes, the Runn should mount fine and work fine with a curved, self powered treadmill. One of our developers actually tested with a Technogym curved treadmill recently and it worked fine.
For cadence, we have an onboard circuit that is looking at motion data. The motion data is run through an algorithm which provides cadence.
The maximum speed is limited by the values that will fitness in the speed data sent over Bluetooth. This limit is 655.31 KM/H or roughly 407mph.
Thank you Matt (and Tim at NPE) for making me laugh with the max speed XD
I’m guessing you have to enter how long the belt is, so it can work out your speed? Or are all belts the same size?
If you look at the pictures, there are two optical sensors. It will just measure the time the white marker needs from one sensor to the other. Due to this, no calibration (or belt length) needed. More white markers means it is measuring more often (good at low speeds).
Got you – thanks!
So it measures the time to get from one sensor to the next but it has to know the distance between those two sensors in order to calculate speed right? Then what if I put 5 stickers down instead of 2. Do they all have to be the same distance apart? Just trying to figure out how it calculates speed.
The sensors are on the device, so it is tracking the time for the sticker to hit the first and second sensor- they know exactly how far apart the sensors are on the hardware. I thought the same thing at first- how do they know how far apart the dots are, then realized they are just tracking the time each dot goes between their two sensors.
Thanks Glenda! I get it now. There are TWO sensors on the device.
This looks great.. However, I am in the camp of only using a treadmill in the gym. Its a work gym, not open to the public, but fairly busy and has about 8 treadmills. Do you know if NPE will sell spare cradles ? I think I could persuade the gym to buy a unit or two, and keep them behind the desk for those who want to use them. However, limiting the use to one/two treadmills wouldn’t really work. However, a clip/cradle and stickers on every treadmill so you can move a unit around would be fine.
I’m not really bothered about zwift, but using this as an ANT+ footpod paired to my 945 would mean far more accurate data for intervals.
Yes. We can sell extra cradles. We will have them on our store during next week.
Great – thanks. It’s the gym AGM next week, so I’ll be raising the purchases of a few as a request.
Hi, instead of the silver stickers a metallic marker pen should also work and my be easier to apply (and to refresh after some time).
Would you be able to connect both the Runn and Stryd to a single device (e.g., 945) to get pace from the Runn and cadence/power from the Stryd?
Runn doesn’t yet support the standard ANT+/BLE device profile for footpods for the FR945 to connect to. Once it does, you’d be able to handle that part. And the Stryd part would cover power. Cadence in that scenario would have to come from Runn.
Quick related question regarding running apps. do you happen to know if there is any way to take a garmin file of a previous race and import to simulate it on a treadmill cycling functionality?
Would this work on a woodway or similar slatted treadmill?
Yes, it will work on a Woodway or similar slatted treadmill. We tested it on the Woodway 4Front and the TechnoGym Skillmill and it worked great.
Hy Ray, One question, it counts the number of revolutions of the belt, but how it measures the lenght of the belt in order to give the speed?
It doen’t need to length. It has two optical sensors on the device that it knows the distance between and simply times how long it takes for the sticker to pass from the first sensor to the second one.
I’m interested in knowing how it calculates the belt speed. I didn’t see a mention of placing the stickers a certain distance apart. How does 1 sticker work if it doesn’t know the length of your belt? Did I just miss that part?
How does it know you have 1 or 6 stickers? If you have 6 how does it know there are 6 and that the belt just isn’t moving at a very high rate of speed?
How it knows belt speed. I just saw someone comment that there were 2 optical sensors and it just measures the time between the 1st sensor detection and the 2nd sensor detection.
Does Sticker width affect accuracy? Can the reflective marker be too wide?
Yes, the reflective stickers can be too wide. We posted a stencil on our knowledge base in case people want to make their own marks.
Where can I find the stencil? Or I guess a safe bet would be just dont make them any larger than the stickers right?
Here’s a link to the Runn Sticker Template: link to npe-inc.zendesk.com
Any reason you couldn’t mount this at the front of the track which would be less likely to be knocked off.
You can definitely mount it at the front of the track.
FYI there IS calibration if required. Mine was showing incorrect speeds on initial installation and they guided me through the following steps which worked:
Step 1 – Set the treadmill speed to 5mph and the incline setting to 0. Ensure the sensor strips are affixed to the treadmill belt and pass underneath the Runn’s optical sensors.
1a – Double tap the white button to turn on the right LED
1b – single tap the white button to get the left and right LEDs toggling when the strip passes under the Runn
Step 2 – Press and hold the white button the back of the Runn for 6 seconds. The Runn LEDs will blink from left to right when calibration is active.
Step 3 – The Runn will perform the calibration and will complete automatically
Step 4 – After the calibration process has completed, the LEDs will go dark unless the Runn is plugged in.
Step 5 – Connect the Runn to Zwift or GymTrakr and ensure the Runn is reporting the correct speed. If the Runn is not reporting the correct speed, repeat steps 2-5 again.
Step 6 – If calibration is successful, the Runn can now be used. If calibration still fails, please contact us.
Just had this back as I wanted to see if there was a way to calibrate a self powered Manuel curved treadmill
“We do have the Runn factory calibrated to a verified speed of 5 mph and 0% incline.
There is not a way to calibrate on a self-powered treadmill because it cannot be set to a consistent speed.”
I believe through my ignorance I miscalibrated my device when trying to set it up. Right now when my treadmill is set to 3.2 mph the Runn reports 8.2 mph.
I don’t really trust that 5 mph on my treadmill is correct. Correct me if I’m wrong, but won’t this procedure calibrate the Runn to the treadmill’s 5mph? Are you aware of a way to set the Runn back to factory setting?
Hold the white button on the back for 10 seconds. That should bring it back to factory settings.
I’ll give that a try. Thank-you, Ashley…
I will try that. Thank-you, Ashley…
Been using the Runn and like it a lot. Good discussion below about effect of ground contact on the belt speed and how it effects the calibration. But I haven’t seen an answer to the more basic question here – doesn’t calibrating the Runn to 5 mph on the treadmill assume that the treadmill speed is correct? Seems like it should come pre-calibrated – otherwise calibrating to the treadmill speed somewhat defeats the purpose of using it. Thanks.
The Runn comes already factory calibrated. You can reset it to factory calibration by holding the white button for 10 seconds.
It does show incline data on Strava. I adjusted incline running on Zwift and it showed on my Strava file. Although it will not send decline so it was just a constantly rising hill on the data.
Also noticed my 2011 Sole F80 on the Runn ios app maxed at almost 13% incline where the treadmill states 15%. Wonder if the Runn incline sensor is more accurate.
That would be easy to measure: get adigital Stabila (they can be trusted) and give it a go. Those are tools you only need to buy once
Great review, thanks. I have a question about the stickers. Do they need to be placed at even intervals around the belt? And how does the Runn unit know if the treadmill has done a single revolution if there are multiple stickers?
I’m thinking of the stickers (or White-out, great idea) as being like the magnet on a spoke for a bike speed sensor, and if you had two, the computer might think the wheel had done two revolutions, not one, and mark you as going twice as fast as you are.
No – the measurement is not time between stickers/marks, it’s time between the 2 sensors in the device for a given sticker/mark. More marks just add more measurement points per belt revolution.
I loved the review and went to their site to purchase one, but hesitant because neither your review nor their website includes the dimensions of the baseplate on which it mounts. I do have a flat spot on the rear and the top of the treadmill, but they are fairly short. I can’t really tell from your pictures the size and approximating it from the pictures it’s still not perfectly clear that it will fit on my old treadmill. Can you post the dimensions of the baseplate? I also sent a request to NPE on their website that they include dimensions so that a consumer can make sure that it will work with their specific treadmill. Love your review and it has me sold since either me footpod or treadmill really sucks at accuracy.
“I’d also love to see a way to mount it underneath the treadmill (to minimize chance of damage)”
The design fundamentally could do that as-is, other than
a) mechanical design characteristics of the treadmill – i.e. the device as-is requires a flat area a certain distance above the belt, which treadmills may or may not accomodate underneath;
b) maybe the accelerometer used for cadence may not take to being mounted upside down;
c) insufficient lighting for the optical sensors to do their work.
Hi Ray, forgive me if you already addressed this but I can’t find any review for the Garmin footpod (GFP).
Have you/would you consider accuracy testing of GFP vs treadmill (maybe also vs outdoor reality)?
I was planning on running outdoors with GFP paired to FR935 and Edge 520 in pocket as GPS reference to.
Since I can trigger changes in speed in the footpod by altering my stride or cadence, I am betting that changes in running form treadmill vs tarmac would also affect it.
The only reason I can see for Runn over a footpod is indoor speed accuracy, and without knowing how bad (or good) the GFP is, it is really tough to see any value (for an ANT+ ecosystem) here since the GFP is cheaper and brings other data/metrics.
LMGTFY..
Thanks, didn’t find this when I searched, maybe due to age of article. It has a lot of info, and includes a general statement “very accurate”, but no in-depth data on accuracy.
Given Ray’s tendency to in-depth analysis I was hoping to find something with comparison graphs and lots of data.
The introduction of the RUNN seems like a good time for an indoor run speed shootout type article, maybe comparing a couple of running pods vs the RUNN.
I can trigger swings of 10% or more by altering my cadence or stride (at same treadmill speed), so am sceptical of the <1% accuracy implied in that article.
If footpods are that accurate, I see zero value proposition for Runn for someone in an ANT+ ecosystem.
Yeah, I never did a super data driven standalone thing of the Garmin Running Footpod (and these days, it’s barely findable).
That said, I’ll probably add more data to this post around Stryd vs Runn vs Zwift Pod. Once I get back from the Tour Down Under after the weekend.
Hey Ray,
thanks for this detailed article, as always very helpful! I am considering upgrading my Treadtracker to NPE’s Runn and therefore would be very much interested in accuracy data and your assessment whether it is worth upgrading my Treadtracker to Runn.
Also one question on the calibration: How many of you did have to calibrate the speed to 5mph? If my treadmill is off regarding the speed (which it definitely is a bit), than the Runn would also be off by that amount. That’s also my issue with the Treadtracker.
hmmmmm I’m a bit bummed I bought a Stryd now.
1/2 to 2/3rds of my runs are done on my treadmill.
Ingenious device, albeit with the looks of those DIY RadioShack electronic kits for cars (like park distance control, auxiliary heating et cet.) for those that are too cheap to get the built-in OEM extra systems.
Makes you wonder why treadmill velocity isn’t measured optically in the first place. The only caveat would be that displayed speed would lag behind a bit (one revolution max), and there would be no way of setting the treadmill to a certain kph, other than adjusting belt speed by +/- and see where you end up at. That’s a price though I’m sure every treadmill owner would gladly pay to get accurate speeds.
I hope they sell enough so they can give the unit a major design overhaul, maybe even hide it in a less prominent, and exposed place. The location DCR mounted it on is like the most stepped on surface of a treadmill besides the belt.
I assume a speed of zero is transmitted if no cadence is detected? Should we be worried of cheating?
Ray, NPE owes you a cut, just bought one.
What are you recording? Do you record your activity in both zwift and using your garmin watch? I like keeping all of my activities in garmin plus like to keep training status accurate. Basically what is yours or others setup when using zwift run?
I use
Runn > Zwift > Strava
and
Runn > Garmin fenix > Garmin Connect
to ensure I still get all the metrics on my fenix. Unlike Ray, I didn’t have any issues with getting the Runn and my fenix paired – it saw it as a footpod straight away (think I had to specifically search for a footpad though, not just search for ‘any device’).
Thanks for the reply, so you just record the excersize both on your watch and zwift at the same time?
Correct.
And do you get incline data on your fenix? Or only from zwift
Can you search for hhe RUNN as a footpod specifically, and then it connects in a different fashion?
I just searched and connected. But so far on my fenix 6, it shows no speed – even though the watch confirms it’s connected
I have a Garmin Fenix 6X Pro. The Runn is connected via ANT+ to the watch. There are two devices in the section “sensors”.
The first called “Trainer”, ANT+, shows incline, elevation gain and lost on the watch (on the 6X Pro the Runn data field is installed –> IQ Store).
The second called “run sensor”, ANT+, shows speed/pace and cadence.
No problems to have all the data on the watch and in the Connect app.
Awesome! Just ordered mine. Looking forward to make my teenaged treadmill a lot smarter.
I used the promo code “RUNN20” and got $20 off!
thank you for sharing the code!
Where did you use the promo code? Doesn’t work in the Zwift Store for me.
Thanks!
link to store.npe-inc.com
NPE’s web site
Just tried code and no go. Guess I should have acted sooner.
Having done similar treadmill measurements with highspeed camera (120fps+) and many markers on the belt – I doubt it measures the speed of treadmill right with only 1 mark.
Why? My measurements show that at least on my semi-pro home treadmill there is a difference in speed when the belt is moving without any load (you are in flight stage) and when you put pressure on the belt (during your ground contact time). You could clearly see that from the video capture.
And now the big question – what speed do you want to measure? If it’s during ground contact time (and I don’t see the reason why you want to measure belt speed without any load) then it’s pretty hard for the sensor to catch that exact moment with only 1 mark.
I think fellrnr.com came to the same conclusions with his measurements for speed difference (load/was no load) – I was motivated by his work.
Maybe someone from NPE team could comment?
I’m willing to take a try, but where in EU you could buy it? On Runn site it estimates $100 for shipment + then extra takes and that is waaay too much.
I thought this as well, and ended up putting stickers at a 15″ interval (I think somewhere on the NPE web site it recommends between 12-18″). With that, you can certainly see the difference between my “empty” treadmill and when I’m running on it. If I set my treadmill going without anyone on it at 10km/h, the Runn also reports 10km/h. However, when I start running on it, the treadmill still shows 10km/h, but the Runn reports a more accurate 9.7/9.8 km/h. You could argue that even this isn’t correct as the amount of time the treadmill is actually moving at your running pace (i.e. your ground contact time) is only a very small fraction of each stride and therefore the rest of the time the belt is actually moving faster than you, but I can live with that. I do think some people are going to think there’s a problem when they calibrate their Runns to their treadmills, but once they start running there’s a discrepancy.
I got my Runn from cyclepowermeters.com – UK-based and EU-shipping. Turned up in 3 days.
Thank you for the link – I would try them.
or 90 Euro from zwift link to zwift.com
A lot of basic treadmills do have Bluetooth data connectivity specifically Horizon and Matrix that I sell in my retail store.
ok NPE, how can I convert my recumbent exercise bike into a smart bike? Make that product!
What are the aasics shoes on the picture?
Asics GEL-DS Trainer 24.
The inside of the shoe shows this SKU: 1011A176 (if you add ‘Asics’ to the end of it on Google it seems to shoes).
I would expect that if I have a treadmill with a CSAFE port, I am better off using that module from NPE? How do the two compare?
Hello Carmi
Tim from North Pole Engineering here. Yes, if your treadmill has a full CSAFE port, I would recommend our GEM RETRO. If it doesn’t have a full CSAFE port, then the Runn would be our recommendation.
-Tim
My treadmill has the SOLE brand name printed in white on both sides of the belt. It seems that the RUNN will be “triggered” by these instead of / in addition to the stickers. Has this been addressed? Thanks. #runstrong
Hello Bruce,
The Runn could be triggered by other markings on the belt. This shouldn’t be an issue as I have tested with numerous Precor treadmills with similar branding on their belts and haven’t had an issue. Feel free to send a picture to use at support@npe-inc.com and we will give it a look over.
-Tim Eskew
North Pole Engineering
I can confirm that my Technogym treadmill has markings on both side of the belt and it’s definitely not an issue with the Runn. I’ve placed 4 stickers at equal distance from those marks and it just works fine!
Gonna give it a try. May be good patch for my nice new Peloton tread that doesn’t cooperate well with the rest of the world. Ive been using my Fenix 5Plus and “high-tech” footpod to get my runs into Garmin. Peloton does sync with Strava, but no incline data on Strava end, so this might be good fix. Problem with Peloton and Zwift also the huge monitor fixed on the treadmill. Peloton doesn’t enable streaming onto it and it is fixed and huge, so difficult to see any kind of TV or monitor in front of tread unless it is high up. (a screen that could be lowered a little or tilted more would have worked) but I think Peloton in their myopia, assumes none of their devout followers would even consider doing anything during a run other than listen to one of their instructors prattle. Nice hardware, though.
Are there maximum incline values that it supports? Cant find this information anywhere?
My treadmill goes top +25%
Or -10 and +15% If I introduce my piece of wood per fellrnr.com training recommendations.
There is no max incline values, the Runn would be able to read your treadmill’s incline.
Hi Dries,
There are no maximum limits for incline so +25% would not be an issue nor would -10%.
-Tim Eskew
North Pole Engineering
Nice! this just made it extra interesting …
I’d be very interested in this if the incline data could be useful, as I do almost all of my treadmill runs at 8-15% but of course they show up on Garmin/Strava as flat runs. As it stands, there’s no appreciable difference between the Runn and my Garmin footpod aside from Zwift running, which doesn’t interest me. I’d guess there’s very little hope that Garmin decides to do something to make this possible, given the very small subset of users (Runn owners who care about their incline data) who would ask for it.
Hi Jan,
We are looking at a way to add incline data as a data field you can include on your Garmin. We will post news on this on our knowledge base at npe-inc.zendesk.com
Same analysis here about the elevation. That’s a very valuable data when doing treadmill workouts
and I’m glad to read that NPE takes this into account.
Beside that (and the fact that the documentation about how to use the device is really… short), it works very very well! ::thumbs up::
Thanks!
That’s great, Tim. Get that working and I’d be a buyer for sure. To be clear, what I’m referring to is getting the watch to record elevation gain.
What are the dimensions of the bracket? I don’t think I will have a flat space big enough to fit it to.
Hi, bracket dimensions are: 92 mm x 38 mm (3.6″ x 1.5″).
Thanks,
-Jeff
North Pole Engineering
Thanks Jeff,
If I were to purchase the NPE Gem retro instead, (as looks like a neater option) can I still link my Wahoo Tickr X to Zwift to show both heart rate and cadence?
The new Garmin 245/945 Beta released a day or so ago is relevant to this post. The Beta adds a “new Virtual Run activity profile. This enables broadcast of speed and heart rate information to virtual running applications such as Zwift.”
Hey folks-
Just a super quick update to let you know that Clever Training is now stocking the NPE Runn, and atop that DCR Readers get a 10% discount there using coupon code DCR10BTF. Plus free US shipping (intl shipping is as always a flat-rate $29USD).
Here’s that link: link to clevertraining.com
As always, picking it up via Clever Training US helps support the site here, thus making you awesome. Have a great weekend all!
(And yup, more NPE Runn data to come from me next week when I return back home)
How do you turn it off?
And on for that matter?
The Runn is always on broadcasting in Bluetooth at a very low power so you essentially just need to open Zwift and connect it. If you double tap the white button, it turns on the ANT radio and if you double tap it again, it turns the ANT radio off.
Just setup on my curved self powered treadmill, pace seems to be quite accurate and adding the reflective tape every foot (6 slated for me) enables continuous pace/speed updates as I slow up or down. Have noticed that there seems to be about a 10 second delay to reset to 0 when going from speed immediately to stop, I guess less of an issue for powered trendmill users
What kind of white-out do you recommend that is adhesive to the belt? I tried nailpolish but that’s not adhesive enough and the white is too mat to reflect.
Download the Runn sticker template and you can use white out tape. That would come off easier but stay on well. link to npe-inc.zendesk.com
I just hooked up my Runn and tried it on Zwift this past weekend. I am experiencing an issue where the speed reported by Zwift is approximately 60% faster than the treadmill is set for. My guess is that Zwift thinks the speed sent by the Runn device is in mph which Zwift then converts to kph. Is there a setting either on the Runn device or in Zwift to correct this error?
Thanks, Scott
I just installed my Runn last night and have the same issue. Runn speed is WAY higher than treadmill indicated speed. I’d prefer not calibrating the Runn to the 5mph treadmill setting so am hoping for an answer as well. I currently have 3 stickers on the belt so I may try fiddling with 1 or 2 and see if that makes a difference.
Hi, I’ve recently started using the Runn sensor with Zwift. It works brilliantly and makes jumping on the treadmill to use Zwift so much simpler. But… the elevation data on my activities is absolutely when posted to Garmin or Strava (thousands of feet of elevation gain). Strava have fixed a few activities for me but I think they are getting sick of me asking. Zwift Support weren’t very helpful! Has anyone else encountered this problem? And, if so, any solutions?? Thanks!
Did you get a resolution to this?
I am seeing the same issue in both the data sent to Strava and Garmin for every run I do.
Mack,
You can email us at support@npe-inc.com and we can try to help with what you are experiencing.
Thanks!
Thanks for the review.
We’ve tried it and found a problem though.
Out treadmill has LOGO’s down the side of the belt where the stickers go which gives false readings. Barring trying to tape over them I can’t see this working well in this scenario.
Love this! Just got mine delivered and set up. Had to macgyver it a bit. I have a commercial treadmill I inherited and the belt doesn’t lie completely flat and the way it’s setup I had to raise the sensor platform a smidge so that it wasn’t rubbing 100% of the time. A few pieces of cardboard and all the adhesives and we’re in business
So apparently my macgyvering wasn’t quite enough…the runn was still rubbing against the belt (it would shift in the cradle) or was simply too close. Removed the cardboard and stuck a thick shim on the side of the treadmill (fit perfect) and used command strips to affix the cradle. Seems to be working well now. Though, it does seem to be 5-10sec/mile off from the treadmill reading, even after calibtration.
One other suggestion, it can be tough to decipher which LED’s are lit up…they seem to bleed over a bit.
Had ordered it a little while ago, it arrived quickly but been off my feet. Set it up quickly this am and it was so easy to actually run for a change. No drop outs or pumping 2 buttons each time or using a phone and an ipad and making sure both were charged (I was using TSS app or an original milestone).I had one of the most relaxed runs I’ve had in zwift (although totally unfit). Excellent!
Thanks Ray for the tips on placement and always on.
Has anyone tried this with a peloton run via the iPhone app?
Can’t stomach the Tread’s price, but would love more data from my “dumb” treadmill
Yes. As far as I can tell the peloton app doesn’t receive any data except hr data. I just record the entire workout in my garmin since the peloton app doesn’t sync to training peaks or strata anyway if you only have a digital subscription.
Correct, the Peloton digital apps (meaning, not physically connected to a bike/tread) don’t take any sensor inputs except heart rate (ANT+/BLE, and maybe 5kHz too, gotta check). So for example you can’t use a Wahoo KICKR to send power to a Peloton iPad app.
Now, as for the second part – connections to 3rd party services. Peloton only supports Fitbit and Strava. However, Strava requires the setup be done on a ‘real’ Peloton bike (not sure on Fitbit, haven’t tried that one yet).
But, one interesting loop-hole to this is that you can use *any* Peloton bike. And once you setup the connection once, it’ll remain connected forever for any workouts even ones on the app sans-bike. So, you can actually go to one of their studios and do it, and even ones of their show-rooms too (which they have boatloads of). Stepping it up further, there’s a dedicated Peloton website which lists all the hotels Peloton bikes are in. Those work too. Same goes for any friends, etc…
I presume the same is all true on a Tread, but I don’t have one of those.
> Correct, the Peloton digital apps (meaning, not physically connected to a bike/tread) don’t take any sensor inputs except heart rate
hmph. guess my runpod can be returned after it arrives today.
Thanks for the excellent article. Was all set to buy but looks like the Clever Training promo code looks like it’s expired or no longer valid.
Hi Nick-
Sorry for the issues there – things should be all good now on the Clever Training 10% coupon code.
Apologies, and thanks for the support!
Thanks Ray. I was able to purchase the sensor successfully with the link so looks like everything is back to normal. Thanks for taking care of this and for your detailed reviews!
Thanks for the support!!!
Hmm, doesn’t seem to be working again! :-(
Thanks…on it! Will post back shortly when fixed. :-/
Anybody get frequent drop outs when transmitting over Ant+ to a garmin watch? Dropped out early in run (when I slowed to a walk during warmup) and then twoard the end during a steady hard effort. Am I better off pairing via BT to my Garmin 945?
I had many dropouts this morning on a 15km Zwift run (maybe 50 times). I was using Zwift (BT) and my Garmin watch (ANT+) to record the run. Both show very similar dropouts. I think it has to do with the fact that I replaced the Runn stickers on the treadmill belt with painted (Wite-Out) ones yesterday. I had done a test to see that the Runn unit was picking up the marks.
Discount code not working again. Went to order and got:
Oops! This item is not valid with coupon codes.
Finally got around to ordering again and the code worked today!!
I picked up the Runn after reading this and I love it! Thanks for the article. Wondering about this: my running shoes have a Garmin foot pod for cadence when I’m outside, but I’d rather use the NPE Runn source when I’m on the treadmill for its speed accuracy (I guess cadence would be ok from either source)
Short of removing the foot pod from my shoes, is there a way I can tell my Fenix 6 to prefer the Runn data source when it is available?
I guess I misunderstood the incline piece… Just got my RUNN but dont see my activity recorded any of the incline changes. What am I missing?
Once connecting the NPE device, my Apple TV was out of connections and I have to constantly disconnect my bike trainer. This is a pain for Brick workouts. Is there a Bluetooth dongle or something that would allow me more connections. Any advice is greatly appreciated. Thanks, Andrew
NPE CABLE (Connect Ant+ and Bluetooth) is clutch for Apple TV. Got one and and can’t imagine Zwifting without it on Apple TV
Ok, so I picked up the NPE Cable and tried to hook up the Runn and my Tacx Neo 2t to to free up Bluetooth connections on the Apple TV.(mostly for the girl’s AirPods ?). After some frustration, it does work, sort of… The Runn and Neo must be programed into the Cable on separate channels, this requires a manual switch on the NPE Cable app. This is less than ideal as the whole point for me was to create a smooth transition for brick workouts and practicing tri transitions. At least my wife’s AirPods connect easily now.
Any suggestions on brick workouts in Zwift.
If I use the Runn with Zwift for pace and cadence will the Zwift on ipad/iphone be able to connect with my bluetooth heart rate monitor as well?
Happy with the out of the box calibration, so do not understand why people would like to re-calibrate their Runn to match treadmill speed. The whole point of this is to have accurate and consistent belt speed measurement, rather than assuming your treadmillis correct or indeed your footpod (especially at different speeds or stride lengths at those speeds). BUT:
1) I cannot seem to get the Runn to provide cadence, even after increasing sensitivity – This is a shame, but I can still use my footpod for that, so not a deal breaker
HOWEVER:
2) This may be a Zwift Q, but if I get my treadmill up to speed, and then start the Run on Zwift, the game immediately has me running at the Runn measured speed, even if I haven’t started running yet! Surely just like when cycling, if moving on the flat or an incline, if you stop pedaling, Zwift knows to stop you. So why on Running would Zwift ignore a complete lack of cadence and just have me running immediately??
Thanks
Dropouts!!! Using the Runn with my Garmin 945 set to treadmill and mid-run I get tons of terrible dropouts. Previously they occurred after 45 minutes or so, but today I had 2 in the first 20 minutes. It takes forever to re-connect and in fact today, the only way I was able to reconnect was by re-starting my watch. I’m paired with Ant+ and turning ANt+ on/off from the RUnn doesn’t seem to solve the problem. I am using Garmin 945 beta software- the one with the virtual run feature but I’m not running on Zwift so I can’t actually use that setting. Anybody have any similar issues or suggestions?
Has anyone been able to get this to connect with the Polar M430?
Thought you might be interested in my conversation with North Pole Engineering on this and why after really wanting it to work, I don’t think this device is for for purpose for a number of reasons.
link to docs.google.com
Hello Paul,
I have been using the Runn unit with Zwift and my Garmin FR735XT watch since February 13. I am now on my second unit to be honest. The first unit had an issue immediately in that it could not detect any change in incline/elevation. It would just stay stuck at -0.10% regardless of what application I would use to check it. After much troubleshooting it was replaced by NPE and the new unit worked without issue. The only issue I currently have is that when I warmup at 12km/hr I see a lot of dropouts on the Zwift screen yet I do not see them outputed in the data from Zwift or Garmin in the FIT file. I see slight fluctuations in the speed/pace with my pace varying by approximately +/- 1 second. I was not seeing any dropouts when I ran faster but yesterday I ran 8K at 14km/hr and I could many dropouts on the Zwift screen but not on the output data. The dropouts are so short that my avatar does not slow down or get affected in any way. It really does not seem to have any impact apart from me seeing the dropouts on the screen since the data is not affected. Perhaps it’s a Bluetooth issue thing or some inconsistant data is being sent to Zwift by the Runn or my computer. I share your frustration with regards to interval sessions with your avatar still moving if you remove yourself from the moving belt. I use to jump off the belt in between intervals when using a footpod and it worked quite well. I have now adjusted my interval sessions in that I slow down the treadmill to 5km/hr in between intervals to catch my breath and then its back to 15.25km/hr for the intervals. It works fine this way. It is odd however that Runn or Zwift does not have a way of ignoring belt speed if cadence goes to zero. That should be changed on either side (probably more on Zwift’s side) as this could also prevent cheating in Zwift running.
Hi Francois – We’re still happy to work with you via your support ticket!
Paul,
If you’re interested, we have a beta version of firmware that we are currently testing that could address your dropout and cadence issues. We have sent this to a few customers with positive results on the data drop out issue. We would be interested in seeing if it also helped your situation.
In regards to cadence, the new firmware also addresses the bug where if you only connected via ANT+, you would not see any cadence (or incline). If you also connected to the Runn via BLE, then you would see cadence show up via ANT+ and BLE.
Currently, Zwift does not require cadence for your avatar to move, only speed.
If you are interested in trying the beta firmware, please send us an email at: support@npe-inc.zendesk.com.
Thanks,
-Jeff
North Pole Engineering
Mine did not transmit cadence or incline until I updated the firmware, which was not indicated anywhere in the instructions and was not easy to find on the website (and requires a separate app), so you may want to stick a note in the box telling people to first update the firmware and provide the app name, etc.
However, even after updating the firmware and resetting the unit, the incline is not correct. It matches up to about 2%, then is .5% low until around 9% incline, and is 1% low above that, which means the elevation numbers it produces are going to be low.
I also noted that the speed is correct at 5.0 MPH but gets progressively higher than the treadmill or another foot pod, up to almost 1.0 MPH high at 9.0 mph. However, as soon as you step on the treadmill it slows down to reading too low. I also noted that the distance shown in the Garmin watch does not match the distance shown in the Runn IQ app (IQ app is higher than watch). How can the same data stream produce different results in the native watch app and the Runn IQ app?
Hi Tommy – Thank you for also reaching out to our support e-mail, we look forward to working with you on this!
Is it compatible with fenix 3?
Yes, it is compatible.
Great Runn review!
Hi – we got this and it’s been awesome but…is there any way to turn it off? It’s plugged into the wall so always powered but there’s no point it being on when not being used. Worse, it can conflict with the wahoo trainers and take up a bluetooth slot on the apple tv. Turning it off would solve that. Thoughts?
I purchased the Runn and am quite disappointed. It is supposed to do three things; transmit elevation, cadence and distance and fails at all three. Distance is hit or miss, sometimes it is long and other times it is short and the stickers provided stick for about one use before needing to be replaced. Cadence is low which means I needed to move it to multiple places on the treadmill to try and get it right (and it is still off). But worst is elevation. It does not actually transmit elevation directly, it only goes to their Connect IQ app and does not get incorporated into the data and does not appear in Connect, Strava or anywhere else and is ridiculously inaccurate. On one hour run with the treadmill at 0% elevation it read than I climbed over 3,000 meters (over 2 miles!), the next time with elevation changing it read even more. I have tried numerous rests and calibrations but it never changes, it is just all over the place.
My biggest disappointment is their customer support. I tried working with them, changing locations of stickers, moving the unit, recalibrating etc. and it is just not fit for purpose so I asked for a refund per their policy and was told “If you send the unit back to us, we can work on getting you a refund and our Fulfillment department will work on the RMA once it is received.”. So I am supposed to pay to ship it back myself on the hope that maybe they will work on getting me a refund? What kind of support is that? It does not work, give me my money back. If I had bought it in a store I would simply go to the store and return it, but since I bought it directly from them I get the runaround. I am very disappointed as I had such high hopes for this device and really wanted it to work, but I should not have to work this hard to get basic functionality out of it. My trusty old Garmin foot pod is far more accurate and reliable.
Tommy,
We apologize for the experience you had with the Runn and that it didn’t work out for you. We would be happy to give you a refund once we have the unit back. We would like to work with you to make returning it as easy as possible. Our fulfillment department will be reaching out to you to provide you a shipping label so there is no cost to you to return it.
Thanks,
North Pole Engineering Support
Great device. First I used a zwift runpod but it had to be calibrates for every run to be accurate.
After a month of using RUNN on zwift and 230km later, I can say that it is a great product, but still some issues to resolve.
-I experienced 0 dropout on Bluetooth
– speed was pretty much in line with what my treadmill was saying, however I was forced to do a calibration for the incline piece. Would be great to have two separate calibrations, one for speed, one for incline so we can keep the speed factory settings.
– I have mine plugged to the wall. I never have to touch it, zwift will turn Bluetooth on and off on it automatically. Love this!
– I have 4 stickers and none of them came off so far!
– I love the fact that you don’t have to worry about the space between stickers because they are TWO sensors under RUNN. This should be explained somewhere in the doc.
– my real issue is with incline data. It is all wrong. Although calibrated (showing 0 with Gymtrakr app and -0.20 when I stand on the treadmill) what Zwift publishes on Strava is completely wrong. 200 to 300 meters elevation over 1h run for a 100% flat run. I do not know what is wrong here, RUNN, Zwift or Strava showing actual incline of Watopia map? There is also no way to calibrate incline in Zwift so no way to check.
So if RUNN could fix the problem in incline this would be an amazing product!
Yann
Hi Yann – I am happy to hear that you are enjoying your Runn! Could you e-mail us so that we can take a look into your incline issues? Our support e-mail is: support@npe-inc.com
I just received it, and although I like it, the build quality of the cradle isn’t great.
I also had to white paint as stickers would not work.
The biggest issue is Incline, just can’t make it work at all, tried calibrating, etc.
Andrew
Sold out on CT’s site with no restocking estimate (so unavailable). Bummer.
I wonder if this would be a good solution for Apple Watch users. I had one for 2 weeks, and the level of inaccuracy on treadmills made the watch a no-go for me. Running at a steady pace, it would be behind by 10% or so, then go to intervals, and it would jump ahead a mile or so in like 20 seconds. I was certainly faster than the steady pace, but not THAT much faster! 25 min run w/ the last 5min spent doing 4 stride intervals (.05 speed up, .2 recover) left my total distance either sub 2.5 miles or or well over 5 miles. Reality was probably 3.75-4. Worthless.
This could solve that without having to spend on a Stryd pod if I ever try to go back to the Apple Watch (which I liked otherwise). For now, sticking with a Garmin Fenix (if the damn action buttons wouldn’t get too stuck after a year and require replacement…always a few weeks after warranty expiration)
Bryan,
Please reach out to us at support@npe-inc.com and we may be able to help you out.
Thanks,
-Jeff
North Pole Engineering
I’ve had my device for a number of months now… While the pacing works quite well the incline piece does/has not… I’ve tried all of the suggested troubleshoot; updating firmware on device, watches (both F6 and F945), IQConnect App, etc… Resetting device, beta firmware, etc… still nothing.
Although the main function of pacing works well I really wanted the incline feature to work as I do quite a bit of treadmill running.
Magnus, I believe we have had the exact experience thus far. I’ve had a Runn unit since February 2020. I’ve gone through all of your steps in addition to replacing my original unit. The support from NPE has been good to attempt to troubleshoot the unit but as you mention, the incline data is useless. For me, incline precision is not critical and I work more based on effort than exact incline %. Nevertheless, it’s annoying that the data collected by the unit is so inaccurate. For pace, speed, distance, the unit has been consistant and reliable. Have some micro dropout issues that persist but seem to only be noticeable on the Zwift screen. The dropouts are so short lived that they do not even show up on the Zwift FIT file or the Garmin 735XT FIT file recorded during the run. The product is good (the stickers not so much until I superglued them to the belt).
When I run on a treadmill with my Stryd the speed from my Stryd is usually around 0.5kph slower than the treadmill. According to Stryd belt speed and actual speed aren’t the same thing:
link to support.stryd.com
If I used a RUNN would it report the belt speed which is apparently faster than my actual pace?
Hi Chris – Runn reports your treadmill belt speed taking into account your foot strike, which might report slightly different from your treadmill display. Runn comes factory calibrated.
The update for the iOS Configurez app helps a lot with the incline issue; it allows direct quick calibration of incline that can be done before each Zwift run. It also simplifies calibration overall; I had a hard time getting mine into calibration mode sometimes.
Please, can you let me know if this device would work with Holofit? I know that their website states that it is not compatible with treadmill but if it use FTMS, would it be possible?
As elliptical FTMS have the same protocol?
Thanks in advance
Kind regards
Wanted to love this but only lasted few runs. The holding/mounting system is quirky and cheap. When unit is in place did great job on speed and pace but for my tread this always matched the treadmill’s stated speed within 0.1mph. I managed to make foot contact with it almost every run which totally whacked the incline data until this most recent time when I accidentally broke the mounting clip and sent Runn flying. Alas. Really would like to be able to track my “elevation gain” in Garmin, but not meant to be. I start running ZWIFT when there’s a quality treadmill and user interface that make it as pleasant as Peloton running and cycling. I’ve heard Life Fitness has some compatibility with ZWIFT now.
Hi Eric – We would be happy to help you with your Runn & cradle issues. You can e-mail us at support@npe-inc.com
I’d agree the cradle is not the best designed however my biggest issue is the lack of elevation data. I’ve tried every fix suggested by NPE but still unable to get accurate elevation data.
Please fix/address this as it’s one of the main advertised features…. which does not work.
Agree. As it agreed we’ll with my tread’s indicated speed, the appeal for me was elevation data. Before I accidentally broke the cradle during the, the incline it reported was sometimes right, sometimes little off, sometimes way off. Part of that was likely the insecure mounting and part the accidental contact with my shoe while running, but it certainly wasn’t “set and forget” as it seemed to be for DCR. Even if I could mount securely and out of the way, I don’t want to have to calibrate incline every time I run.
Hi Magnus – If you e-mail us at support@npe-inc.com, we would be happy to help!
Email sent.
I installed the NPE RUNN on my treadmill yesterday and everything went smooth. However, one thing I noticed when pairing the RUNN with my Garmin Fenix 6X was it found two ANT+ sensors. One the foot pod as expected (FP – 254133) and another “Trainer – 254133”. What is the latter?
Also had to turn off the “Trainer” to see the inclination on my Watch.
I have the same issue with incline being shown on the Fenix 6 and I also have the FP and trainer shown as devices, not sure if they should both be connected to the watch or not. I broadcast Bluetooth and ANT+ at the same time to connect to the watch and Zwift so I get the training status credit in GC.
Very informative article, do you have any idea if/when Zwift will integrate incline in their platform?
Quick question – I have a Runn, all set up and calibrated. Should I be seeing run power data when my run is downloaded and viewed on my Garmin Connect account or Zwift companion? Power data is blank on runs so far
Do you think it would be feasible to use this as an eliptical speed sensor? On mine I guess that I could put the stickers on the rotating wheel but I’d have to mount the Runn vertically (rotated 90deg from the normal treadmill position). Then I could ‘run’ in Zwift on the cross trainer. Incline measurements wouldn’t work but I wouldn’t care about that… is that the only problem?
I just installed this on my treadmill and it is way off. The speed is showing almost double the speed of the treadmill read out which I know is completely inaccurate. I’ve placed 3 stickers on the belt…each a minimum of 18” apart. Not sure what else to do?
I calibrated mine with the Configurez app. The sensor can be calibrated for incline and speed. There are no instructions but it’s pretty easy to figure out. If you get it wrong there is a factory reset option in the app too so you don’t have to hold the button for ages.
I always knew I would have to calibrate it because I’ve installed on an eliptical – so the stickers are on a wheel and it’s mounted vertically. Obviously incline was way off, but I’ve been impressed that the calibration range was sufficient to bring the reported incline back to zero. Running at the right speed during and pressing the calibrate button on the app at the right time was tricky (at 3 speeds) but now the output on the Runn says exactly the same as the eliptical’s display panel. So even in this extreme case, the device can be calibrated.
Thanks for your reply. My understanding is that if you calibrate it you are forcing it to match the machine. I bought the sensor so that I could see if my treadmill was accurate. If I calibrate it I won’t know which is accurate?
That’s true Amy – you would be told the same speed by the sensor and the treadmill and both could have the same degree of inaccuracy! I suppose that I would try doing a factory reset and use the app to monitor the speed. (Just saying this because Zwift allows you to do a calibration too, and the app should be the source of truth). The other thing I noticed was that you have to be off the treadmill when doing a calibration or speed checks. I doubt this would make the margin of error you’ve described though.
Thanks John. Yes, we have been off the treadmill while doing everything. I did a firmware update and it didn’t help. I am starting to think I got a lemon. For it to be so far off…seems very strange. I think we’ve tried everything short of speaking to NPE which I will do as soon as they open. Thanks for all suggestions though.
Will this connect to a forerunner 35?
It should according to the specs (it has Ant+) and it attaches to my fenix immediately, but I have not tried the 35.
Thank you!
Yep, got one and inspired by all your tests with TreadTracker I did similar with Runn and found it to be even more accurate than the TreadTracker. Basically within 0.1% of a measuring wheel and 1m marks on belt filmed at highspeed on my phone which for me are the gold standards.
I just received the Runn, bought it directly from NPE. In hindsight buying it from Zwift would have been smarter, as a paid around 50 Euro more now (I live in the EU).
Setting this up is a bit tedious. Especially updating the firmware was taking a long time and had to be restarted for around 10 to 15 times (with different devices.
Stickers didn’t stick, but Typex worked fine. Pace was just like I know it from using my Stryd footpod on the treadmill, without calibration of the Runn
Curious if anyone’s had similar issues. Treadmill – Sole F65 6mos old. When we first started using the Sole, the pace it was reading felt way faster than it should be. Today we plugged in the Runn, factory default reset.
The Sole is saying 16:00 min pace, Runn is giving(what I think is accurate) 11:00 min pace.
Are treadmills this far off? I’m kind of surpised, this thing is like 6mos old. Annoying, just want some good data!
Is a Stryd in my future…LOL
That seems quite a way out. My first thought is that the belt must be slipping for that much difference so have you tensioned the belt at all?
In my experience (I have a NordicTrack C2950) the treadmill is actually a bit ‘pessimistic’ in that it puts power to the motor for a certain speed but the belt actually goes faster, as much as 5% I’ve found. And over the course of a 30 min run the belt speed will actually increase even though the treadmill speed setting remains fixed. To calibrate I’ve used measuring wheels and measured the belt length and counted number of revolutions for various speeds and can confirm that even the Runn sensor was a bit pessimistic so I had to calibrate it. E.g. the treadmill speed setting will be 14 kph (sorry, I’m in metric) but the measured speed from the Runn sensor (confirmed with wheel & belt measurements) is 0.5 – 0.7 kph more than that.
I never, ever post but making an exception to give a shout out to the support team at North Pole Engineering. Based on this review, I brought the Runn last February because my Sole F80 speed calibration was not satisfactory. Sure enough, the Runn showed that the F80 was slow by 10-30 sec/mile with the gap increasing as the speed went up. Everything worked great until last week when in the middle of a Zwift run, the speed dropped to zero. Sparing this post from the different ways I tried to fix it, I reached out to NPE and got a response within hours. I tried various fixes and each time reported back my lack of success and got a response again within hours. Finally they determined they would replace it and I am now waiting for it to arrive. Exceptional customer service.
Does this Runn sensor allow your Garmin to calculate V02 max values from indoor training on a treadmill?
I’m happy for someone to contradict me on this, but I think the Garmin needs a run with GPS outdoors at least once every 2 weeks to calculate the VO2 max. I mix the treadmill with outdoors so I can’t be sure, but recall that after a few weeks of Zwift only (with the Runn), I got a message to that effect on the Garmin.
That’s my understanding too. Any indoors runs with either my RUNN or Stryd does impact my training load but not my VO2max. So no GPS, no VO2max.
I’m making this post to share my experience with the Runn.
I purchased the Runn 8 months ago. After charging it and running for 20 min it died. Charged it again and found the battery would not hold a charge. It would last about 45 min while idle, less if being used. But, no worries, we just left it plugged in and all was great… until now. The usb plug seems to be loose and the vibrations from the treadmill keep tripping the connection. I have been looking for an alternative device I could use but I seem to always return to the Runn as the best option so I will be getting another one. Fingers crossed I don’t get another lemon.
Yeah, it is (or was) a great piece of kit but mine has started dropping out now after 12+ months of solid work. Dont know if it is the ANT+ transmitter or the sticker detection. Going through a diagnostic process with the NPE support team but no success yet. Shouldnt have to just buy another one IMO :(
Doesn’t really work with the Stryd sensor. Can only get incline from the Runn sensor if you want to have power numbers.
Silly question but I can’t seem to find the Runn on any of your affiliate sites (amazon, backcountry or competitive cyclist) but only on Zwift. Anyway to get you supported via them (or some other site not previously listed)?
Yeah, I’m not sure why NPE doesn’t list all of their products on Amazon (they do some, but not everything). No worries though. I don’t do direct affiliate partnerships with manufacturers, mainly to remove any sort of bias perception towards recommending one brand over another purely because that brand has a higher commission rate. Similarly, it removes me having to worry a brand will retaliate when I say something bad about their product (which…pretty much happens in every review.). By having a handful of common-ground retailers, it’s an easy button.
I appreciate the support attempt nonetheless!
your affiliate links are not working.
UPDATE 2022 January
Bought NPE Runn for my wife to take a part in Tour de Zwift Run ;-)
bought from Zwift on Monday evening and some hour ago I just received the package with NPE Runn
and already installed it on the old treadmill with latest firmware
Notes:
firmware update failed several times on different Android phones (ok both Blackberry, but …)
old iPhone SE works without problems on first connect ;)
immediately connected to Garmin Venu 2S as 2 different sensors
#1 footpod
#2 cadence and speed sensor
is it ok to let it be always connected by USB cable from the plug ?
Mine has been plugged since the first day i bought it :-)
My Fenix doesn’t see it as a fitness device but as a footpod. As the cadence figures of the Runn are very inaccurate/jumpy I would like to use my footpod but that’s impossible. Grrrrrrrrr
My ANT sampler sees it as both a ‘stride-based speed and distance sensor’ and a ‘fitness equipment’ one.
My Android phone as Runn on BT. Not clear what profile.
Configurez of course sees it. Also no profile. NPE doesn’t have an app.
Curious if there is any that does ANT (which my phone has) and BT….
Hmmm, I use ANT with Zwift. I find the cadence count to be fairly accurate. I count my steps from time to time just to be sure (and to cut down on boredom). I find RUNN cadence is within 3-4 steps of my count-for example 176 vs 178 or 180.
I just got a Trueform Runner and looking to add the Runn sensor and use Swift. Does anyone have experience using a Truform Runner with this set up?
I’ve had several issues with Zwift and the Runn that I’m pretty sure is Zwift’s fault so I just use the Runn Sensor’s GymTrakr app now which is really accurate. Sure, running is ‘free’ on Zwift but the levels are capped out at 20. Just watch Netflix instead :)
I mounted a Runn treadmill sensor on my old Kettler crosstrainer (elliptical trainer). Due to the construction of the Kettler the Runn is turning around and the stripes are static. But it is working fine. The Runn is connected as foot pod to my Suunto watch (no automatic calibration) and speed and distance are transferred properly. I calibrated the Runn with the speed shown on the analogue display of the Kettler and after a workout of 30 minutes the distance is equal on both devices, Kettler and Suunto watch.
Thomas
Interesting approach. I chose a different method, attaching the Runn to the Kettler body with velcro and a right angle bracket, and putting stripes on the flywheel. It is accurate after calibration too.
This solution doesn’t work for me, because the mount point of the foot bar is near the outer edge of the flywheel and the sensors of the Runn cannot scan the stripes on the flywheel without a heavy contact and flying away. 😁
Yes, I was fortunate that the contact with the flywheel is further away from the outer edge. You came up with a clever solution to that.
Man, I love how I can always find an answer to ANY gear question on your site. Thank you!! I just got the DFC for the Peloton after reading your review (loving it so far) and now looking into this for my non-Zwift-friendly Proform 9000.
Thinking to try this for my Trueform with turf but wondering if anyone has any insights. There is a little strip at the side of the belt where I can paint markers on, but wondering if the length needed is important. Likewise curious if anyone has found the best alternative to the stickers – whether it’s reflective paint, white-out, or?
Also can’t find any info as to how this device works? Does the room need to be well lit or does the device shoot out it’s own light?
I have one question. But before that, couple of comments.
I bought NPE Runn couple of months ago. Problems:
1. I had to use pencil/marker because the sticks do not work.
2. It screwed my Garmin Epix 2 cadence sensor with complete inaccurate data.
Now, I bought Garmin HRM Pro Plus. The cadence problem seems to be fixed (meaning I think it is now using cadence from the strap instead of NPE Runn). But I am not sure how to confirm this. I want to use pace from NPE Runn and everything else from HRM Pro Plus / Watch. Is there any way in Garmin to see or select this?
TY
I use a Garmin Fenix 6X Pro. I never found a solution to get the pace from the Runn and the cadence from the 6X. So I decided to use another setup.
With a Raspberry PI and two infrared sensors I record cadence and speed from the treadmill belt and broadcast these data via ANT+ USB dongle to the 6X. The incline, decline and elevation gain I get from the IQ Runn data field on the 6X. So all data are correct in Garmin Connect.
There should be an option in Runn to deactivate cadence to use any watch instead.
Thomas.
That sounds great. I had a look at Arduinos with a view to do the same but there seemed to be issues with the onboard BT but I have just seen the nano 33 ble which has ble baked in and also 9 axis accelerometers so incline and cadence should be possible. Might as well get rid of the Runn altogether.
Do you have a link to the arduino project assuming it was one you found? I’ve been thinking of doing something similar but hadn’t found many references to existing projects like that.
Expensive for what it is. Cheap and clunky. It could however fill a niche. I say “could” deliberately though:
I don’t use Zwift but wanted to record accurate speed and distance on my watch to upload to wherever and then Strava (Foot pods don’t work well on treadmills despite their makers assertions to the contrary, a complex issue). My Garmin FR255 connects but does not display pace (perhaps I have to use virtual trainer activity and connect to Zwift?). Not what I want. Coros Apex Pro does not see the Ant+ broadcast. It can recognise the device on BTLE but fails to connect to it. The only watch that displays pace when connected via BTLE is my Polar Pacer – weird.
This thing has connectivity issues for most purposes other than connecting to Zwift and this should be made clear in its marketing. Zwift support are unaware of these limitations (I bought it through Zwift as it is cheaper than directly from NPE). They assure me it is the same device and not customised for Zwift.
Also unable to update to recommended latest firmware as fails then gets a weird stuckDFU error. NPE sent a 20+ point instructions on how to sideload the firmware via another app (not ConfigureEZ).
Yeah, right.
Of course many people will use out of the box, not use ConfigureEZ, not upgrade the software and start Zwifting without even calibrating the thing. Bof!
This is not a consumer ready product.
It is going straight back.
The Garmin Forerunner 255 shows pace, incline, elevation gain (+/-). Make sure, that ANT+ and Bluetooth is enabled on the Runn and the FR255 connects two devices, a smart trainer and a run sensor. The firmware update is done with the app Configurez running on Android, so far no problem for me. I attach a picture, showing the Runn IQ data field at the bottom and pace.
This is the second one I have had from Zwift.
I don’t think it broadcasts on Ant+ (yes, I have enabled it and the right LED is on):
My Coros doesn’t see any Ant+ device. My Garmin only connects to a trainer (which if you inspect has weird stuff like wheel diameter etc…). I assume this is via BTLE (you can’t specifically connect to just Ant+ or BTLE on the FR255) and only one sensor is available.
I think there may be an issue with ANT+ on this device. This is the same problem as on a previous one that I returned. This seems an unlikely coincidence.
Their customer service states the NPE and Zwift devices are identical (I can’t see any advantage in having custom firmware disabling the onboard ANT+ radio as I presume this is part of the same chipset as for the BTLE).
Something however does not add up.
I’ve had no issues with mine with my 955 on Ant+. My treadmill broadcasts to Zwift, but not to my watch. I’ve compared them on a bunch of runs and they are almost identical.
So I eventually got it to work.
I contacted NPE and they instructed me to bootload a beta image they provided using a downloaded app (not ConfigurEZ) and I think some 28 lines of instructions and so my device no longer fails to update.
I think I have the connectivity issues sorted:
ANT+ is working when selected.
Coros does not detect the device via ANT+.
Coros detects a “trainer” via bluetooth but won’t connect with repeated attempts.
So won’t work with my Coros devices (Apex Pro, Pace 2).
Coros users beware.
Works via ANT+ with my old FR935 for pace. I have to download an app from NPE for gradient (which probably also connects via ANT+). Unfortunately, although the datafield reports the correct gradient (after calibration), the fit file gradient (well total ascent) is around 3 times this value. I have altitude measured in meters on my devices.
I can connect to an android tablet running zwift with no problems, presumably via bluetooth as my cheap old pad doesn’t have the hardware to support ANT+ even after downloading the required services and apps. Gradient is also conveyed via this interface (though still incorrectly three times the value so I suspect feet misreported as meters).
Does not work directly with my newer FR255. Connects alright but pace remains resolutely at zero. It will provide pace and (incorrect) gradient to Zwift however via the Virtual Run activity
Frankly this is going to be a hot mess for some users. On the other hand if you use imperial (quasi-imperial) measures and use it directly with Zwift I suspect you will not have an issue.
Calibration requires thought. If your treadmill is closed loop (mine is with a Hall effect sensor on the drive wheel) then the displayed pace when unloaded is going to be reasonably accurate though will slow when loaded as an error signal is required to drive the feedback. This means you should calibrate using ConfigureEZ without you running on it. You should however be on the thing to calibrate gradient.
There is also a Zwift speed calibration available layered on this. Again it would be OK to calibrate based on the treadmill display values when operated in an unloaded state.
Beware. Structured running workouts on Zwift downloaded from TrainingPeaks are dangerously inaccurate. This is because Zwift uses a fraction value of your best mile pace (yes, running workouts in Zwift are pace not power based, and based on a probably inaccurate base metric).
If anyone is interested, it is quite easy to build structured running workouts in xml format and to ensure they are based on your lactate threshold pace and associated zones.
I have a comment/question that I don’t think has been brought up.
My NPE Runn varies the incline % depending upon the pace I am running. I have calibrated it previously using the procedures provided. However, when walking at 3-4mph and 0% (per treadmill) it correctly reads the incline as 0%. But when I get up to a running speed, it starts reading 1-2% at slows speeds (6mph), and the issue magnifies at higher speeds (8-9mph) when it reads 3-4%.
Clearly there is some kind of vibration issue with my pounding the treadmill with my cadence at these higher speeds – is it simply because the treadmill is on a carpeted floor? Is there anything else I can do to fix this?
I have a LifeSpan treadmill with a textured belt and had problems with the stickers falling off. I tried painting stripes with a silver paint pen but the speed readings were frequently unreliable. I ended up using small pieces of white gaffer tape, similar in size to the original stickers and that is working really well. Reliable speeds and they are staying attached.
I’ve had my treadmill for almost 2 years now and I had intended to get one of these back when I first got it. It never really mattered that much until I got a coach last year and then the inconsistency between the treadmill and outside was really making some of my training difficult to track properly. I considered getting a Stryd but the cost was really putting me off. Then my wife got serious about training for a half marathon we’re running next year and I remembered this thing.
All I can say is “Wow!”. What a game changer! My treadmill runs slightly faster than what’s on the display (5 – 10s per mile) and does that pretty consistently through every pace so its not hard to deal with for workouts. It was so easy to set up too. My only issue was the stickers just didn’t really want to stick to the tread but that was easily solved with some dabs of superglue. Its amazing because it “just works”. It shows up as a footpod on my Garmin 955 Solar and I can just go! All of my other metrics come from my HRM Pro. I’ll be pairing it to my wife’s 945 as well so she can benefit from it.
Now I don’t need to spend extra time trying to get my workout out of iFit and into TrainingPeaks so my coach can see it and its more accurate to boot!