Over the past two days, a small number of publications have gotten a hands-on look at the Garmin Vector system – which starts shipping today (Wednesday, August 7th). In doing so we’ve collectively been able to ride with it, ask any questions we wanted of the Vector development team, and poke at it as we’ve seen fit. But an in-depth review that does not make. That takes time, specifically, lots of riding time with lots of comparative power meters at once.
Typically I dedicate at least 30-45 days for power-meter related reviews for data gathering. That’s not so much a function of total days, but really riding time in between my busy work travel schedule. Luckily, I’m off for a few weeks, so I have more time to ride than normal. But that still means lots of riding time. Which is all a long round-about way of saying this isn’t an ‘In-Depth Review’, instead, it’s just an initial hands-on look at the platform. I’m aiming for a review in early September – likely in between Eurobike and Interbike, barring any major issues.
Upon leaving this event, the six media organizations present were handed production trial units to use and test with. Once that trial is complete I’ll be sending it back to Garmin. The units were production units off the assembly line like any other unit, they were/are not beta, and are final build. The same units that you’ll be able to procure starting today.
What I’ve noted below is a culmination of these past two days, as well as the past 2+ long years of technical conversations with the Garmin Vector team. But, ultimately, these handful of rides are just the start of a longer in-depth review process to understand whether the $1,699 power meter is worth your hard earned cash.
So, with that bit of of warning out of the way, let’s dive right into things:
What’s included inside the box:
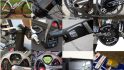
Unless you’ve got yours secondhand from some guy on the street corner, you’ll start with the Vector systems in the box – like so:


Cracking open the lid we find all the major components looking up at us:


If we open up that middle compartment there’s a small pile of paper goods, along with a pair of cleats, some washers, and a USB stick:

Here’s what that all looks like when unpacked:

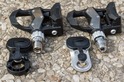
Next we’ve got what are really the two major components of Vector: The pedals and the “pedal pods”.
The pedal pods contain the communications components, effectively the ANT+ radios. There is no official left or right. Instead, that’s dictated by the pedals.


Next up is the pedals themselves. The pedals actually contain three components: The pedal body, the pedal cartridge (goes in the body), and then the pedal spindle (goes in the cartridge). The spindle is the piece that ultimately measures the load you exert. The pedal body is a LOOK Keo compatible unit:

The pedal body and pedal cartridge are manufactured by Exustar, whereas all remaining components are made in-house by Garmin (or a component supplier). Ultimately, everything is tested as a single system upon assembly in Taiwan. In fact, every Vector set is individually dynamically calibrated (meaning with rotating weights by a computer) before shipment.

The calibration values are recorded into the device at time of manufacture. Additionally, a multi-point temperature calibration is done at the factory as well prior to shipment. Since silicon strain gauges are known to have repeatable temperature drift properties, by doing a multi-point temperature calibration they can ensure temperature shifts don’t impact accuracy (the pedals have temperature gauges in them).


The pedal type is perhaps the single most controversial aspect of Vector. Initially in the Metrigear days pre-Garmin it started off life as a Speedplay pedal, but post-acquisition it changed to being a LOOK Keo compatible pedal. The reason for this is primarily business focused. They discussed the need to be able to effectively ‘own’ the process end to end from design to support – with them saying that “we wanted to own the spindle, and own the supply to the spindle.”
Which isn’t to say that other pedals aren’t being considered. Garmin Vector lead Clark Foy noted that “Nothing technical prevents us from doing that [other pedal types], it’s a pure business decision.”
In fact, they commented that every pedal vendor has contacted them about offering a Vector-compatible unit. And no doubt in time they’ll be offering more pedal types. They believe that the next market for them will be mountain bike pedals, and then they’ve also expressed an interest in looking at spin bikes as well.
Finally, the weight of the pedals are as follows (per pedal):
Pedal (including cartridge/spindle): 152g
Pedal Pod: 23g
Cleats and hardware (screws): 38g
Total per pedal: 213g
Getting it installed on your bike:
Now that we’ve got it unboxed, we’ll go ahead and get everything installed. The entire process only takes a couple of minutes and is pretty straight forward.
First, I’m going to assume that you’ve removed your old pedals. Additionally, I’m going to assume you were able to install the cleats (if needed) on your bike shoes.

With that out of the way, we’re ready to begin. The first thing we’ll need to do is determine whether or not any of the washers are needed. Washers are used within the crank arms to allow for a tighter fit. While that may seem contradictory to add width to increase fit, it ensures that the system can be ‘pulled tightly together’.

In my case we ended up going with two washers, but that’ll vary per crank arm brand/model. The Vector team recommended that you err on the side of more washers rather than less washers. The reason being you really want things to be absolutely snug and tight.

You can see below there’s a bit of a gap between the crank-arm and the pedal pod. This is actually good. If there was no gap, they’d actually be concerned, as that’s a sign that things might not be tight.

Next we’ll go ahead and slide the pedal pod onto the crank arm. The pedal pods have no specific left/right. They play with whomever. The pedals themselves control left/right. So you can mix and match the pods with no consequence.
Now we’ll add the pedals in. Do this with the crank-arms horizontal (9PM/3PM position). As an installation tip, when you get pretty close to really tightening things down, you’ll want to actually angle the pod slightly forward. That way when you fully tighten things it naturally tightens into the vertical position.


Which brings me to the next point. You can arrange the pedal pod in any orientation that you want. But the Vector team strongly recommends the angle shown below (pointing down while on the forwarding horizontal position). The reason being that if you were to orient the pod upwards instead (for example), you could potentially hit it with your shoe when you clip in/out.

Many folks have expressed concern about the pedal pods hitting the ground. That’s actually a bit of an optical illusion, it’s actually virtually impossible to hit the pedal pod without hitting your shoe first. They note that in thousands of hours of testing they’ve never had a single pedal pod break-off by hitting the ground.
Here’s a bit more of a zoomed in look at the same photo. Note that in this case, the crank-arm is pointed directly down (the photo angle makes it appear otherwise). You can see that it’s technically impossible to hit the pedal pod at that angle.

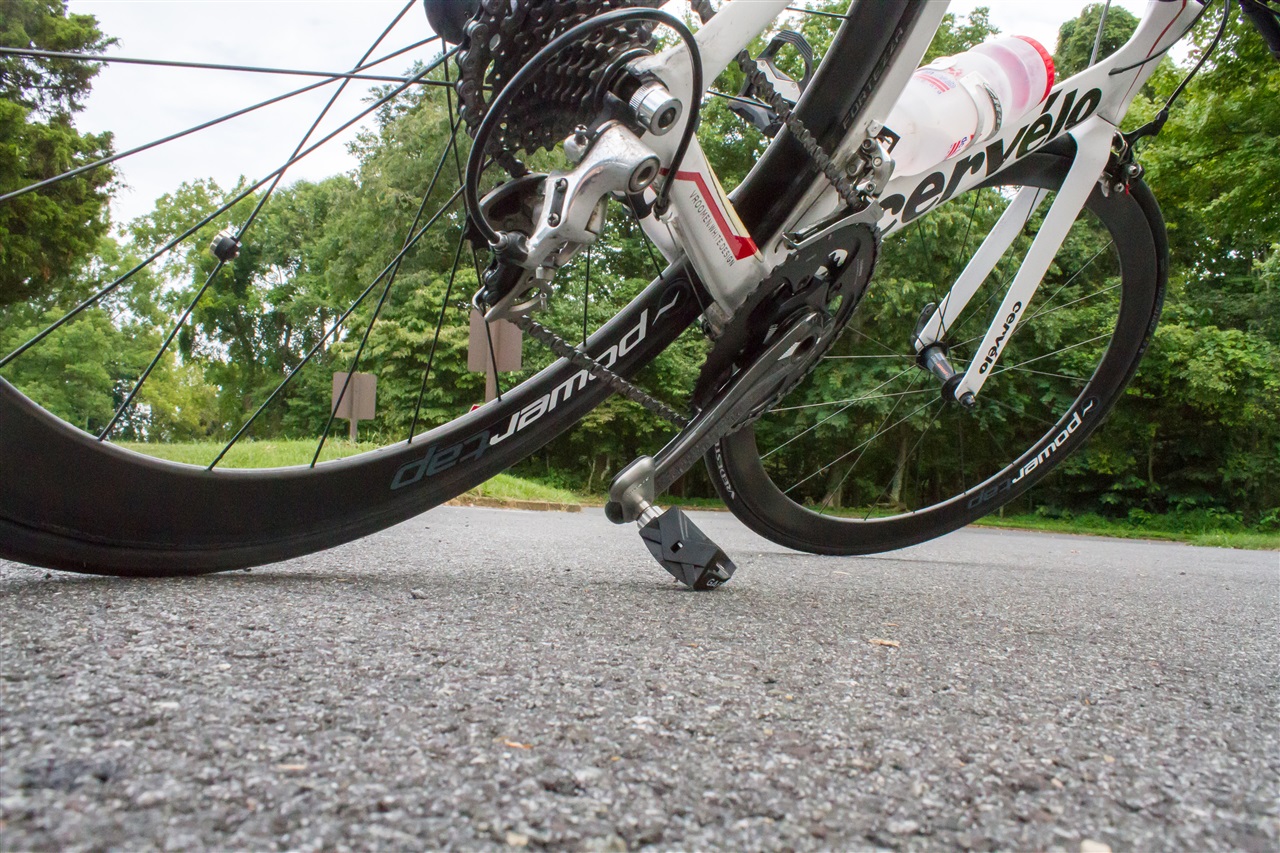
Now, curbs are potentially another scenario entirely, as seen below:

When it comes to mountain bike pedals (in the future) – that’s definitely an area the Vector team recognizes they’ll need to address.
Getting back to the installation, you’ll go ahead and complete the process on the opposite side. Also, you’ll want to snap in the pedal pod cable. Once that’s done it’s time to pair it with your bike computer.
By default the unit will now be in a pairing mode (they call it beacon mode). But in the event you want to manually pair it with the ANT+ ID, it’s actually laser etched into both pedals (09915):

Which, brings me to another notable. The pedals themselves are paired to each other in the factory. This can’t be changed (in other words, you can’t mix half a pedal with a friend, or split pedals with a friend). The right pedal acts as the master (primary), and the left pedal acts as the secondary. Data is communicated from the left pedal to the right pedal via a private ANT channel, then broadcast via ANT+ by the right pedal to your head unit (using standard ANT+ power messages).

After pairing your pedals within the bike computer you’ll need to go ahead and enter your crank length. This is required for accurate measurement of data. By default it’ll be set at 172.5mm. In the event you don’t have a head unit that you can set crank length with, you can do so via the Vector Updater app that you can download from the site (PC/Mac). I show a bit of that towards the end in the firmware update section.
With the crank length set you’ll need to get on the bike and ride (trainer or forward movement) at 80-90RPM’s for about 5-7 seconds. It’s super-quick and easy. This is called “Setting the Installation Angles”. On the Edge 510/810, there’s a small wizard that walks you through this:


For those without the Edge 510/810, you can just do this manually – simply go and ride for 15-30 seconds. The Vector unit will internally set the installation angles and start transmitting power. It’s really important to note that you won’t see wattage data until this completes.
Once that’s complete, clip out of your pedals and stand over the bike (or next to it). Then do a manual calibration (Static Calibration). You’ll access this through the bike profiles, and then the power settings.

This takes about 10 seconds to complete:

Finally, get back on the bike and start your ride. At this point do what’s called a “Dynamic Calibration”, which is simply pedaling backwards 8 times. Upon the eighth time you’ll receive a Dynamic Calibration confirmation message.

With that, you’re good to go! You should always do these last two steps at the start of every ride (just like any other power meter on the market).
Quick Checklist: With your installation largely complete, here’s a quick checklist I’ve put together for ensuring you’ve taken care of everything:
1) Washer in place if need be, more is better than flush/less.
2) Pedals tightened to 25 foot-pounds (ft-lb). Too little or too much can result in inaccurate power. If you firmly tighten with a wrench, you will be fine. Just don’t under tighten (e.g. finger tighten) or put your full force into tightening the pedals.
3) Pedal connectors plugged into pedals.
4) Pair pedals within the bike profiles. Ensure that your crank length is correct (i.e. 172.5mm, 175mm, etc..). If on older Garmin, use computer instead to do this.
5) Turning on Garmin unit, if on 510/810, run through Installation Guide, requires cadence at 80-90RPM (in other words, must be on bike). If on other units, go for short few second ride.
6) Post-installation guide, go into calibration menu. With pedals at 3/9 position (horizontal) and with you UNCLIPPED do a manual calibration (just press the calibrate button).
7) Finally, once riding, within the first minute or so of your ride, pedal backwards a full 8 times. A confirmation message will display on your Garmin.
Note that steps 6 & 7 should be done every ride. This last component (step 6 specifically) is no different than any other power meter on the market today. The only exception I can think of is the Stages, which recommends every few weeks.
Vector crank arm compatibility notes: Here’s the limitations which Vector is bound to from a crank arm perspective:
Crank limitations (width): 15mm in width and 38mm in height. Certain models of S-Works, FSA, and ROTOR Flow units appear not compatible.
Crank limitations (length): 110mm-236.5mm
Setup and Calibration Notes:
The Vector has an installation setup step and two different calibration methods, depending on the situation. Below are all of the different methods fully outlined. Note that the Vector team has double-checked this specific section for accuracy.
Initial Installation – Setting Vector’s Installation Angles:

You must set Vector’s installation angles anytime you remove the battery cover from the Vector pods, or, anytime you move it between bikes. The purpose of this step is to tell Vector how the force sensors are aligned in relationship to the cranks, which is required in order to calculate power. This step accounts for how tight you’ve cranked in the pedal, and how the pedals ended up on your particular crank when tightened down.
There are two ways this calibration method occurs, depending on which head unit you’re using. For the Edge 510 and Edge 810 you’ll get a prompted installation, which I’ll describe first.
From here you’ll need to get on your bike and pedal the bike (you don’t need to be clipped in, you can do this in street shoes). This can be done on a trainer or just on the road. You need to bring the RPM’s up to between 80 and 90RPM.
The process lasts about 5-7 seconds and then will give you a completion message. Once you’re done with the initial calibration, you’ll then move onto manual calibration (below, next section).
For those without the Edge 510/810, you’ll simply need to complete the same procedure, but without any additional confirmation from the head unit. In other words, just go ride 15-30 seconds (to be sure), and you’ll be good to proceed to the next step. The unit will internally perform this calibration, but since older head units aren’t updated to display the information, you won’t receive a confirmation. Note however that it won’t actually give any wattage until this is done, so you know that if you get wattage, then you’ve completed this.
Static Calibration (aka Manual Calibration):

Next is static calibration. This should be done prior to starting every ride, and is fundamentally the basic same process you would be doing on any other power meter on the market. In manual calibration you’ll go ahead and turn the head unit on and navigate into the power meter settings.
Once there, while standing over your bike (or next to it), but NOT clipped in, arrange the pedals in the 3PM/9PM position (horizontal). Technically any position is fine, but the Vector team recommends this position for the highest accuracy.
Next, go ahead and press the calibrate button. It’ll now measure torque on the unit. It’ll come back about 5-10 seconds later and display 0.00, though you may see that value fluctuate slightly as the torque value being displayed is actually in real-time.
With that, you’re unit is correctly calibrated and ready to get on and ride. Note again that this should be done before every ride. Also note that this is compatible with pretty much any power meter head unit on the market (except the Timex units, which don’t support calibration functions).
Dynamic Calibration:

This next calibration type is called ‘dynamic calibration’, because it’s done while the unit is dynamically moving. The goal of this is to remove any ‘clip-out residual strain’ that occurs within the pedal body. This is considered the method to get the absolute highest level of accuracy within the unit. If you don’t do this, you’ll still be within +/-2%, but this gets it a bit closer. And given how silly easy to perform, you might as well.
While on your bike within the first minute of your ride, go ahead and simply pedal backwards. Eight full times. Once done, you’ll receive the message shown above.
Yup, that’s it. As easy as that. You do not need to do this each time you clip out, as they didn’t see any benefit there. Nor at any other point during the ride. Rather, just at the start of the ride. Not that it hurts either.
The Dynamic Calibration prompt message will be seen on the Edge 500/510/800/810 and FR910XT. Other units will not receive a prompt, but the Vector calibration is still done by the pedals. Should other head unit companies wish to, they could add this functionality in, as the confirmation is broadcast in standard ANT+ messages to the head unit.
Static Torque Test (Hanging Weights – for extremely advanced users only):
Finally, we’ve got the most advanced calibration method out there. This isn’t really so much a case of calibration, as it is validation. Within a Static Torque test you hang a weight of a known value (i.e. 25 pounds) on the cranks. In turn, you’re able to get the torque value read back to you, allowing you to validate if the unit is performing within specification. Garmin will be providing instructions and a formula to determine if the unit is within specification. The formula is: Mass (kg) x gravity (m/s2) x crank length (m) = Expected torque value in Nm
To do this, you’ll simply go into the calibration menu, which puts it into a torque display mode:

Then, you’ll go forth and hang the weights on the unit. Again, this should be scientific grade weights – not just something random you picked up at Sports Authority sporting goods store. The minimum weight that the Vector team recommends is 25 pounds. You’ll then take the torque value displayed, along with the weights used and compare it against values provided by the Vector team. They’ll be publishing a data sheet in the coming days to the Vector Owners site with the full table of correct torque values for each combination.
What Vector Transmits & Understanding Left/Right Power Measurement:
Vector transmits a number of different metrics to your bike computer. The most basic is simple power, displayed in watts (i.e. 250w).

However, the appeal of Vector for some is the ability to get left/right power data – showing exactly how many watts you’re putting out on each leg.
Now, there’s actually not much scientific understanding of what to do with this information yet. While it may seem self-evident to try and work on improving your weaker leg, it’s often been found that in doing so you subconsciously lessen power output on the other stronger leg – ultimately reducing total power (a bad thing).
The one scenario where it’s clear there’s benefit is those recovering from a single-leg injury, allowing them to gauge progress of recovery.
That’s not to say there’s no value in it. Far from it. As it stands today Garmin is working with a dozen academic groups on various projects, all of which are getting Vector sets in the coming weeks. They expect these organizations to eventually publish research papers based on Vector usage. But the focus of these papers (largely) isn’t actually validation of the Vector system or accuracy, but rather related to other research areas. For example, a focus around (bike) fit, fatigue and efficiency.
They know already from their testing that they see “dynamic differences” in pedal balance. For example, different power output levels, different fatigue levels, etc… – all impacting left/right balance. But it’s really going to take a lot of time and data to make sense of it.
And to be really clear, Clark Foy was very upfront that you shouldn’t try and get a perfect 50/50 balance, noting: ‘We’re not saying you should try and go out and pedal 50/50.’ He continued on to clarify that at this point, there needs to be more understanding on how to use the balance information – ideally based on larger sample sets. Sample sets they hope that Vector can help enumerate.
The most useful way to see the left/right data is to add the ‘Balance’ data field. I tend to prefer the 10-second (10s) or longer smoothed variation, as it’s a little easier to see how things are trending.

What’s really interesting here will be to start looking at how this data lines up with both estimated left/right pedal balance (such as that seen on the Power2Max and newer Quarq power meters), as well as how my pedaling balance may or may not impact units such as the left-crank-only Stages Power.
Take for example, this below comparing the same trainer ride with left/right data. Remember that the post-hard torque calibration was done around the 12-minute marker, so really looking at chunks 13:20 till the end.


Speaking of which, it was asked whether or not Garmin has considered just selling a left-only or a right-only system, in an effort to reduce the price of the unit to those looking for less overall accuracy. They simply commented: “That’s a possibility.”- and noted that there’s no technical barrier there. It’s purely a product/business decision.
The two pedals (left and right) that make up Vector work as a primary/secondary system. The right pedal is considered the primary, and the left pedal the secondary. From a data transmission standpoint, the left pedal sends data to the right pedal using a non-ANT+ proprietary high speed multi-node network, which is then transmitted from the right pedal to the head unit using ANT+.
When transmitted from the right pedal to the head unit using ANT+, total power is transmitted alongside of % of power of the right pedal (which allows the head unit to do simple math for the left pedal).
As noted above, the unit transmits power via ANT+, to all ANT+ head units that support the ANT+ Power Meter Device Profile (i.e. any bike computer that supports ANT+ power). However, only head units that have been updated to understand ANT+ Left/Right power will show Left/Right power.
Ultimately, all of this information is later visible on Garmin Connect (the free analysis site from Garmin), as well as a number of other 3rd party applications like Training Peaks and Golden Cheetah. You can see below the left/right balance graph for one of my rides with Vector:

Looking at the above, you’ll notice there isn’t much pedaling on the downhill segments, hence the lack of dots. Here’s the trainer ride as noted above, with shows it across the entire length:

I thought this was interesting to see the calibration point (around 12 minutes) and the slight shift in pedal balance after that point.
Before I get into the next section I want to briefly define two terms: Pedal Smoothness and Torque Effectiveness.
Pedal Smoothness is how even your pedaling is over the course of the stroke. This is similar to Spin Scan as found on a CompuTrainer. Torque Effectiveness speaks to the ratio of positive and negative power – in other words, how much your pulling up versus pushing down. Currently Vector does not transmit this information, however the plan is to add it – though no specific date has been set for that software update. Ahead of that, you’re seeing the various units being updated to prepare for it.
There are four core Garmin bike computer (head unit) firmware updates being added to support various Vector features. Even without these firmware updates you’ll still read most data just fine from Vector. The goal of most of these updates is to ‘streamline’ the Vector experience a bit.
Pedal Smoothness and Torque Effectiveness data fields: This adds these two data fields to the units being updated. These can be added to your data screens. Note that at present Vector does not transmit this information (yet). It’s planned, but a specific date hasn’t been identified. Only the Rotor power meter transmits this information today.
Initial Installation, Wizard for setting Vector Installation Angles: This is the mini-wizard which tells you to spin-up to 80-90RPM and then validates completion. For non-updated units, this will all happen behind the scenes without the confirmation (see calibration section).
Dynamic Calibration Notification: This notification will occur upon backpedaling 8 times, resulting in the display rendering a confirmation message.
Power Meter connection calibration reminder: This is probably the best update of them all, and impacts any power meter. With this update, when the unit powers on and you’ve got a power meter paired, it’ll remind you to do a calibration at that point. Hopefully this will dramatically increase the accuracy of power meter data for the general population that doesn’t do this today.
Here’s the units getting firmware updates, and the schedule for doing so:
Garmin Edge 500: This week, update: now available
Garmin Edge 510: Today, now available
Garmin Edge 800: Today, now available
Garmin Edge 810: Today, now available
Garmin Forerunner 910XT: Within two weeks
Here’s the Vector-related updates coming with each firmware update:
Pedal Smoothness and Torque Effectiveness data fields: Edge 510/810
Initial Installation, Wizard for setting Vector Installation Angles: Edge 510/810
Dynamic Calibration Notification: Edge 500/510/800/810, Forerunner 910XT
Power Meter connection calibration reminder: For the Edge 500 and 910XT, a ‘shortcut’ option to access the power meter calibration is being added (the other units already have it).
Note that some of the updates are also seeing other features/bugs added or addressed. For example, the 810 update sees a number of non-Vector fixes added.
And I also do know that the Edge 800/500/910 updates includes a change to the way the power meter messages are processed for event-based power meters (i.e. basically everything but the PowerTap), which should increase consistency of power meter data recording across the Garmin lineup. The change focuses on not repeating the last power value for 2 entries when you stop pedaling, again, for event-based power meters. PowerTap is time-based, thus it’s not applicable to it. The Edge 510/810 have already been recording power this way previously.
Initial Ride Data Power Measurement Accuracy Backgrounder:

My first question upon hearing of the Vector event was “Can I take my own bike?”. In doing so, I’d be able to get pretty solid data from a battleship of power meters. In some ways, I sorta rolled up to the party a bit overdressed, but that’s alright – I’m used to being ‘overdressed’ when it comes to technology.
Here’s how my bike (the one I own) was outfitted from a measurement standpoint:
– PowerTap G3 Hub (rear wheel power meter)
– SRAM Quarq Elsa (crank spider based power meter)
– Stages Power (left-crank based power meter)
– Garmin Vector (pedal based power meter)
With that, I’m able to track four unique power measurement channels at once. I’m doing that via a small army of recording systems. First is the Northpole WASP system, connected to an iPhone to record the data in real-time from all units. This is the most efficient way I can track data as it’s like listening to everything at once, all the time.
Next, I’ve got a ‘handful’ of Garmin Edge units recording data.

So with that, let’s talk about the tests I’ve been able to complete – all within the last 24 hours.
Group Ride: This was starting from the hotel in Boulder and climbing up Left Hand and into the mountains. This lasted a few hours, about three I believe.
Trainer Ride: This was a short trainer ride I did to get some steady data, see further notes later on.
Solo mountain ride: This was a ride I did later in the afternoon back into the mountains, lasting about an hour, 40 minutes of which was pure climbing.
Over the coming weeks I’ll be able to gather more data – both quantitative (i.e. power meter data), as well as qualitative (non-PM data items such as durability). I’ll publish those all within my full and final in-depth review (again, this post is not a review). In the meantime though, I wanted to get out some initial impressions.
First Rides Impressions:

Within the context of those first few rides, my impression of the Vector platform is definitely positive. Outside of installation errors we made (more on that below), the system worked as expected from a functional standpoint. It responds inline with the other power meters from the perspective of how quickly it reacts to changes in power.
When I look at shifting leg power to impact pedal balance, we see that it responds seemingly accordingly. If I apply more force on my right leg, the balance slides to the right. And the inverse for the left leg.
From a cadence standpoint, the unit produced cadence in line with the Quarq (which uses magnets). The Vector system doesn’t use magnets and instead uses accelerometers. There are actually two accelerometers on each pedal. One within the pedal pod used to wake-up the unit. The second is within the spindle and used for cadence, and for setting installation angles. Thus, four accelerometers across both pedals. The system has a cadence range of 30RPM to 150RPM.
Looking at the pedals themselves (and cleats) I didn’t see any issues from a build standpoint. Obviously since they were brand new cleats they clip in a bit firmer than my well worn (as in, worn to almost nothing left) cleats. That’s probably a good thing.

As I saw on my second outdoor ride, the system showed no issues at all in the rain (or accompanying thunderstorms). I simply didn’t see any variations there when I went from dry to wet. Fear not, I’m sure I’ll get plenty more rain experience with them in the coming weeks.

Also, for lack of anywhere to stick battery information – the battery is good for 175 hours of use. The battery level is communicated to your bike computer, with the lowest-battery level being sent:

They noted that they tend to see the right-pedal pod burn slightly more battery than the left, simply due to the nature of having to do more work communicating to the head unit. The pods will alert you when you reach 20 hours of battery remaining.
Beyond those areas, I’ve covered much of the remaining quantitative aspects either below in the accuracy section, as well as above in the ‘What it displays’ section.
Accuracy: A look at two and a half rides worth of data:
At almost the exact minute this will publish, on Wednesday morning, it’ll have been 24 hours to the dot that the Vector pedals were installed on my bike. As such, I’m not claiming that this is a complete, or heck – even partial, set of data. It’s just a small window into what will be a large gallery of data in my full in-depth review next month.
But, a window is better than no window. During that 24 hours I went out for a long group ride in the the Boulder mountains. Then after that I spent some time on a trainer. Then after that I went out again for another ride up a mountain. And then, I wanted to just lie in an air conditioned Chipotle for hours. Instead, I wrote this post…for about 8 hours.
Thus, I’ll dive into what data I do have, and make the raw data available to you at the end of this section. Please do take a few seconds to read the background test on each ride.
Ride #1: Group Ride (aka: I learned a lot of valuable things about Vector installation)

As you might expect, I learn a lot about a product during the product review process. Usually that process is over the course of a month or longer. Thus the first few times out with the product I tend to find all the ways not to do something. And, that’d sorta be the case here.
Early that morning while installing the units onto my bike I was taking photos and a team member was doing the wrenching. Because we were taking photos, and because we were ‘on deck’ for a bigger wrench, we didn’t wrench things down terribly tight. In the hustle and bustle of getting everyone ready, we both forgot about it. As a result, my pedals weren’t tight enough…or even close to being tight enough. Which in turn caused the unit to read low (about 16 watts), albeit perfectly consistently low the entire time.
Secondly, as part of that process, we neglected to remember to change the default crank length (172.5mm) to my actual crank lengths (175mm). Which also contributed to things being a few watts low. During the first portion of the ride after I had about 10-15 minutes of data I noticed this discrepancy against the other power meters I was running (total of four). In chatting with the Vector guys while riding we realized the issue with the crank length. So at the next stop before the climb we went ahead and reset everything on the unit (crank length, calibrations, etc…).
Now, with that taken care of, I headed on up into the mountains. And while things looked a bit better, they were still reading a bit low. Again, consistency low. At that point there wasn’t too much more to do other than to just ride-on. So that we did. And here’s what that data looked like:

Upon getting back, we decided to throw the bike on a trainer and see if we could figure out what was up. We decided to start-over with installation. As soon as the pedal wrench touched the pedals, we collectively realized the issue – they were far from being tight. Probably borderline dangerous not tight. So while the comparative data above isn’t terribly useful, that’s alright. The purpose of showing you how to avoid my errors is probably far more valuable at this stage of things.
Ride #2: Trainer Ride (aka: Now we’re getting closer)

With the pedal tightness taken care of (along with the crank length), we brought the trainer outside. It was a LeMond Revolution (without the PowerPilot head unit), which meant that I lost the PowerTap wheel. Still, three power meters is enough to play the comparison game.
I decided on a simple 20-minute ride (baking in the sun). The first 10 minutes I’d just keep it nice and consistent. Then at the 10-minute marker I’d double-check the calibration on everything. Then I’d go ahead and do a few sprints. The sprints are recommended to ‘settle’ the pedals down a bit after installing the pedals onto a new/different bike. This is the same procedure as found as the Quarq power meters. After that I’d recalibrate and then do some more steady state riding.
Here’s the results of that.

As you can see, things are consistent, but there was still a bit of flex in the data between the different power meters. Not outside of the bounds of normalcy between a given set of PM’s, but some of the shifting between them was interesting. The Quarq appeared to measure the highest, with the Stages and Vector often tracking the closest.
With that out of the way I was starting to feel pretty confident in the installation, and thus, in the data I was seeing. Keeping in mind that the goal isn’t to have three power meters exactly on the same wattage, instead, there will always be some variance. What you want is consistent variance between them.
Ride #3: Up and down mountain ride (aka: I think things are looking good)

Now 3PM, the day doesn’t seem to end. But I really wanted to get about an hour-long ride in to see how things looked outdoors on the open road with all the changes made.
So Clark and I headed up Flagstaff mountain, a ride that pretty much just involves leaving the hotel and going straight on the same road, and then straight up to the top. I’d climb for about 40 minutes before turning back around. We split up shortly after starting the climb, making it more of a solo climb.
During this ride we did pre-ride calibration per the standard procedures. Then, at about the 5-7 minute marker I also did another calibration on the PowerTap and Quarq. I was seeing the Quarq running a bit high at that time so I wanted to get it back to reality, and suspected the temperature shift coming from indoors might be the cause. Indeed, after doing that second early-ride calibration things were all good again.

And, looking at the data – it looks very solid. Keep in mind, once you ride non-stop up for 40 minutes, there’s not much pedaling on steep and wet mountain roads coming down. Yes, it rained. And thundered. And lightning.

The challenge with the above is that it’s just too much detail. So I went ahead and did rolling 60-second averages:

As you can see, everyone tracks well – there’s no outliers here. We do see some slight shifts in relationships. It’s those areas that I’m interested in digging into more. For example, typically I’d expect to see the PowerTap the lowest of them all (due to drivetrain placement).
Finally, looking at cadence, you can see things are nearly-spot on perfect. We see tiny variations while descending, likely because I was only moving the pedal one or two strokes in some cases (or half a stroke if banking around a corner), which may be enumerating differently between the power meters. I’m more focused on the first 2/3rds of this chart.

Here’s the four Normalized Power values as well for this ride:
Garmin Vector: 241 watts
SRAM/Quarq Elsa: 241 watts
CycleOps PowerTap G3: 245 Watts
Stages Power: 248 watts
Now, obviously that looks pretty darn good. The Vector and PowerTap are within 1.7% of each other – well within the combined tolerance of 2% each (and that’s before we even talk drivetrain loss). And the Quarq and Vector matched spot-on. All in all, very good.
Over the coming weeks I’ll be collecting tons more data. Assuming the data looks like this last test, then there’s likely little to worry about. Of course, as I’ve previously seen – it’s not just a single ‘good’ ride, but rather repeated rides that show consistency. And don’t assume that the Vector is wrong (or right) in anything above. It could be any power meter. That’s where getting into a more stable testing situations helps, before going back outdoors.
Here’s the data from all three rides, raw .FIT files in a simple ZIP file.
How service/replacement parts works:

The Vector system has a 2-year warranty, which covers manufacture defects per their standard policy and process. The factory calibration is warranted for 1 year, and Garmin will offer a server to the end user if they are not able to calibrate the Vector themselves (i.e. torque validation).
In the event of an issue with your Vector system (either self-inflicted such a a crash, or unexpected support issue), you’ll start with a call to Garmin support for your local region/country. If they’ve completed troubleshooting and determine there is an issue with the system (for example, the left pedal not responding), then the entire pedal set would be returned to the local country/region support center and swapped out. This process works the same as any other Garmin product.

Now, in the event of the ugly self-inflicted issue, such as breaking a pedal pod on a curb, you can purchase two out of three of the core Vector components.
Parts available as accessories:
1) Pedal Body & Pedal Cartridge Set: $199US = Includes the pedal body, cartridge, as a pair, not including spindle.
2) Pedal Pods: $69US for a single pod (corrected)
The part that is not available as an accessory is the pedal spindle. The spindle is where the magic happens, and where the actual strain gauges are. Basically, that’s the bulk of the cost of a Vector system. Though, it’d be incredibly difficult to damage the spindle even in the most painful of crashes. The spindle is protected first by the pedal body (which Garmin has beefed up over the baseline models). Then you’ve got the pedal cartridge inside that. And finally, the spindle inside the cartridge. Having spent some time toying with the different parts, I’m honestly not sure what type of crash would impact the spindle – short of getting run over by a train. Though, in time, I’m sure someone will find a way.
The two above components will be standard SKU’s that any Garmin distributor/retailer can stock within inventory.
They noted that the part they consider ‘consumable’ is the pedal pods. This is for two reasons. One is that we could see physical changes to the pods, or additional versions of the pods offered. For example, a pod able to accommodate crank arms that are slightly wider than current allowances (they said they’d gauge consumer demand here, but it sounded fairly trivial to offer). They also saw opportunity to bridge into other wireless protocols. Remember this is the communications portion of the device, and today that’s ANT+. But they noted that down the road they could offer a Bluetooth Smart variant, or Bluetooth/ANT+ combo variant. No specific plans or dates are on the table today. But, that would ultimately be a pretty cheap ‘upgrade’ for owners at basically just $70 to get Bluetooth Smart.
Firmware Updating:

Vector supports firmware updating using the ANT+ USB stick. Firmware updates control the software of the Vector system, and enable it to get new features and updated software. The goal with firmware updates is two pronged. First is to be able to address any issues that may arise down the road. And second is to be able to introduce new functionality down the road. It was made very clear that they plan to utilize this avenue for a long time to introduce features to the platform.
They view the current Vector release as v1.0. Not in the hardware sense, but in the software sense. I asked for example if we would expect to see a new Vector pedal system a year from now, and they stressed anything going forward would be software-focused (outside of new pedal types, i.e. a mountain bike pedal). They have a three year software roadmap of features and functionality they want to add.
But at the same time, they admitted quite openly that there’s a lot of functionality that the greater cycling community will probably want – and they’ve left room on their development schedule to accommodate that. Further, they anticipate that we’re in a bit of a phase of ‘we don’t really know how the full extent of the data can be used’. In other words, there’s a lot of data that the Vector (and to a degree, other pedal-based platforms) can bring. But it’s too soon to be able to really make sense of all that data. The goal of their v2/3/4, etc… plans is to be able to start enumerating that in a more useful metric beyond just wattage and left/right power.
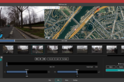
To get started with updating the firmware you’ll need the ANT+ USB stick that came with the unit. That’s the one that looks like the above photo.
From there you’ll need to download the Vector Updater app (PC/Mac) from Garmin.com. Once downloaded, the install only takes a few seconds:

The app communicates with your pedals via ANT+, which is the same technology used between your bike computer and the pedals.

In order to begin the update process you need to put the Vector pedals into a “beacon” mode. To do so you’ll simply pop-off the battery cover on the pedal pods (which pulls out the battery), then, put it back in again. This simply puts the system into the beacon mode. It’ll remain in this mode for five minutes, or until you start pedaling – whichever occurs sooner.

It should go without saying that you do need to have your pedals relatively nearby – within about 10 feet (3m). Then click to begin the search.

It’ll find your pedals pretty quickly, and then enumerate information about them. This includes your current firmware version, as well as the firmware version available on Garmin.com. It should be your goal that these two match. Once the update process completes, you’re good to go.
Remember that post-firmware update you should go ahead and re-do the calibration process noted up above.
Pricing, Availability and Compatibility:

Lastly, the unit is priced at $1,699US, which includes both pedals and transmitter pods (and cleats). The units start shipping today, August 7th, 2013 (yes, that’s this today, Wednesday). For “some time”, Garmin Vector will only be fulfilled through local bike shops, and not through either Garmin.com, nor any other online retailer. In fact, online retailers are not permitted to offer Vector for sale via the Internet (even if they have a physical store). Garmin expects to be able to have distribution flowing to all international bike dealers concurrently with US shipments heading out.
You’ll also need an ANT+ compatible bike computer with power meter support in order to get power information from Vector. As long as your bike computer supports power meters today, then you’ll at least get the most basic information (power). But only newer bike computers made (or updated) in the last year or two support the left/right pedal balance metrics. And further yet, even fewer support the Pedal Smoothness and Torque Effectiveness – though the Vector pedals don’t transmit that information quite yet.
Ultimately, while I’m impressed with the data that I’m seeing after getting everything squared away – I’m actually somewhat more impressed with how much detail and thought appears to have gone into this launch day (Wednesday). When I look at the dozen plus step by step and overview videos, the detailed manuals, and the dedicated tools (apps) to configure Vector, the detail on future plans – it’s really unlike anything I’ve ever seen from the Garmin Fitness division.
As noted above, notwithstanding any issues (with the unit, or my schedule/life), I’m aiming to have a full in-depth review sometime between Eurobike (Aug 28-30th) and Interbike (Sept 18-20th).
Additionally, I’m planning a post in the coming days that helps to make sense of the power meter market at large, talking through each of the options and prices and what my general guidance is. Stay tuned!
With that, thanks for reading! As always, feel free to drop questions below.
–
Update Aug 7th, 2013 9:54PM Eastern: Corrected $69 rate is per pod, not per pair. Added warranty info (2 years), added additional static torque test detail, added detail around calibration prompt for older units, clarified use of accelerometers.
FOUND THIS POST USEFUL? SUPPORT THE SITE!
Hopefully, you found this post useful. The website is really a labor of love, so please consider becoming a DC RAINMAKER Supporter. This gets you an ad-free experience, and access to our (mostly) bi-monthly behind-the-scenes video series of “Shed Talkin’”.
Support DCRainMaker - Shop on Amazon
Otherwise, perhaps consider using the below link if shopping on Amazon. As an Amazon Associate, I earn from qualifying purchases. It doesn’t cost you anything extra, but your purchases help support this website a lot. It could simply be buying toilet paper, or this pizza oven we use and love.